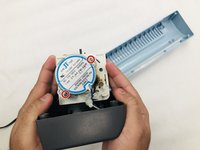
주요 콘텐츠로 건너뛰기

GBC Creative Laminator Motor Replacement

필요한 것

  1. GBC Creative Laminator Motor Replacement, Motor: 1 단계, 이미지 2개 중 1개 GBC Creative Laminator Motor Replacement, Motor: 1 단계, 이미지 2개 중 2개
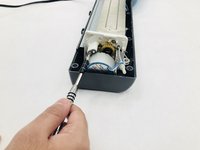
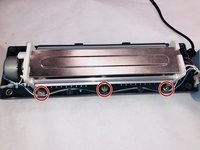
    • Using the Phillips #2 screwdriver, remove ten 12 mm long screws on the bottom of the device.

  2. GBC Creative Laminator Motor Replacement: 2 단계, 이미지 1개 중 1개
    • Open the top of the device, and the inside of the Laminator will be exposed as shown.

  3. GBC Creative Laminator Motor Replacement: 3 단계, 이미지 2개 중 1개 GBC Creative Laminator Motor Replacement: 3 단계, 이미지 2개 중 2개
    • Using the Phillips #2 screwdriver, remove two 9 mm long screws on the side of the main component that keep the motor in place.

  4. GBC Creative Laminator Motor Replacement: 4 단계, 이미지 2개 중 1개 GBC Creative Laminator Motor Replacement: 4 단계, 이미지 2개 중 2개
    • Using the Phillips #2 screwdriver, remove three 8.5 mm long screws and washers on the front edge of the plastic casing.

  5. GBC Creative Laminator Motor Replacement: 5 단계, 이미지 1개 중 1개
    • Lift the motor out of the plastic casing.

결론

To reassemble your device, follow these instructions in reverse order.

다른 한 분이 해당 안내서를 완성하였습니다.

작성자

2다른 기여자 명과 함께

Yujia Tang

회원 가입일: 07/11/18

405 평판

안내서 2개를 작성함

IUPUI, Team S1-G1, Wilson Summer 2018 IUPUI, Team S1-G1, Wilson Summer 2018 회원

IUPUI-WILSON-SU18S1G1

5 회원들

안내서 4개를 작성함

0가이드 댓글

댓글 쓰기

조회 통계:

지난 24시간: 2

지난 7일: 11

지난 30일: 34

전체 시간: 1,275