소개
To replace the SSD you will need a Pry Tool and Phillips screw driver.
필요한 것
-
-
Flip the laptop over and remove each rubber shoe
-
Use a Philips screwdriver to care fully remove each screw
-
-
-
-
After removing the screws carefully pry open the case starting on the top right hinge.
-
There is a clip in the center of the laptop , when the edges are completely removed lift carefully to unclip the center.
-
-
-
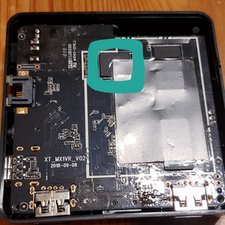
Carefully remove the screw holding down the SSD.
-
Lift the SSD until it is at about a 10-degree angle and then slide it out of the socket.
-
Slide in your new SSD, and follow the previous steps in reverse.
-


To reassemble your device, follow these instructions in reverse order.
To reassemble your device, follow these instructions in reverse order.
다른 5명이 해당 안내서를 완성하였습니다.