소개
Garbage disposals can run into problems when built-up waste accumulates over time. It is important that one has a fully functional garbage disposal to drain correctly and to rid one’s sink of waste. This guide will show you how to replace a garbage disposal in 10 minutes or less!
-
-
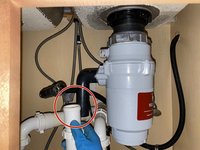
Before installing your garbage disposal, make sure both your pipes and garbage disposal mount (pictured at the top) are aligned correctly to support your model.
 FixBot에 문의하기
-
-
-
Attach your garbage disposal to the mount (circled) that is attached to the sink hole.
-
-
-
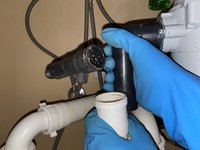
Connect the silver mounting hardware attached to the top of the garbage disposal by turning it clockwise.
-
Mount disposal to the sink using one hand to lift it and the other to attach to the silver mounting hardware while making sure to match the grooves of your disposal into the mount. The disposal should now be all in one piece.
-
-
-
-
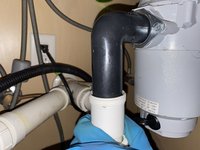
After mounting the disposal in place, align the black disposal pipe with the white PVC pipe connected to the sink.
-
-
-
Once everything is in place, tighten all of your tube rings to ensure no leakage occurs.
-
-
-
Install and plug electrical wire into the correct power source. Test your disposal switch and check for any signs of leakage.
-


Be sure to test your garbage disposal before sending any waste down the drain. Happy disposing!
다른 5명이 해당 안내서를 완성하였습니다.
팀

University of Memphis, Team S51-G10, Willis Spring 2021 University of Memphis, Team S51-G10, Willis Spring 2021 회원
UM-WILLIS-S21S51G10
1 회원
안내서 3개를 작성함
1가이드 댓글
There is a tiny hose that attaches to an air compressor. It keeps falling off.
Nancy Raza - 답글 공유