주요 콘텐츠로 건너뛰기

Gateway M-2626u RAM Replacement

필요한 것

  1. Gateway M-2626u RAM  Replacement, Battery: 1 단계, 이미지 1/1
    • To prevent injury, make sure the laptop is not plugged in while removing the battery!

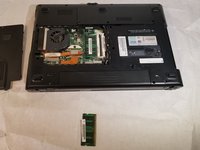
    • Make the switch in the upper right corner of the turned over laptop is switched to the "unlocked" position. (the unlocked padlock icon)

  2. Gateway M-2626u RAM  Replacement: 2 단계, 이미지 1/3 Gateway M-2626u RAM  Replacement: 2 단계, 이미지 2/3 Gateway M-2626u RAM  Replacement: 2 단계, 이미지 3/3
    • Push the switch to the right, toward the inside of the computer to dislodge the battery.

    • Finally, pull the battery outwards and away from the laptop as depicted in this image.

  3. Gateway M-2626u RAM  Replacement, Back Panel: 3 단계, 이미지 1/2 Gateway M-2626u RAM  Replacement, Back Panel: 3 단계, 이미지 2/2
    • Using the Phillips #1 screwdriver, remove the four 6mm screws on the back of the laptop.

  4. Gateway M-2626u RAM  Replacement: 4 단계, 이미지 1/2 Gateway M-2626u RAM  Replacement: 4 단계, 이미지 2/2
    • Insert the plastic prying tool and pry the back panel off starting at an edge and moving your way around it.

  5. Gateway M-2626u RAM  Replacement, RAM: 5 단계, 이미지 1/1
    • Remember to always remove or disconnect the battery!

    • Push outwards on the metal tab to unlock the RAM stick from its position.

  6. Gateway M-2626u RAM  Replacement: 6 단계, 이미지 1/2 Gateway M-2626u RAM  Replacement: 6 단계, 이미지 2/2
    • Lift up and remove the RAM from the device.

    • Follow the same steps to remove the second RAM stick from your device.

결론

To reassemble your device, follow these instructions in reverse order.

Tanya Jain

회원 가입일: 03/19/18

317 평판

안내서 3개 작성하였습니다

UMass Dartmouth, Team S3-G2, Peak Spring 2018 UMass Dartmouth, Team S3-G2, Peak Spring 2018 회원

UMASSD-PEAK-S18S3G2

2 회원들

안내서 14개 작성하였습니다

댓글 0개

댓글 쓰기

조회 통계:

24 시간 전: 0

7일 전: 1

30일 전: 12

전체 시간: 149