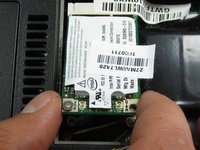
주요 콘텐츠로 건너뛰기

Gateway MA6 Laptop Wireless Card Replacement

필요한 것

  1. Gateway MA6 Laptop Wireless Card Replacement, Battery: 1 단계, 이미지 1개 중 1개
    • To prevent injury, make sure the laptop is unplugged before removing the battery.

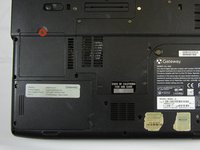
    • Make sure the switch in the upper right corner of the laptop is switched to the "unlock" position (toward the unlocked padlock icon).

  2. Gateway MA6 Laptop Wireless Card Replacement: 2 단계, 이미지 3개 중 1개 Gateway MA6 Laptop Wireless Card Replacement: 2 단계, 이미지 3개 중 2개 Gateway MA6 Laptop Wireless Card Replacement: 2 단계, 이미지 3개 중 3개
    • Pull the switch on the upper lefthand corner of the laptop towards the unlocked padlock icon.

    • Firmly pull the battery outwards and away from the laptop.

  3. Gateway MA6 Laptop Wireless Card Replacement, Wireless Card: 3 단계, 이미지 2개 중 1개 Gateway MA6 Laptop Wireless Card Replacement, Wireless Card: 3 단계, 이미지 2개 중 2개
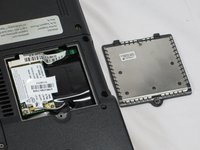
    • Loosen the 3mm Phillips #0 screw from the back of the WiFi card backplate.

    • The screw will remain in the backplate.

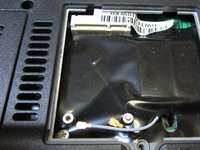
    • Lift upwards on the back plate to remove it.

  4. Gateway MA6 Laptop Wireless Card Replacement: 4 단계, 이미지 1개 중 1개
    • Use the plastic opening tool to gently pry upwards on the two connecting cables to remove them.

  5. Gateway MA6 Laptop Wireless Card Replacement: 5 단계, 이미지 1개 중 1개
    • Remove the 2 mm Phillips #0 screw.

    • The card will lift itself up 30° after the screw has been removed.

  6. Gateway MA6 Laptop Wireless Card Replacement: 6 단계, 이미지 2개 중 1개 Gateway MA6 Laptop Wireless Card Replacement: 6 단계, 이미지 2개 중 2개
    • Hold the WiFi card on both sides and pull outwards to remove it.

결론

To reassemble your device, follow these instructions in reverse order.

작성자

4다른 기여자 명과 함께

Chris Naughton

회원 가입일: 04/07/14

705 평판

안내서 5개를 작성함

Cal Poly, Team 6-2, Forte Spring 2014 Cal Poly, Team 6-2, Forte Spring 2014 회원

CPSU-FORTE-S14S6G2

5 회원들

안내서 20개를 작성함

댓글 0개

댓글 쓰기

조회 통계:

지난 24시간: 0

지난 7일: 2

지난 30일: 5

전체 시간: 774