주요 콘텐츠로 건너뛰기

Gateway MS2370 RAM Replacement

필요한 것

  1. Gateway MS2370 RAM Replacement, Battery: 1 단계, 이미지 1/1
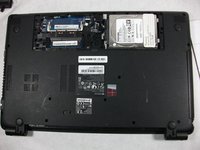
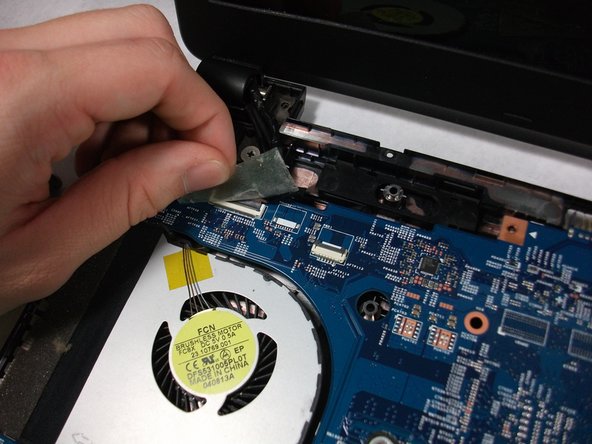
    • Make sure the laptop is turned off and flipped over so that the bottom is facing up. Then, locate the battery clip as shown.

  2. Gateway MS2370 RAM Replacement: 2 단계, 이미지 1/1
    • Either using your fingers or a plastic spudger push the battery clip to the left to release battery.

  3. Gateway MS2370 RAM Replacement: 3 단계, 이미지 1/1
    • Pull the battery from the laptop to remove it.

  4. Gateway MS2370 RAM Replacement, RAM: 4 단계, 이미지 1/1
    • Unscrew the three 10mm inch Phillips 01 screws on the back of your laptop.

    • Unplug everything from the USB and SD ports.

  5. Gateway MS2370 RAM Replacement: 5 단계, 이미지 1/1
    • Remove the cover panel.

    • This exposes more screws that must be removed.

  6. Gateway MS2370 RAM Replacement: 6 단계, 이미지 1/1
    • Unplug the two exposed cables from the motherboard.

  7. Gateway MS2370 RAM Replacement: 7 단계, 이미지 1/2 Gateway MS2370 RAM Replacement: 7 단계, 이미지 2/2
    • Unscrew the rest of the case screws which include several 10mm 01 Phillips screws and three 3mm 00 Phillips screws.

    • This marked screw will not fully come out. Just loosen it and leave it there it will not effect the rest of the replacement.

  8. Gateway MS2370 RAM Replacement: 8 단계, 이미지 1/2 Gateway MS2370 RAM Replacement: 8 단계, 이미지 2/2
    • Pry the laptop case apart.

    • The disc drive in this photo was removed. You can remove it just by puling it out when the previous step is completed.

  9. Gateway MS2370 RAM Replacement: 9 단계, 이미지 1/1
    • Unplug the track-pad and the keyboard ribbon cable by lifting up the grey flap and removing the cable.

    • This cable has a special connector the requires you to lift open a grey flap to unplug properly.

    • The keyboard plug is located at the center of the motherboard and can be unplugged like a normal cable.

  10. Gateway MS2370 RAM Replacement: 10 단계, 이미지 1/1
    • Remove the top half of the case.

  11. Gateway MS2370 RAM Replacement: 11 단계, 이미지 1/1
    • Unscrew all 5 10mm inch Phillips 01 screws.

    • One more off screen

  12. Gateway MS2370 RAM Replacement: 12 단계, 이미지 1/3 Gateway MS2370 RAM Replacement: 12 단계, 이미지 2/3 Gateway MS2370 RAM Replacement: 12 단계, 이미지 3/3
    • Unplug the ribbon cable connected to the USB Hub, the network card, and the monitor cable.

  13. Gateway MS2370 RAM Replacement: 13 단계, 이미지 1/1
    • Flip the motherboard over.

  14. Gateway MS2370 RAM Replacement: 14 단계, 이미지 1/3 Gateway MS2370 RAM Replacement: 14 단계, 이미지 2/3 Gateway MS2370 RAM Replacement: 14 단계, 이미지 3/3
    • Using your two thumbs to pull outwards from the inside of the RAM slot to release and remove the RAM.

    • The last step of this replacement guide is not required to complete the fan replacement guide.

결론

To reassemble your device, follow these instructions in reverse order.

다른 2명이 해당 안내서를 완성하였습니다.

Mathieu Bolduc-Clayton

회원 가입일: 10/17/17

518 평판

안내서 4개 작성하였습니다

UMass Dartmouth, Team S1-G5, Simcock Fall 2017 UMass Dartmouth, Team S1-G5, Simcock Fall 2017 회원

UMASSD-SIMCOCK-F17S1G5

3 회원들

안내서 10개 작성하였습니다

댓글 0개

댓글 쓰기

조회 통계:

24 시간 전: 1

7일 전: 6

30일 전: 12

전체 시간: 1,540