주요 콘텐츠로 건너뛰기

GoPro Hero 4 Black Camera Lens Replacement

보관된 가이드
해당 안내서는 단지 역사적인 목적으로 보관됩니다. 최신 버전 안내서를 사용하여 수리 하십시오.

필요한 것

  1. GoPro Hero 4 Black Camera Lens  Replacement, Camera Lens: 1 단계, 이미지 1/1
    • Remove the faceplate by carefully prying around the edge.

    • Loosen the clips on the edge, then pull the faceplate off. Be aware that there is double stick tape holding it in place(indicated by the red arrow).

    • The power button on the front of the GoPro may pop off.

  2. GoPro Hero 4 Black Camera Lens  Replacement: 2 단계, 이미지 1/1
    • Take the PH000 philips head screwdriver and remove the 4 corner screws.

    • Note: The screws circled in red are longer than the screw circled in orange.

    The PH00 philips bit works better than the PH000.

    sam - 답글

  3. GoPro Hero 4 Black Camera Lens  Replacement: 3 단계, 이미지 1/1
    • Now remove the camera and boards from the black plastic housing. Use the plastic opening tool to assist in the removal.

    • Be careful of the surrounding guts underneath the front. Work yourself around the camera on each side.

    • The side ports might cling to the plastic housing and prevent the camera from coming out. Delicately maneuver the ports out of the housing.

  4. GoPro Hero 4 Black Camera Lens  Replacement: 4 단계, 이미지 1/1
    • Remove the ribbon strip by pulling on it. This will remove the connection.

    • Push down on the three wires and the clip will disconnect from the motherboard.

    • During reassembly, remove the black tape on the ribbon cable, turn the camera upside down so you can see the port, and reinsert the cable with tweezers. It's a lot easier!

  5. GoPro Hero 4 Black Camera Lens  Replacement, Camera Sensor: 5 단계, 이미지 1/1
    • In this step you'll remove the camera sensor. Make sure you keep it clean as dust can form on the other side. If possible, put it in an electrostatic bag while you finish your repair.

    • Remove the four PH000 Phillips screws outlined in red.

    • Gently remove the board. As you lift the board, the computer chip (outlined in orange) will separate from the motherboard.

    There is a step missing in between your step 5 and step 6! There is no description of how to remove the small sister board partly buried under the lens assembly! There's an inaccessible screw on the small board but the board is shown already removed in Step 6. How did you do that?

    Justin von Linsowe - 답글

    It doesn't need to be removed. Remove the two screws under the lense in the front, then continue on. The whole motherboard will come out in one piece.

    Thomas Durant -

    There is most definitely a step missing, relating to the removal of the daughterboard, and in particular tips on accessing the partially obscured screw under the lens housing.

    robin - 답글

  6. GoPro Hero 4 Black Camera Lens  Replacement: 6 단계, 이미지 1/1
    • Remove the single screw.

    • This is the last screw holding the motherboard in. (It will still be held in by the clip holding the ribbon cable)

    This is very poor picture quality.

    Lisa Hagerty - 답글

    How to replace the ribbon strip in step 4?

    Roger Anderson - 답글

    This was NOT the last screw for the Hero 4 Black that I have. Refer to the picture in step 3. Both screws in the lower right (on either side of the E141021 marking) had to be removed. I'm pretty sure this is an oversight in the original instructions because there is no way I could separate the motherboard without removing those long screws. There was double sided sticky film over that entire section, but I gently pried the film back enough to get access to the screw heads.

    sam - 답글

  7. GoPro Hero 4 Black Camera Lens  Replacement: 7 단계, 이미지 1/1
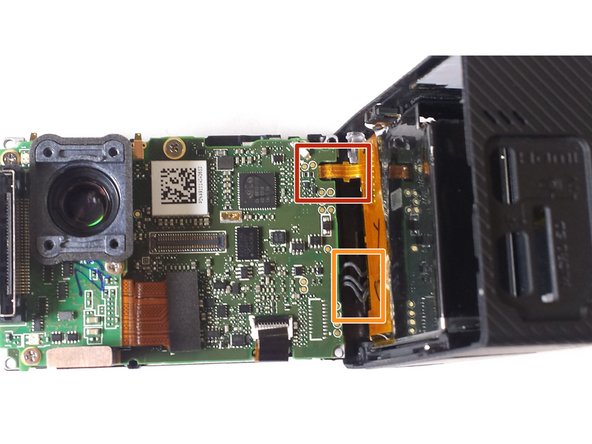
    • At the top of the ribbon strip, there is a black clip that needs to popped up.

    • You can use your finger or a pair of needle nose tweezers.

    • Remove the black tape from the ribbon cable before reinstalling. Reapply after!

    There is a small piece of black tape on top of the connector. Take it off before then flip up and pull ribbon out. You can save and reuse the tape easily.

    Conley Reed - 답글

  8. GoPro Hero 4 Black Camera Lens  Replacement: 8 단계, 이미지 1/1
    • Remove the black tape from the ribbon cable. With the needle nose tweezers, gently grab the ribbon and pull down. This will disconnect the ribbon from the connector.

    • Now the motherboard can be removed. This will allow access to the screws that hold the camera lens in.

  9. GoPro Hero 4 Black Camera Lens  Replacement: 9 단계, 이미지 1/1
    • Remove these three screws. Then pull the lens out and replace with a new one.

결론

To reassemble your device, follow these instructions in reverse order.

다른 14명이 해당 안내서를 완성하였습니다.

Jonathan Campbell

회원 가입일: 09/29/15

830 평판

안내서 3개 작성하였습니다

IUPUI, Team 1-2, Hagerty Fall 2015 IUPUI, Team 1-2, Hagerty Fall 2015 회원

IUPUI-HAGERTY-F15S1G2

3 회원들

안내서 3개 작성하였습니다

댓글 5개

Just finished replacing the lens in the GoPro 4 Black here at work (that I dropped and broke). Other than a missing step and struggling with reconnecting the last ribbon cable during reassembly, it when well. After seeing these instructions, I was confident I could replace the lens. Thanks for posting this. It was very helpful.

James Bell - 답글

How do people manage to get the last ribbon cable in place?

Ruben Israel - 답글

It's tricky. Reconnecting that small ribbon cable took me the longest of all of the steps to complete. I used the curved needle tweezers in the kit. It can be done, so keep trying.

sam -

I'm looking at the flags and it is saying that this is a archived version and I should use the update version. But I don't know how to find that.

Fabian Charlton - 답글

Sorry about that! It looks like a new set of guides is in the works, but nothing has been published as yet. So for the moment, the flag is misleading, and this is the only available version of the guide.

Jeff Suovanen -

댓글 쓰기

조회 통계:

24 시간 전: 0

7일 전: 1

30일 전: 2

전체 시간: 6,846