주요 콘텐츠로 건너뛰기

Google Pixel XL Earpiece Speaker Replacement

필요한 것

  1. Google Pixel XL Earpiece Speaker Replacement, Display Assembly: 1 단계, 이미지 1/3 Google Pixel XL Earpiece Speaker Replacement, Display Assembly: 1 단계, 이미지 2/3 Google Pixel XL Earpiece Speaker Replacement, Display Assembly: 1 단계, 이미지 3/3
    • Heat an iOpener and apply it to the top edge of the display for two minutes.

    • A hair dryer, heat gun, or hot plate may also be used, but be careful not to overheat the phone—the display and internal battery are both susceptible to heat damage.

    • Take note of the following regions before you begin prying:

    • Thin adhesive lined against the display panel

    • Thick adhesive

    • The OLED display panel, which is very prone to damage

    • The display cable, which can be damaged during prying

  2. Google Pixel XL Earpiece Speaker Replacement: 2 단계, 이미지 1/3 Google Pixel XL Earpiece Speaker Replacement: 2 단계, 이미지 2/3 Google Pixel XL Earpiece Speaker Replacement: 2 단계, 이미지 3/3
    • Once the edge is warm to the touch, apply a suction cup close to the edge.

    • Lift on the suction cup, and insert an opening pick into the gap.

    • Do not insert the pick more than 13 mm (0.5 inches), or you will damage the display assembly.

    • If you have trouble creating a gap, reheat the edge and try again.

    • You can also try to use a playing card instead of an opening pick to help make the initial entry.

  3. Google Pixel XL Earpiece Speaker Replacement: 3 단계, 이미지 1/3 Google Pixel XL Earpiece Speaker Replacement: 3 단계, 이미지 2/3 Google Pixel XL Earpiece Speaker Replacement: 3 단계, 이미지 3/3
    • Slide the opening clip across the top edge to slice through the adhesive.

    • Be sure not to cut deeper than 13 mm (0.5 inches) or you will damage the display.

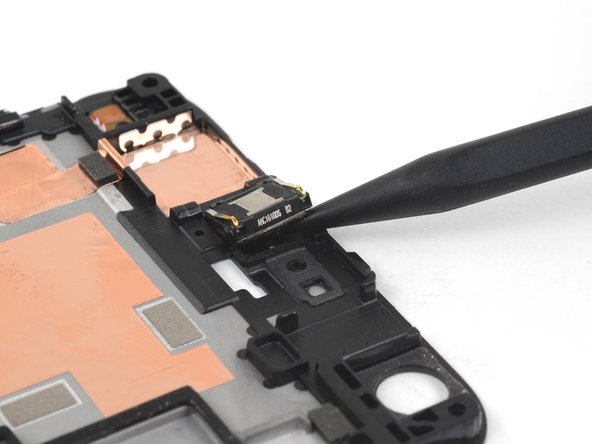
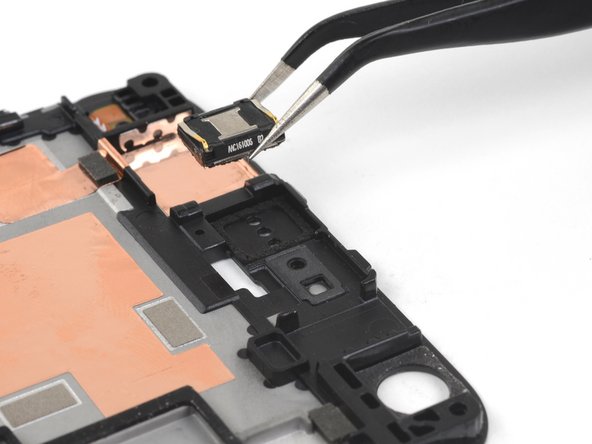
    • There's a mesh covering the earpiece speaker on the top edge of the screen. If you don’t have a replacement mesh, take care not to damage or lose this component.

    • Leave an opening pick in the edge to prevent the adhesive from resealing.

  4. Google Pixel XL Earpiece Speaker Replacement: 4 단계, 이미지 1/3 Google Pixel XL Earpiece Speaker Replacement: 4 단계, 이미지 2/3 Google Pixel XL Earpiece Speaker Replacement: 4 단계, 이미지 3/3
    • Heat an iOpener and apply it to the right edge of the phone for two minutes.

    • Insert an opening pick near the top edge of the phone, where you have already sliced the adhesive.

    • Slowly guide the pick around the right corner.

    • Carefully slide the pick down the right edge of the phone to slice through the adhesive.

    • Do not insert the pick more than 1 mm (1/32") along the edge, or you will damage the display assembly.

    • Repeat the step for the left edge of the phone.

  5. Google Pixel XL Earpiece Speaker Replacement: 5 단계, 이미지 1/2 Google Pixel XL Earpiece Speaker Replacement: 5 단계, 이미지 2/2
    • Heat the bottom edge with an iOpener for two minutes.

    • Insert a pick near the right edge where you have already loosened the adhesive.

    • Carefully guide the pick around the corner.

    • Slide the pick along the bottom edge to slice through the adhesive.

    • Do not slice deeper than 8.5 mm (1/3") or you will damage the display cable.

  6. Google Pixel XL Earpiece Speaker Replacement: 6 단계, 이미지 1/1
    • Once you have sliced around the perimeter of the phone, carefully lift the display assembly up slightly by the right corners.

    • Do not attempt to remove the display assembly. It is still attached by a flex cable.

    • Use an opening pick to slice through any remaining adhesive.

  7. Google Pixel XL Earpiece Speaker Replacement: 7 단계, 이미지 1/3 Google Pixel XL Earpiece Speaker Replacement: 7 단계, 이미지 2/3 Google Pixel XL Earpiece Speaker Replacement: 7 단계, 이미지 3/3
    • Lift the display assembly from the top end and swing it around such that it rests upside down on the frame.

    • Be careful not to strain the flex cable when you swing the assembly around.

  8. Google Pixel XL Earpiece Speaker Replacement: 8 단계, 이미지 1/2 Google Pixel XL Earpiece Speaker Replacement: 8 단계, 이미지 2/2
    이 단계에 사용된 도구:
    Magnetic Project Mat
    $19.95
    구매
    • Remove the two 4 mm T5 screws securing the display cable bracket.

    • Throughout this repair, keep track of each screw and make sure it goes back exactly where it came from.

    • Remove the display cable bracket.

  9. Google Pixel XL Earpiece Speaker Replacement: 9 단계, 이미지 1/2 Google Pixel XL Earpiece Speaker Replacement: 9 단계, 이미지 2/2
    • Use the point of a spudger to pry up and disconnect the display cable from its connector.

    • To re-attach press connectors like this one, carefully align and press down on one side until it clicks into place, then repeat on the other side. Do not press down on the middle. If the connector is misaligned, the pins can bend, causing permanent damage.

  10. Google Pixel XL Earpiece Speaker Replacement: 10 단계, 이미지 1/3 Google Pixel XL Earpiece Speaker Replacement: 10 단계, 이미지 2/3 Google Pixel XL Earpiece Speaker Replacement: 10 단계, 이미지 3/3
    • Remove the display assembly.

    • For comprehensive instructions on how to reinstall the Pixel XL display, follow this guide.

    • If your replacement display did not come with a speaker grille, use tweezers to gently peel the adhesive grille from your old display, and transfer it to the replacement.

    • Before installing a new display, be sure to remove all traces of adhesive from the frame. Use a spudger or an opening tool to scrape it off, and use high-concentration isopropyl alcohol to remove any residue.

    • If you are reinstalling the same display assembly, be sure to remove all adhesive residue from the panel and the frame before applying new adhesive.

    • Be sure to turn on your phone and test your repair before installing new adhesive and resealing the phone.

    • During the boot-up process after reassembly, the screen will go through a calibration sequence. Do not touch the screen during this process, as it could result in improper touch calibration and create touch issues.

  11. Google Pixel XL Earpiece Speaker Replacement, Google Pixel XL Opening Procedure: 11 단계, 이미지 1/1
    • Remove the following screws that secure the midframe to the back:

    • Seven black 4 mm T5 screws

    • Two silver 3 mm T5 screws

  12. Google Pixel XL Earpiece Speaker Replacement: 12 단계, 이미지 1/1
    • The midframe is held tightly in place by plastic clips which push into the edge of the back case.

  13. Google Pixel XL Earpiece Speaker Replacement: 13 단계, 이미지 1/3 Google Pixel XL Earpiece Speaker Replacement: 13 단계, 이미지 2/3 Google Pixel XL Earpiece Speaker Replacement: 13 단계, 이미지 3/3
    • Find the small notch in the bottom left corner of the frame and insert an opening pick.

    • Slide the opening pick along the bottom edge of the phone towards the bottom right corner and leave it there.

  14. Google Pixel XL Earpiece Speaker Replacement: 14 단계, 이미지 1/3 Google Pixel XL Earpiece Speaker Replacement: 14 단계, 이미지 2/3 Google Pixel XL Earpiece Speaker Replacement: 14 단계, 이미지 3/3
    • Insert a separate opening pick into the right edge of the phone, near the bottom.

    • Slowly push the pick upwards along the seam until the first clip pops free.

    • Due to the tight tolerances, this may be difficult, requiring a substantial amount of force. If you are having trouble, try inserting and sliding a playing card.

    • Once you've released the clip, leave the opening pick in place to prevent the midframe from resealing.

  15. Google Pixel XL Earpiece Speaker Replacement: 15 단계, 이미지 1/2 Google Pixel XL Earpiece Speaker Replacement: 15 단계, 이미지 2/2
    • Insert an opening pick into the right edge of the phone and slide it upwards towards the top right clip.

    • You do not need to insert the pick more than 2 mm into the edge. If you insert the pick all the way in, you may risk damaging flex cables.

    • Slowly slide the pick past the clip to disengage it from the frame.

    • At this point, the right edge of the midframe should be free from the case. If it isn't, slide an opening clip up and down along the right edge.

  16. Google Pixel XL Earpiece Speaker Replacement: 16 단계, 이미지 1/3 Google Pixel XL Earpiece Speaker Replacement: 16 단계, 이미지 2/3 Google Pixel XL Earpiece Speaker Replacement: 16 단계, 이미지 3/3
    • Grasp the right edge of the midframe by the corners and slowly hinge the edge up.

    • When the left edge feels loose, stop hinging and lift the midframe upwards.

    • Remove the midframe.

    • To reinstall the midframe, align it to the case, then squeeze around the perimeter until all the clips snap back into position. When properly done, the midframe should lie flat.

  17. Google Pixel XL Earpiece Speaker Replacement, Earpiece Speaker: 17 단계, 이미지 1/3 Google Pixel XL Earpiece Speaker Replacement, Earpiece Speaker: 17 단계, 이미지 2/3 Google Pixel XL Earpiece Speaker Replacement, Earpiece Speaker: 17 단계, 이미지 3/3
    • Flip the midframe over.

    • Use the point of a spudger to pry up and loosen the earpiece speaker from the plastic midframe.

    • Remove the earpiece speaker.

    • During reassembly, be sure install the replacement part in the proper orientation. The gold colored clips should face towards the camera hole.

결론

To reassemble your device, follow these instructions in reverse order.

Repair didn’t go as planned? Check out our Google Pixel XL Answers community for troubleshooting help.

다른 7명이 해당 안내서를 완성하였습니다.

Arthur Shi

회원 가입일: 01/03/18

247,906 평판

안내서 503개 작성하였습니다

iFixit iFixit 회원

Staff

135 회원들

안내서 16,475개 작성하였습니다

댓글 한 개

This guide has been updated!

Arthur Shi - 답글

댓글 쓰기

조회 통계:

24 시간 전: 1

7일 전: 6

30일 전: 11

전체 시간: 6,140