이 버전에는 잘못된 편집 사항이 있을 수 있습니다. 최신 확인된 스냅샷으로 전환하십시오.
필요한 것
-
이 단계는 번역되지 않았습니다. 번역을 도와주십시오
-
Heat an iOpener and apply it to the top edge of the display for two minutes.
-
Take note of the following regions before you begin prying:
-
Thin adhesive lined against the display panel
-
Thick adhesive
-
The OLED display panel, which is very prone to damage
-
The display cable, which can be damaged during prying
-
-
이 단계는 번역되지 않았습니다. 번역을 도와주십시오
-
Once the edge is warm to the touch, apply a suction cup close to the edge.
-
Lift on the suction cup, and insert an opening pick into the gap.
-
If you have trouble creating a gap, reheat the edge and try again.
-
-
이 단계는 번역되지 않았습니다. 번역을 도와주십시오
-
Slide the opening clip across the top edge to slice through the adhesive.
-
Leave an opening pick in the edge to prevent the adhesive from resealing.
-
-
이 단계는 번역되지 않았습니다. 번역을 도와주십시오
-
Heat an iOpener and apply it to the right edge of the phone for two minutes.
-
Insert an opening pick near the top edge of the phone, where you have already sliced the adhesive.
-
Slowly guide the pick around the right corner.
-
Carefully slide the pick down the right edge of the phone to slice through the adhesive.
-
Repeat the step for the left edge of the phone.
-
-
이 단계는 번역되지 않았습니다. 번역을 도와주십시오
-
Heat the bottom edge with an iOpener for two minutes.
-
Insert a pick near the right edge where you have already loosened the adhesive.
-
Carefully guide the pick around the corner.
-
Slide the pick along the bottom edge to slice through the adhesive.
-
-
이 단계는 번역되지 않았습니다. 번역을 도와주십시오
-
Once you have sliced around the perimeter of the phone, carefully lift the display assembly up slightly by the right corners.
-
Use an opening pick to slice through any remaining adhesive.
-
-
-
이 단계는 번역되지 않았습니다. 번역을 도와주십시오
-
Lift the display assembly from the top end and swing it around such that it rests upside down on the frame.
-
-
이 단계는 번역되지 않았습니다. 번역을 도와주십시오
-
Remove the two 4 mm T5 screws securing the display cable bracket.
-
Remove the display cable bracket.
-
-
이 단계는 번역되지 않았습니다. 번역을 도와주십시오
-
Use the point of a spudger to pry up and disconnect the display cable from its connector.
-
-
이 단계는 번역되지 않았습니다. 번역을 도와주십시오
-
Remove the following screws that secure the midframe to the back:
-
Seven black 4 mm T5 screws
-
Two silver 3 mm T5 screws
-
-
이 단계는 번역되지 않았습니다. 번역을 도와주십시오
-
The midframe is held tightly in place by plastic clips which push into the edge of the back case.
-
-
이 단계는 번역되지 않았습니다. 번역을 도와주십시오
-
Find the small notch in the bottom left corner of the frame and insert an opening pick.
-
Slide the opening pick along the bottom edge of the phone towards the bottom right corner and leave it there.
-
-
이 단계는 번역되지 않았습니다. 번역을 도와주십시오
-
Insert a separate opening pick into the right edge of the phone, near the bottom.
-
Slowly push the pick upwards along the seam until the first clip pops free.
-
Once you've released the clip, leave the opening pick in place to prevent the midframe from resealing.
-
-
이 단계는 번역되지 않았습니다. 번역을 도와주십시오
-
Insert an opening pick into the right edge of the phone and slide it upwards towards the top right clip.
-
Slowly slide the pick past the clip to disengage it from the frame.
-
-
이 단계는 번역되지 않았습니다. 번역을 도와주십시오
-
Grasp the right edge of the midframe by the corners and slowly hinge the edge up.
-
When the left edge feels loose, stop hinging and lift the midframe upwards.
-
Remove the midframe.
-
-
이 단계는 번역되지 않았습니다. 번역을 도와주십시오
-
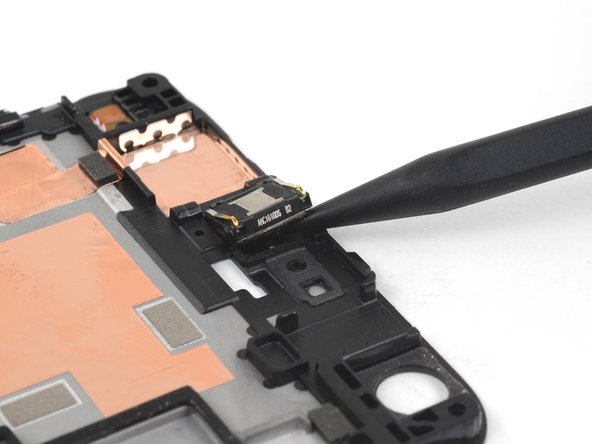
Flip the midframe over.
-
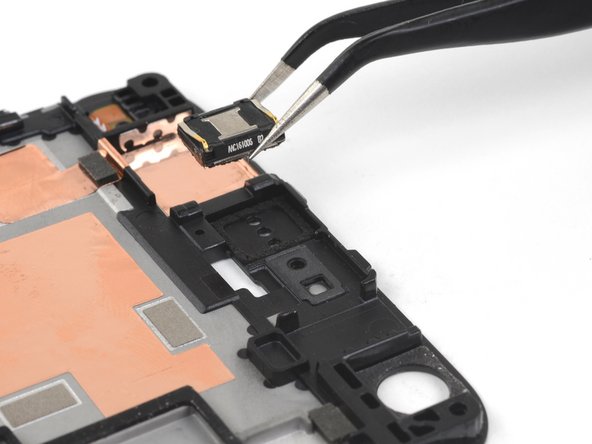
Use the point of a spudger to pry up and loosen the earpiece speaker from the plastic midframe.
-
Remove the earpiece speaker.
-


다른 7명이 해당 안내서를 완성하였습니다.

