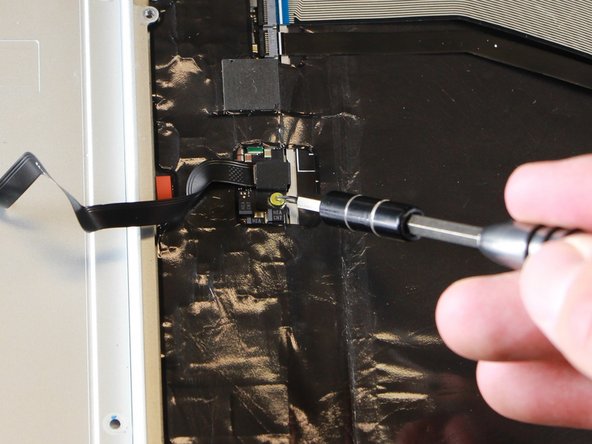
주요 콘텐츠로 건너뛰기

Google Pixelbook Touchpad Replacement

필요한 것

  1. Google Pixelbook Touchpad Replacement, Battery (Back Panel): 1 단계, 이미지 1/3 Google Pixelbook Touchpad Replacement, Battery (Back Panel): 1 단계, 이미지 2/3 Google Pixelbook Touchpad Replacement, Battery (Back Panel): 1 단계, 이미지 3/3
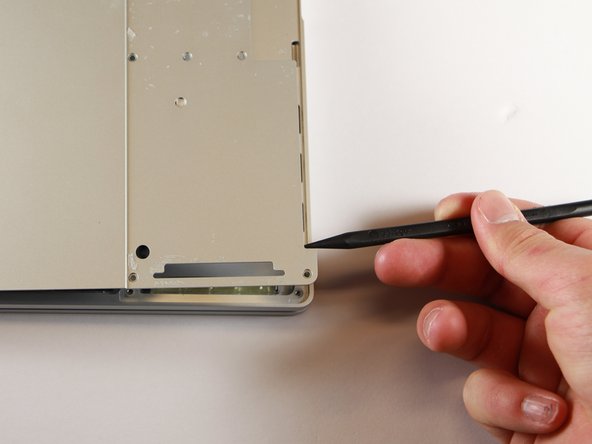
    • Use the iFixit opening tools or a metal spudger to pry the rubber covers off the back of your Pixelbook.

    • Peel the linings off completely until the back of the Pixelbook looks bare.

  2. Google Pixelbook Touchpad Replacement: 2 단계, 이미지 1/2 Google Pixelbook Touchpad Replacement: 2 단계, 이미지 2/2
    • Remove the two yellow 2.0mm screws by using a T3 Torx screwdriver.

  3. Google Pixelbook Touchpad Replacement: 3 단계, 이미지 1/3 Google Pixelbook Touchpad Replacement: 3 단계, 이미지 2/3 Google Pixelbook Touchpad Replacement: 3 단계, 이미지 3/3
    • Remove the seventeen 3.0mm T5 Torx screws from the bottom panel.

  4. Google Pixelbook Touchpad Replacement: 4 단계, 이미지 1/3 Google Pixelbook Touchpad Replacement: 4 단계, 이미지 2/3 Google Pixelbook Touchpad Replacement: 4 단계, 이미지 3/3
    • Use the nylon spudger to pry the edge of the Pixelbook up until you can grab the edge with your fingers.

    • Open the back panel completely and lay it flat so you see the whole inside of the computer.

  5. Google Pixelbook Touchpad Replacement: 5 단계, 이미지 1/2 Google Pixelbook Touchpad Replacement: 5 단계, 이미지 2/2
    • Remove the yellow 2.0mm screw from the middle of the panel by using the T3 Torx screwdriver to turn the screw counterclockwise.

  6. Google Pixelbook Touchpad Replacement: 6 단계, 이미지 1/2 Google Pixelbook Touchpad Replacement: 6 단계, 이미지 2/2
    • Remove the small, black casing by using the spudger to lift it up from its place.

  7. Google Pixelbook Touchpad Replacement: 7 단계, 이미지 1/1
    • Disconnect the flat, black cord from the main component by using a spudger to push it out of the slot, or by using your hand to carefully pull it out.

    • Your back panel is now free from the main component.

  8. Google Pixelbook Touchpad Replacement, Touchpad: 8 단계, 이미지 1/3 Google Pixelbook Touchpad Replacement, Touchpad: 8 단계, 이미지 2/3 Google Pixelbook Touchpad Replacement, Touchpad: 8 단계, 이미지 3/3
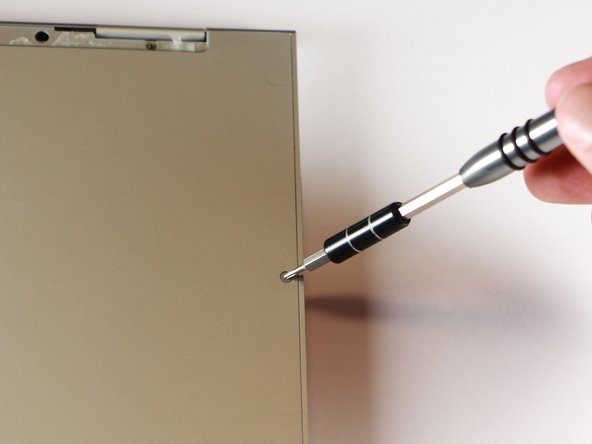
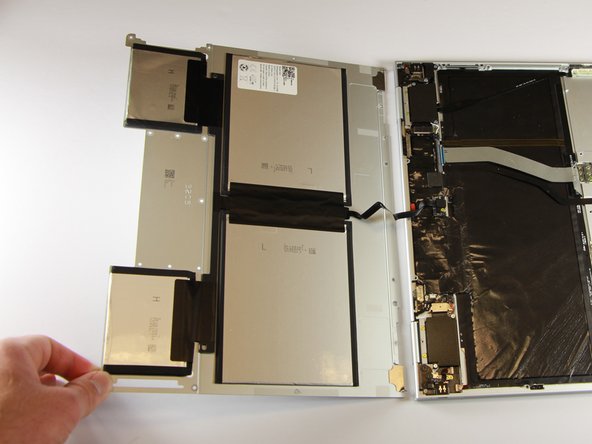
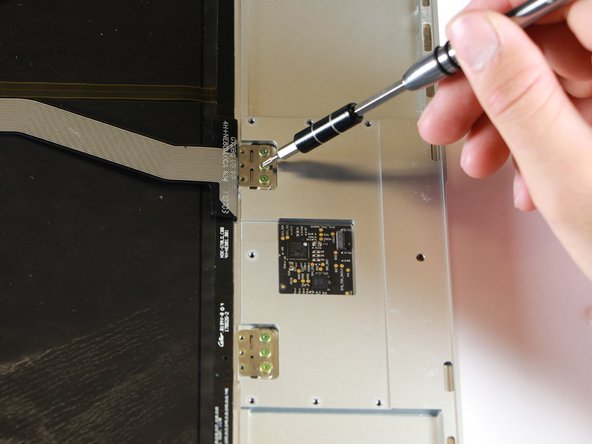
    • Once the back panel is out of the way, use the T3 Torx screwdriver to turn both the 2.0mm and large 3.0mm gold screws from the touchpad.

  9. Google Pixelbook Touchpad Replacement: 9 단계, 이미지 1/3 Google Pixelbook Touchpad Replacement: 9 단계, 이미지 2/3 Google Pixelbook Touchpad Replacement: 9 단계, 이미지 3/3
    • Gently pull out the ribbon connector either by using tweezers or your fingers to pull the cord out and up.

  10. Google Pixelbook Touchpad Replacement: 10 단계, 이미지 1/2 Google Pixelbook Touchpad Replacement: 10 단계, 이미지 2/2
    • Use the nylon spudger to push the touchpad out of the laptop by inserting the point into the hole near the edge of the laptop.

    • As the metal plates with the screws tilt upwards, use your hand to catch the falling touchpad and remove it.

결론

To reassemble your device, follow these instructions in reverse order.

다른 3명이 해당 안내서를 완성하였습니다.

Derrick Unger

회원 가입일: 01/24/18

361 평판

안내서 2개 작성하였습니다

Cal Poly, Team S18-G1, Livingston Winter 2018 Cal Poly, Team S18-G1, Livingston Winter 2018 회원

CPSU-LIVINGSTON-W18S18G1

4 회원들

안내서 7개 작성하였습니다

댓글 6개

Hello, I followed this guide and no the pixelbook will no longer power on. I reassembled exactly as described here. No light is coming on when I plu in the official charger, have tried other chargers as well. Any suggestions? I’ve been holding refresh + power and ESC but no change. Thanks…

saynotohotmail - 답글

lol $@$*…that’s reassuring ^^^ I was just about to order a replacement. Did you ever get it to turn back on? Or figure out what you did wrong lol?

Avh - 답글

What I read after the fact is that if you don’t do a full power off (hold refresh and power for 5 seconds until it is completely off) then the process here could short the motherboard. Which in my case it did. And I really wish these instructions had included something about that.

saynotohotmail - 답글

Ah I see! I just performed it last night actually, I did a regular shutdown via the “shutdown” button in the settings, everything went just fine luckily. Check out the corrosion that was causing my issue! http://imgur.com/gallery/cCfuGh2

In my settings under "devices" I didn't even have an option named “trackpad" - and that would be why,

Avh - 답글

Can anyone direct me to a source for a replacement touchpad? Thanks.

jacrider - 답글

댓글 쓰기

조회 통계:

24 시간 전: 2

7일 전: 9

30일 전: 25

전체 시간: 4,282