주요 콘텐츠로 건너뛰기

HKC P886A Digitizer Replacement

필요한 것

  1. HKC P886A Digitizer Replacement, Disassembling HKC P886A Overall Device Disassembly: 1 단계, 이미지 1/2 HKC P886A Digitizer Replacement, Disassembling HKC P886A Overall Device Disassembly: 1 단계, 이미지 2/2
    • Insert the flat tip of the metal spudger into the seam between the back panel and the screen.

    • The easiest insertion point for the metal spudger is at the corners of the device.

    • Slide the spudger across the perimeter of the device and gently pry apart at each corner.

    • When the screen is separated from the back panel there will be two connected ribbon cables between the two halves of the device. These cables must be disconnected before further disassembly.

    • After the pressure clamps are released orient the device so that the speaker is to the right and the screen is tilted away from you.

  2. HKC P886A Digitizer Replacement: 2 단계, 이미지 1/2 HKC P886A Digitizer Replacement: 2 단계, 이미지 2/2
    • The device is oriented with the camera to the right and the external button towards the top of the picture.

    • Locate the shorter ribbon cable and the black pressure tabs that hold the ribbon cable in place.

    • The tabs used to connect the ribbon cables are fragile and can easily be damaged.

    • Use the plastic spudger to gently slide the tabs about 2mm away from connector.

    • Once tabs are successfully disconnected the ribbon cable should come out of the port without resistance.

  3. HKC P886A Digitizer Replacement: 3 단계, 이미지 1/3 HKC P886A Digitizer Replacement: 3 단계, 이미지 2/3 HKC P886A Digitizer Replacement: 3 단계, 이미지 3/3
    • Locate the longer ribbon cable and the pressure clamp that holds the cable in the connection port.

    • Using the plastic spudger, flip the black locking clip up.

    • The pressure clip will click when it has been disengaged.

    • Once the clip is unlocked, the cable should slide out without resistance

    • In photo 1 the device is oriented with the camera to the left and external buttons towards the bottom. In photo 2 the device is oriented with the camera toward the user. In photo 3 the camera is to the left.

  4. HKC P886A Digitizer Replacement, Digitizer: 4 단계, 이미지 1/2 HKC P886A Digitizer Replacement, Digitizer: 4 단계, 이미지 2/2
    • The matrix is the component that is attached to the LCD (component with the silver backing). It is the component that interprets the location of the users touch.

    • The matrix and screen assembly are delicate and require gentle prying. Try not to deform the components in order to avoid damage to the components.

    • Gently bend screen around LCD to disengage the pressure clamps.

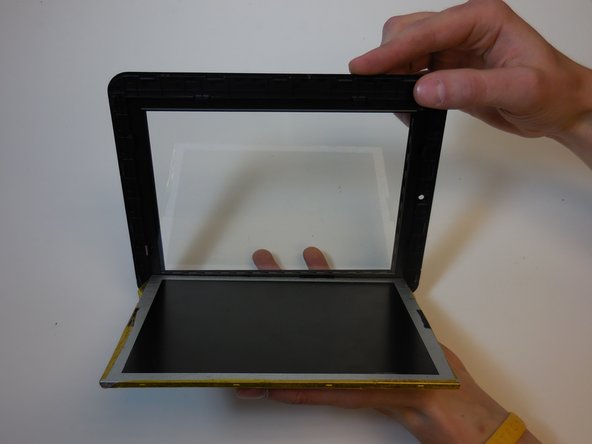
    • Once all pressure clamps are disengaged, separate the LCD screen from the matrix with out touching the display portion of either component.

    • Replacement touch screens are available from this link: laptopscreen.com

  5. HKC P886A Digitizer Replacement: 5 단계, 이미지 1/1
    • To reattach the matrix to the screen, seat the LCD screen in the pressure clamps and gently push the matrix down to re-engage the clamps.

    • Do not touch the front panel of either device or finger prints and smudges will be on the display.

결론

To reassemble your device, follow these instructions in reverse order.

다른 한 분이 해당 안내서를 완성하였습니다.

Cassidy

회원 가입일: 03/11/15

409 평판

안내서 3개 작성하였습니다

Colorado Springs, Team 5-2, Panko Spring 2015 Colorado Springs, Team 5-2, Panko Spring 2015 회원

UCCS-PANKO-S15S5G2

3 회원들

안내서 8개 작성하였습니다

댓글 0개

댓글 쓰기

조회 통계:

24 시간 전: 0

7일 전: 1

30일 전: 5

전체 시간: 352