주요 콘텐츠로 건너뛰기

HMD Skyline Screen Replacement

필요한 것

  1. HMD Skyline Screen Replacement, Prepare your phone for disassembly: 1 단계, 이미지 1/1
    • Let your phone's battery drain below 25% before starting this repair. A charged lithium‑ion battery may catch fire if damaged.

    • Unplug all cables and completely power off your phone.

  2. HMD Skyline Screen Replacement, Separate the back cover: 2 단계, 이미지 1/3 HMD Skyline Screen Replacement, Separate the back cover: 2 단계, 이미지 2/3 HMD Skyline Screen Replacement, Separate the back cover: 2 단계, 이미지 3/3
    • A screw‑driven camshaft in the bottom left corner pushes the back cover away from the phone, creating a gap to begin separating the cover.

    • With the back cover facing up, use a T3 Torx screwdriver to turn the screw in the bottom edge counterclockwise until the back cover pops up.

  3. HMD Skyline Screen Replacement: 3 단계, 이미지 1/3 HMD Skyline Screen Replacement: 3 단계, 이미지 2/3 HMD Skyline Screen Replacement: 3 단계, 이미지 3/3
    • Before separating the back cover, note the following:

    • There's a seam just under the back cover panel. Don't insert your tool here.

    • Insert your tool completely under the back cover, so it's between the frame and the underside of the back cover.

    • Insert an opening pick under the bottom left corner of the back cover and slide it along the bottom edge to release the clips and separate the adhesive.

    • You should feel and hear the back cover clips release. If you don't, insert the pick deeper and try again.

  4. HMD Skyline Screen Replacement: 4 단계, 이미지 1/3 HMD Skyline Screen Replacement: 4 단계, 이미지 2/3 HMD Skyline Screen Replacement: 4 단계, 이미지 3/3
    • Continue sliding the pick under the perimeter of the back cover to fully separate the clips and adhesive.

  5. HMD Skyline Screen Replacement, Remove the back cover: 5 단계, 이미지 1/3 HMD Skyline Screen Replacement, Remove the back cover: 5 단계, 이미지 2/3 HMD Skyline Screen Replacement, Remove the back cover: 5 단계, 이미지 3/3
    • Lift and remove the back cover.

    • During reassembly:

    • Now is a good time to test your phone before sealing it up. Power it on and check that it works. Power it back down before you continue reassembly.

    • If you're installing a new back cover:

    • Make sure you remove all liners from the underside.

    • Use the flat end of a spudger to press the small cable above the wireless charging coil into place over its alignment posts.

    • Place the back cover onto the frame and firmly squeeze around the perimeter to reengage all the clips.

  6. HMD Skyline Screen Replacement, Remove the screen screws: 6 단계, 이미지 1/3 HMD Skyline Screen Replacement, Remove the screen screws: 6 단계, 이미지 2/3 HMD Skyline Screen Replacement, Remove the screen screws: 6 단계, 이미지 3/3
    • Use a T3 Torx screwdriver to remove the thirteen 4.9 mm‑long screws securing the screen to the frame.

    • These screws will be a different color or slightly different shade than the rest.

  7. HMD Skyline Screen Replacement: 7 단계, 이미지 1/1
    • Gently flip the graphite sheet on the battery over the top edge of your phone.

    • Be careful not to tear the sheet, as it's very delicate.

  8. HMD Skyline Screen Replacement, Disconnect the battery: 8 단계, 이미지 1/3 HMD Skyline Screen Replacement, Disconnect the battery: 8 단계, 이미지 2/3 HMD Skyline Screen Replacement, Disconnect the battery: 8 단계, 이미지 3/3
    • Insert the point of a spudger in the notch on the left edge of the battery connector cover and pry up to release its clips.

    • Only insert your tool enough to pry up the cover. Otherwise, you may accidentally disconnect the rear camera press connector.

    • Remove the cover.

    • During reassembly, firmly press the cover into place to engage the clips.

  9. HMD Skyline Screen Replacement: 9 단계, 이미지 1/3 HMD Skyline Screen Replacement: 9 단계, 이미지 2/3 HMD Skyline Screen Replacement: 9 단계, 이미지 3/3
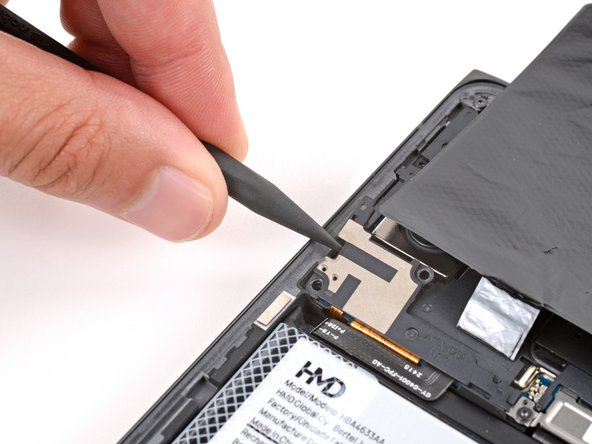
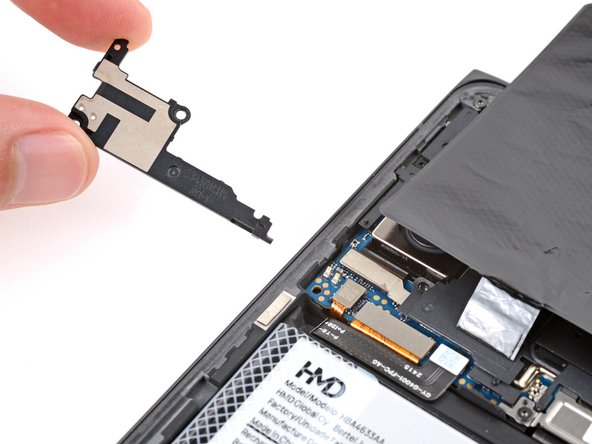
    • Insert the tip of an opening pick under the top edge of the battery press connector and pry up to disconnect it.

    • Check if the rear camera press connector got disconnected during the previous step. If it did, reconnect it.

    • To reconnect a press connector, align it over the socket and gently press down on one side until it clicks into place, then press down on the other side. It might take a few tries to align the connector.

  10. HMD Skyline Screen Replacement, Disconnect the screen: 10 단계, 이미지 1/3 HMD Skyline Screen Replacement, Disconnect the screen: 10 단계, 이미지 2/3 HMD Skyline Screen Replacement, Disconnect the screen: 10 단계, 이미지 3/3
    • Use your fingers to grip a bottom corner of the metal screen-connector cover.

    • Lift the bottom edge of the cover and pull it towards the bottom of your phone to tear the "seal" sticker and remove the cover.

    • During reassembly, slide the tabs on the top edge of the cover under the motherboard cover and use the cutouts near the screw holes to align the cover.

  11. HMD Skyline Screen Replacement: 11 단계, 이미지 1/2 HMD Skyline Screen Replacement: 11 단계, 이미지 2/2
    • Insert the flat end of a spudger under the top edge of the screen cable press connector and pry up to disconnect it.

  12. HMD Skyline Screen Replacement, Remove the screen: 12 단계, 이미지 1/3 HMD Skyline Screen Replacement, Remove the screen: 12 단계, 이미지 2/3 HMD Skyline Screen Replacement, Remove the screen: 12 단계, 이미지 3/3
    이 단계에 사용된 도구:
    SIM Card Eject Tool
    $2.99
    구매
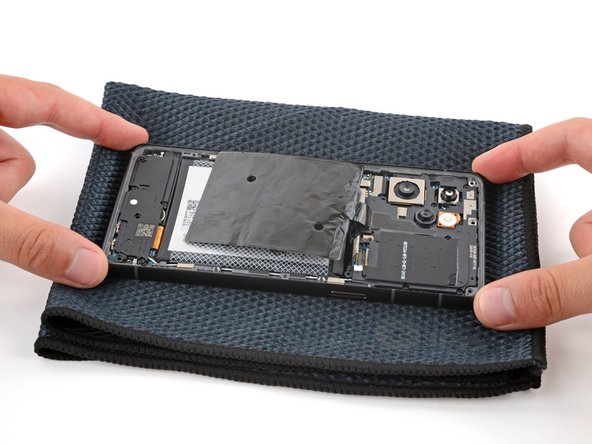
    • Use one hand to grip the bottom corners of the frame and lift your phone slightly off of your work surface (about 1/2 an inch or roughly 15 mm).

    • Make sure you're only gripping the frame, and not the screen and frame together. Otherwise, the screen won't be able to separate.

    • With your free hand, use a SIM eject tool (or something of similar size, like a straightened paperclip) to gently push down on the screen through the cutout in the bottom left corner of the frame—this should separate the screen, causing it to fall onto your work surface.

    • Guide the screen cable through its cutout and lift the frame off the screen.

    • Set the frame down on a clean surface so the cameras are facing up.

  13. HMD Skyline Screen Replacement, Reassembly information: 13 단계, 이미지 1/3 HMD Skyline Screen Replacement, Reassembly information: 13 단계, 이미지 2/3 HMD Skyline Screen Replacement, Reassembly information: 13 단계, 이미지 3/3
    • To install a screen:

    • Remove any tape or liners from the back of the screen—check the screen cable and front facing camera cutout.

    • Hold the frame in one hand and your replacement screen in the other.

    • Thread the screen cable through its cutout on the front of the frame and press the screen into place so it's flush in the frame.

    • Lay your phone screen side down on a soft cloth, making sure the screen doesn't detach from the frame.

    • Simultaneously press down on all four corners of your phone to fully seat the screen in the frame.

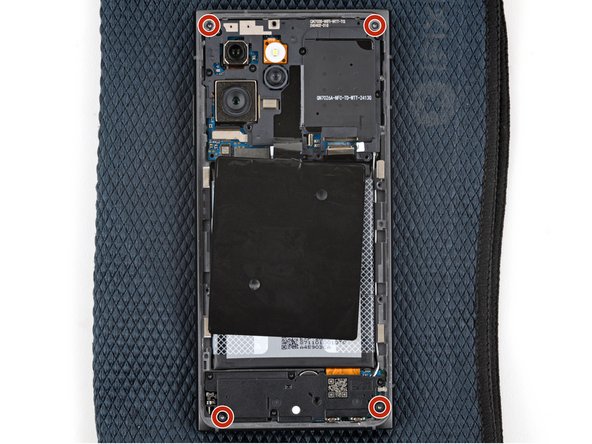
    • Use a T3 Torx screwdriver to install four screen screws in the corners of the frame—this ensures that the screen doesn't detach from the frame during reassembly.

    • If the screws aren't catching, double-check that the screen is fully seated.

결론

To reassemble your device, follow these instructions in reverse order, starting with this step.

Take your e-waste to an R2 or e-Stewards certified recycler.

Repair didn’t go as planned? Try some basic troubleshooting, or ask our Answers community for help.

Spencer Day

회원 가입일: 09/14/22

61,610 평판

안내서 445개 작성하였습니다

iFixit iFixit 회원

Staff

140 회원들

안내서 18,074개 작성하였습니다

댓글 0개

댓글 쓰기

조회 통계:

24 시간 전: 41

7일 전: 332

30일 전: 374

전체 시간: 421