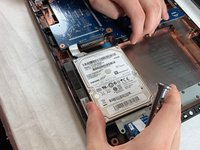
주요 콘텐츠로 건너뛰기

HP 15-R011DX Hard Drive Replacement

필요한 것

  1. HP 15-R011DX Hard Drive Replacement, Battery: 1 단계, 이미지 1/2 HP 15-R011DX Hard Drive Replacement, Battery: 1 단계, 이미지 2/2
    • Slide the lock mechanism on the left side of the laptop to the right.

  2. HP 15-R011DX Hard Drive Replacement: 2 단계, 이미지 1/1
    • While holding the right slide mechanism, remove the battery from the laptop.

    • The battery is not pictured here because it is missing from this particular device.

  3. HP 15-R011DX Hard Drive Replacement, How to Access the Internal Components of an HP 15-R011DX: 3 단계, 이미지 1/2 HP 15-R011DX Hard Drive Replacement, How to Access the Internal Components of an HP 15-R011DX: 3 단계, 이미지 2/2
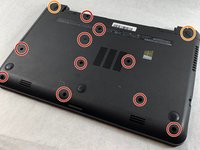
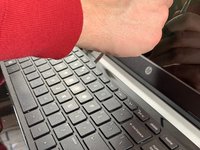
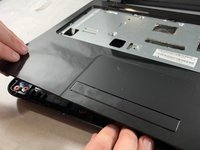
    • Flip the laptop over to reveal screw locations.

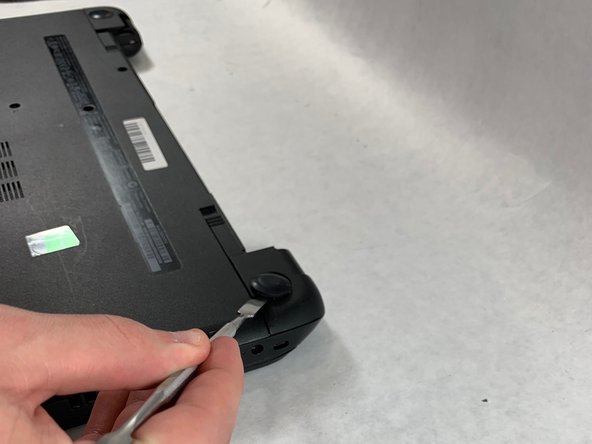
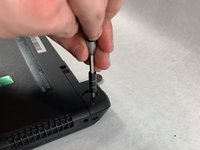
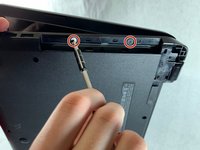
    • Use a metal spudger to remove the two rear rubber feet. There are screws hidden underneath them.

  4. HP 15-R011DX Hard Drive Replacement: 4 단계, 이미지 1/2 HP 15-R011DX Hard Drive Replacement: 4 단계, 이미지 2/2
    • Remove the twelve 5mm Phillips #1 screws on the back of the laptop.

  5. HP 15-R011DX Hard Drive Replacement: 5 단계, 이미지 1/2 HP 15-R011DX Hard Drive Replacement: 5 단계, 이미지 2/2
    • Remove the DVD drive from the laptop.

    • Remove the two 3 mm Phillips #1 screws underneath the DVD drive.

  6. HP 15-R011DX Hard Drive Replacement: 6 단계, 이미지 1/3 HP 15-R011DX Hard Drive Replacement: 6 단계, 이미지 2/3 HP 15-R011DX Hard Drive Replacement: 6 단계, 이미지 3/3
    • Flip the laptop and open.

    • Detach the keyboard by prying it free from the laptop using a spudger.

    • Do not completely remove the keyboard yet. It is still attached by a ribbon cable.

    • Disconnect the keyboard ribbon cable.

  7. HP 15-R011DX Hard Drive Replacement: 7 단계, 이미지 1/2 HP 15-R011DX Hard Drive Replacement: 7 단계, 이미지 2/2
    • Disconnect the two narrow ribbon cables to the left of the keyboard connection.

    • Remove five 4 mm Phillips #1 screws from the metal tray for the keyboard.

    • Pry open the plastic casing using a spudger.

    • If struggling to remove the plastic case, check that all screws have been removed.

  8. HP 15-R011DX Hard Drive Replacement, Hard Drive: 8 단계, 이미지 1/1
    • Remove two 5 mm Phillips #1 screws located at the base of the hard drive.

  9. HP 15-R011DX Hard Drive Replacement: 9 단계, 이미지 1/2 HP 15-R011DX Hard Drive Replacement: 9 단계, 이미지 2/2
    • Pull the hard drive upwards and away from the laptop.

    • The hard drive should disconnect from its port on the motherboard as shown in the second image.

  10. HP 15-R011DX Hard Drive Replacement: 10 단계, 이미지 1/1
    • Flip the hard drive over.

    • Remove the two 4 mm Phillips #1 screws from the base of the hard drive.

    • Remove the mounting brace (silver bracket) from the hard drive.

결론

To reassemble your device, follow these instructions in reverse order.

다른 3명이 해당 안내서를 완성하였습니다.

Ethan Guillotte

회원 가입일: 03/20/19

490 평판

안내서 3개 작성하였습니다

UMass Dartmouth, Team S2-G4, Bailey Spring 2019 UMass Dartmouth, Team S2-G4, Bailey Spring 2019 회원

UMASSD-BAILEY-S19S2G4

3 회원들

안내서 6개 작성하였습니다

댓글 0개

댓글 쓰기

조회 통계:

24 시간 전: 1

7일 전: 4

30일 전: 14

전체 시간: 1,296