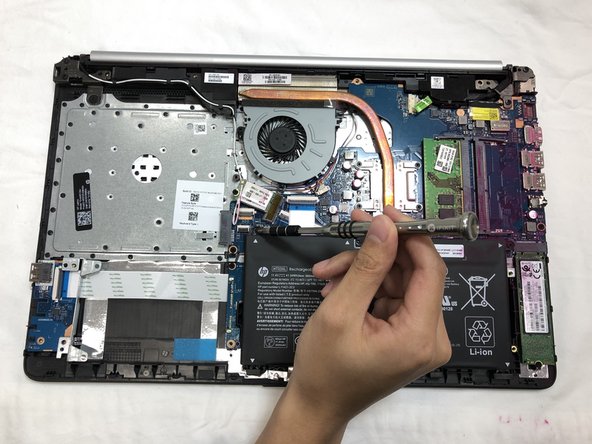
주요 콘텐츠로 건너뛰기

HP 15-da0012dx SSD Replacement

필요한 것

  1. HP 15-da0012dx SSD Replacement, Battery: 1 단계, 이미지 2개 중 1개 HP 15-da0012dx SSD Replacement, Battery: 1 단계, 이미지 2개 중 2개
    • Power down your laptop before proceeding.

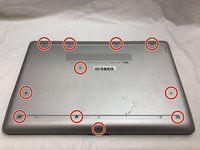
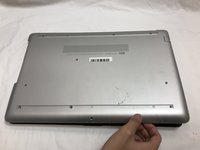
    • Turn your laptop over so that the Laptop Identification Tag on the underside of the laptop faces the ceiling.

  2. HP 15-da0012dx SSD Replacement: 2 단계, 이미지 3개 중 1개 HP 15-da0012dx SSD Replacement: 2 단계, 이미지 3개 중 2개 HP 15-da0012dx SSD Replacement: 2 단계, 이미지 3개 중 3개
    • Using the plastic opening tools, peel back the plastic feet from the underside of the laptop.

  3. HP 15-da0012dx SSD Replacement: 3 단계, 이미지 2개 중 1개 HP 15-da0012dx SSD Replacement: 3 단계, 이미지 2개 중 2개
    • Using a Phillips #1 screwdriver, remove the eleven 9.0 mm screws holding the back cover in place.

  4. HP 15-da0012dx SSD Replacement: 4 단계, 이미지 2개 중 1개 HP 15-da0012dx SSD Replacement: 4 단계, 이미지 2개 중 2개
    • Slide the optical drive out of the computer.

  5. HP 15-da0012dx SSD Replacement: 5 단계, 이미지 3개 중 1개 HP 15-da0012dx SSD Replacement: 5 단계, 이미지 3개 중 2개 HP 15-da0012dx SSD Replacement: 5 단계, 이미지 3개 중 3개
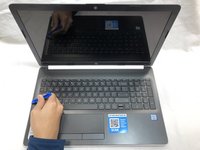
    • Flip the computer over and open the screen.

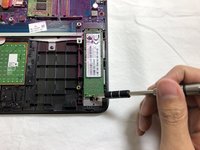
    • Start from a corner and run the plastic opening tools along the edge of the back cover.

    • After the cover has been completely loosened around the entire perimeter, close the screen and flip the computer over.

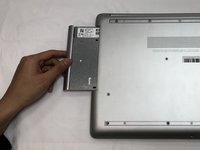
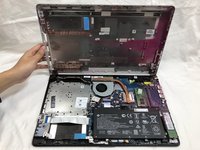
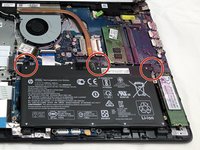
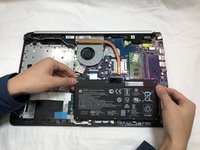
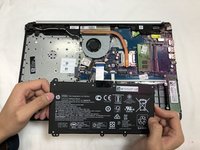
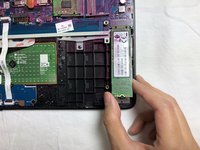
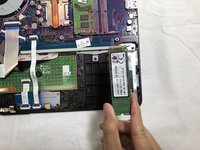
    • Gently pry back the cover starting from the middle, bottom edge.

    • Make sure not to bend or crack the plastic cover.

  6. HP 15-da0012dx SSD Replacement: 6 단계, 이미지 2개 중 1개 HP 15-da0012dx SSD Replacement: 6 단계, 이미지 2개 중 2개
    • Using the Phillips #1 screwdriver, remove the three 8.0 mm screws holding the battery in place.

  7. HP 15-da0012dx SSD Replacement: 7 단계, 이미지 2개 중 1개 HP 15-da0012dx SSD Replacement: 7 단계, 이미지 2개 중 2개
    • Remove the battery by tilting the top of the battery towards you and pulling the battery away from the mounting tabs.

  8. HP 15-da0012dx SSD Replacement, SSD: 8 단계, 이미지 2개 중 1개 HP 15-da0012dx SSD Replacement, SSD: 8 단계, 이미지 2개 중 2개
    • Using the Phillips #1 screwdriver, remove the single 3.0 mm screw holding the SSD module in place.

  9. HP 15-da0012dx SSD Replacement: 9 단계, 이미지 2개 중 1개 HP 15-da0012dx SSD Replacement: 9 단계, 이미지 2개 중 2개
    • Pull the SSD module away from the socket.

결론

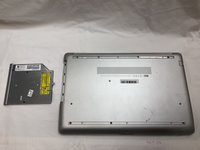
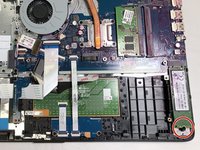
To reassemble your device, follow these instructions in reverse order.

다른 7명이 해당 안내서를 완성하였습니다.

작성자

5다른 기여자 명과 함께

Xavier Hung

회원 가입일: 02/07/19

995 평판

안내서 4개를 작성함

UC Davis, Team S20-G4, Lore Winter 2019 UC Davis, Team S20-G4, Lore Winter 2019 회원

UCD-LORE-W19S20G4

3 회원들

안내서 7개를 작성함

1가이드 댓글

Nice explanation about how to disassemble of hp laptop and assembly of SSD again in this video. Thanks this help me a lot. If you need assistance in Delhi ncr. Kindly call us

Mahima Singh - 답글

댓글 쓰기

조회 통계:

지난 24시간: 1

지난 7일: 18

지난 30일: 84

전체 시간: 10,174