주요 콘텐츠로 건너뛰기

HP 15-f033wm Screen Replacement

필요한 것

  1. HP 15-f033wm Screen Replacement, Battery: 1 단계, 이미지 1/1
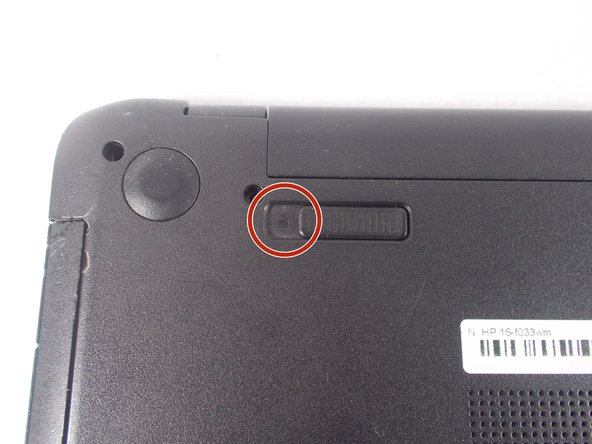
    • Turn power off using the power button located in the top left corner of the keyboard. Press and hold the power button for 3 seconds until it turns off.

  2. HP 15-f033wm Screen Replacement: 2 단계, 이미지 1/2 HP 15-f033wm Screen Replacement: 2 단계, 이미지 2/2
    • Close the laptop and flip it over so that the HP cover logo is on the underside of the laptop.

  3. HP 15-f033wm Screen Replacement: 3 단계, 이미지 1/2 HP 15-f033wm Screen Replacement: 3 단계, 이미지 2/2
    • Locate the battery and the two switches that release the battery when they are unlocked.

  4. HP 15-f033wm Screen Replacement: 4 단계, 이미지 1/2 HP 15-f033wm Screen Replacement: 4 단계, 이미지 2/2
    • Slide the left switch to the right so that the icon of a locked padlock is no longer visible and the icon of an unlocked padlock is now visible.

  5. HP 15-f033wm Screen Replacement: 5 단계, 이미지 1/3 HP 15-f033wm Screen Replacement: 5 단계, 이미지 2/3 HP 15-f033wm Screen Replacement: 5 단계, 이미지 3/3
    • With your left hand, slide the right switch to the left and hold it in place. This will unlock the battery and allow you to easily slide it out of its port.

    • While holding the switch in place, use your right hand to gently remove the battery from its port.

  6. HP 15-f033wm Screen Replacement, Screen: 6 단계, 이미지 1/1
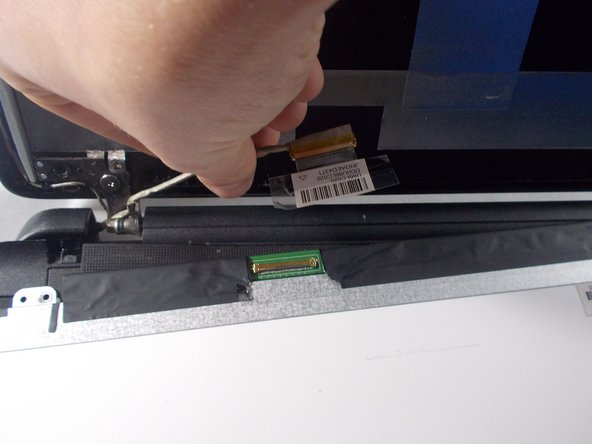
    • After removing the battery, remove the bezel. Do this by prying it away from the faulty screen using the spudger.

    • Make sure screen is angles as far back as possible to fully remove the bottom hinges of the bezel without damaging the laptop.

  7. HP 15-f033wm Screen Replacement: 7 단계, 이미지 1/1
    • Remove the four 3 mm PH1 Phillips head screws in each corner of the screen, fastening the screen to the rest of the laptop.

  8. HP 15-f033wm Screen Replacement: 8 단계, 이미지 1/1
    • Gently remove the screen and place it on the keyboard.

  9. HP 15-f033wm Screen Replacement: 9 단계, 이미지 1/2 HP 15-f033wm Screen Replacement: 9 단계, 이미지 2/2
    • Remove the tape on top of the video cable.

    • Gently disconnect the video cable.

결론

To reassemble your device, follow these instructions in reverse order.

다른 4명이 해당 안내서를 완성하였습니다.

Aaron Chabot

회원 가입일: 10/17/17

608 평판

안내서 4개 작성하였습니다

UMass Dartmouth, Team S1-G4, Simcock Fall 2017 UMass Dartmouth, Team S1-G4, Simcock Fall 2017 회원

UMASSD-SIMCOCK-F17S1G4

3 회원들

안내서 6개 작성하였습니다

댓글 0개

댓글 쓰기

조회 통계:

24 시간 전: 0

7일 전: 0

30일 전: 2

전체 시간: 1,465