주요 콘텐츠로 건너뛰기

HP 17-x027ds LCD Screen Replacement

필요한 것

  1. HP 17-x027ds LCD Screen Replacement, LCD Screen: 1 단계, 이미지 1/3 HP 17-x027ds LCD Screen Replacement, LCD Screen: 1 단계, 이미지 2/3 HP 17-x027ds LCD Screen Replacement, LCD Screen: 1 단계, 이미지 3/3
    • Open the laptop so you can see the screen.

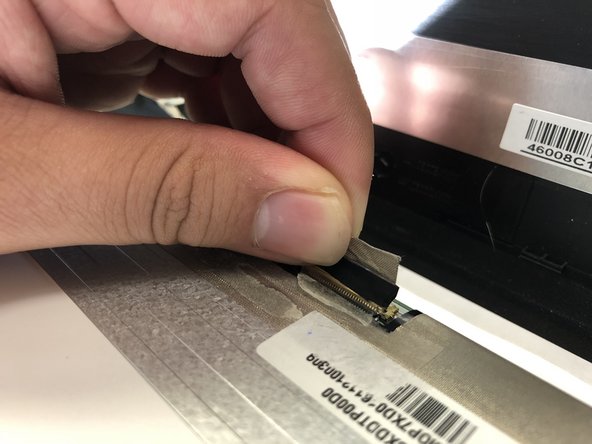
    • Remove the bezel with firm, constant pressure to create a slight gap between the bezel and screen (plastic outlining of screen) with a plastic opening tool.

    • Remove the bezel by starting on the sides of the screen and lastly removing the top outlining.

    • When removing the bezel, be cautious not to use too much force or else you will damage the screen. Apply just enough pressure to create a gap between the bezel and screen.

  2. HP 17-x027ds LCD Screen Replacement: 2 단계, 이미지 1/3 HP 17-x027ds LCD Screen Replacement: 2 단계, 이미지 2/3 HP 17-x027ds LCD Screen Replacement: 2 단계, 이미지 3/3
    • Lift the bezel off the screen to see the outlines of the LCD screen.

    • Remove the four black 3mm screws in each corner of the screen with a JIS #1 screwdriver.

    • Remove the two silver 4mm screws located at the top of the screen with a JIS #1 screwdriver.

  3. HP 17-x027ds LCD Screen Replacement: 3 단계, 이미지 1/2 HP 17-x027ds LCD Screen Replacement: 3 단계, 이미지 2/2
    • Remove the LCD screen and place it on the keyboard.

    • Disconnect the video cable to completely detach the LCD screen.

결론

To reassemble your device, follow these instructions in reverse order.

다른 한 분이 해당 안내서를 완성하였습니다.

Bill Hoang

회원 가입일: 09/18/18

452 평판

안내서 2개 작성하였습니다

University of North Texas, Team S3-G1, Raign Fall 2018 University of North Texas, Team S3-G1, Raign Fall 2018 회원

UNT-RAIGN-F18S3G1

4 회원들

안내서 5개 작성하였습니다

댓글 0개

댓글 쓰기

조회 통계:

24 시간 전: 0

7일 전: 7

30일 전: 11

전체 시간: 645