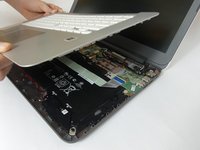
주요 콘텐츠로 건너뛰기

HP Chromebook 14-x013dx Motherboard Replacement

필요한 것

  1. HP Chromebook  14-x013dx Motherboard Replacement, Keyboard, Touchpad: 1 단계, 이미지 1/2 HP Chromebook  14-x013dx Motherboard Replacement, Keyboard, Touchpad: 1 단계, 이미지 2/2
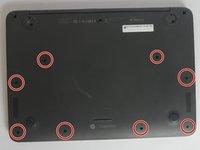
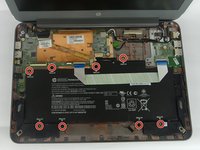
    • Using the plastic spudger, gently lift the 5 rubber pads away from their seating.

  2. HP Chromebook  14-x013dx Motherboard Replacement: 2 단계, 이미지 1/1
    • Remove the five 6mm screws located under the removed pads using Phillips #00 screwdriver.

  3. HP Chromebook  14-x013dx Motherboard Replacement: 3 단계, 이미지 1/2 HP Chromebook  14-x013dx Motherboard Replacement: 3 단계, 이미지 2/2
    • With the Phillips #00 screwdriver, remove the remaining eight 6mm screws. You will now have thirteen 6mm screws removed from the case.

  4. HP Chromebook  14-x013dx Motherboard Replacement: 4 단계, 이미지 1/2 HP Chromebook  14-x013dx Motherboard Replacement: 4 단계, 이미지 2/2
    • To continue removing the back cover, turn the laptop over as displayed.

    • Use the plastic spudger to gently pry around the base of the laptop from the back cover. Continue prying around the entire base of the laptop.

  5. HP Chromebook  14-x013dx Motherboard Replacement: 5 단계, 이미지 1/3 HP Chromebook  14-x013dx Motherboard Replacement: 5 단계, 이미지 2/3 HP Chromebook  14-x013dx Motherboard Replacement: 5 단계, 이미지 3/3
    • Gently lift the silver base of the laptop from the bottom, but do not remove it.

    • To remove the ribbon cables, lift the latch holding the ribbon cables in place and then pull them free.

    • Remove the keyboard panel from the laptop.

  6. HP Chromebook  14-x013dx Motherboard Replacement, Battery: 6 단계, 이미지 1/2 HP Chromebook  14-x013dx Motherboard Replacement, Battery: 6 단계, 이미지 2/2
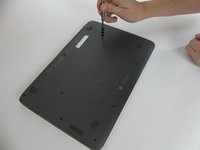
    • Remove the eight 4mm screws holding the battery in place using the Phillips #00 screwdriver.

  7. HP Chromebook  14-x013dx Motherboard Replacement: 7 단계, 이미지 1/2 HP Chromebook  14-x013dx Motherboard Replacement: 7 단계, 이미지 2/2
    • Remove the ribbon cable that runs over the battery by lifting up the plastic latches and pulling the cable away.

  8. HP Chromebook  14-x013dx Motherboard Replacement: 8 단계, 이미지 1/2 HP Chromebook  14-x013dx Motherboard Replacement: 8 단계, 이미지 2/2
    • Unhook the battery's power connector from the motherboard.

  9. HP Chromebook  14-x013dx Motherboard Replacement: 9 단계, 이미지 1/1
    • Lift the battery out of the laptop case.

  10. HP Chromebook  14-x013dx Motherboard Replacement, Motherboard: 10 단계, 이미지 1/3 HP Chromebook  14-x013dx Motherboard Replacement, Motherboard: 10 단계, 이미지 2/3 HP Chromebook  14-x013dx Motherboard Replacement, Motherboard: 10 단계, 이미지 3/3
    • Carefully remove the 4 connections.

  11. HP Chromebook  14-x013dx Motherboard Replacement: 11 단계, 이미지 1/3 HP Chromebook  14-x013dx Motherboard Replacement: 11 단계, 이미지 2/3 HP Chromebook  14-x013dx Motherboard Replacement: 11 단계, 이미지 3/3
    • Using a Phillips #00 screwdriver, remove the seven 2mm screws holding the motherboard in place.

    • Gently lift the motherboard out of the laptop case.

결론

To reassemble your device, follow these instructions in reverse order.

다른 한 분이 해당 안내서를 완성하였습니다.

Eile Woeltje

회원 가입일: 11/06/19

304 평판

안내서 2개 작성하였습니다

IUPUI, Team S1-G3, Stella Fall 2019 IUPUI, Team S1-G3, Stella Fall 2019 회원

IUPUI-STELLA-F19S1G3

3 회원들

안내서 2개 작성하였습니다

댓글 0개

댓글 쓰기

조회 통계:

24 시간 전: 0

7일 전: 2

30일 전: 6

전체 시간: 542