주요 콘텐츠로 건너뛰기

HP Chromebook 11 G3 Touchpad Replacement

필요한 것

  1. HP Chromebook 11 G3 Touchpad Replacement, Keyboard Mount: 1 단계, 이미지 1/2 HP Chromebook 11 G3 Touchpad Replacement, Keyboard Mount: 1 단계, 이미지 2/2
    • Flip the laptop upside down so that the lid lies flat on the table.

    • Remove the nine 6mm Phillips #00 screws that line the border.

  2. HP Chromebook 11 G3 Touchpad Replacement: 2 단계, 이미지 1/2 HP Chromebook 11 G3 Touchpad Replacement: 2 단계, 이미지 2/2
    • Remove the two rubber feet closest to the hinge using tweezers.

    • Remove the two 6mm Phillips #00 screws revealed under these rubber feet.

    • The rubber feet may tear while removal; preventing this can be difficult, but it won’t harm the laptop. If desired, replace these rubber feet during reassembly.

  3. HP Chromebook 11 G3 Touchpad Replacement: 3 단계, 이미지 1/1
    • Flip the laptop so it is in the upright position.

    • Open the lid.

    • Unsnap the keyboard mount along the border of the laptop using a plastic opening tool.

    • This may require more force than expected. Hearing loud clicks as the plastic opening tool slides along the seam is normal.

  4. HP Chromebook 11 G3 Touchpad Replacement: 4 단계, 이미지 1/3 HP Chromebook 11 G3 Touchpad Replacement: 4 단계, 이미지 2/3 HP Chromebook 11 G3 Touchpad Replacement: 4 단계, 이미지 3/3
    • Tilt the keyboard mount up.

    • Use a spudger to flip up the two ZIF connector retaining flaps for the ribbon cables that connect the keyboard mount to the motherboard.

    • Gently remove both ribbon cables.

  5. HP Chromebook 11 G3 Touchpad Replacement: 5 단계, 이미지 1/1
    • Lift the keyboard mount out of the laptop.

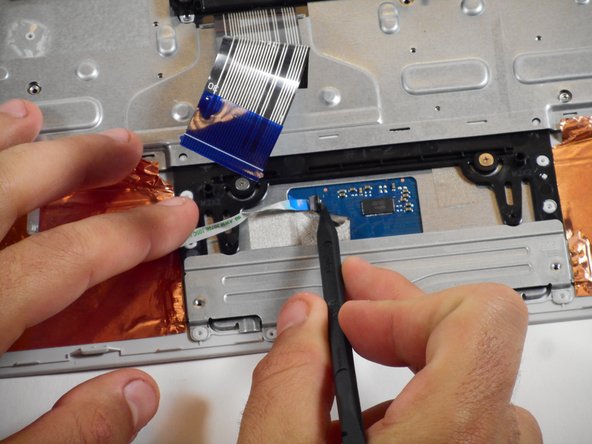
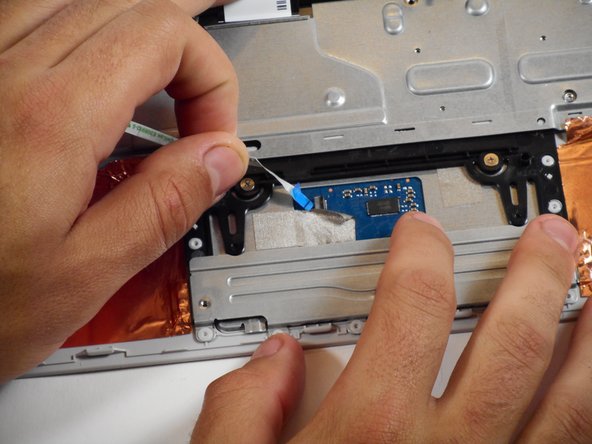
  6. HP Chromebook 11 G3 Touchpad Replacement, Touchpad: 6 단계, 이미지 1/3 HP Chromebook 11 G3 Touchpad Replacement, Touchpad: 6 단계, 이미지 2/3 HP Chromebook 11 G3 Touchpad Replacement, Touchpad: 6 단계, 이미지 3/3
    • Flip the keyboard mount upside down.

    • Use tweezers to lift the tape on the bottom of the touchpad to expose the connector.

    • With a spudger, push up the ZIF retaining flip.

    • Pull out the small ribbon cable.

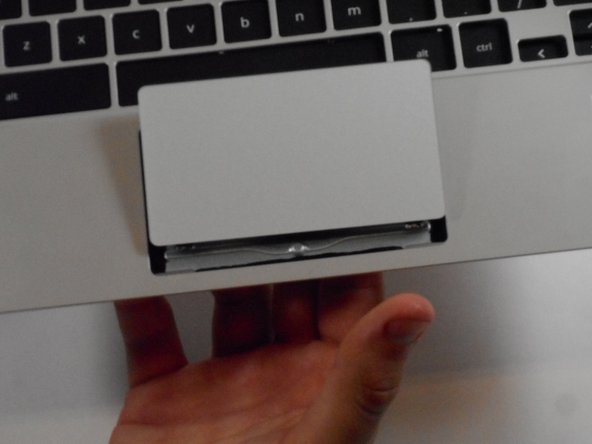
  7. HP Chromebook 11 G3 Touchpad Replacement: 7 단계, 이미지 1/2 HP Chromebook 11 G3 Touchpad Replacement: 7 단계, 이미지 2/2
    • Remove the two Phillips #00 2mm screws that secure the touchpad to the black plastic housing.

    • Flip the keyboard mount to the upright position.

    • From beneath, push the touchpad up through the top of the keyboard mount to remove it.

결론

To reassemble your device, follow these instructions in reverse order.

다른 2명이 해당 안내서를 완성하였습니다.

Rahul Goyal

회원 가입일: 04/26/17

1,369 평판

안내서 10개 작성하였습니다

Cal Poly, Team S23-G3, Livingston Spring 2017 Cal Poly, Team S23-G3, Livingston Spring 2017 회원

CPSU-LIVINGSTON-S17S23G3

4 회원들

안내서 12개 작성하였습니다

댓글 0개

댓글 쓰기

조회 통계:

24 시간 전: 0

7일 전: 3

30일 전: 7

전체 시간: 1,330