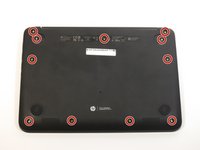
주요 콘텐츠로 건너뛰기

HP Chromebook 11 G4 SD Card Reader Replacement

필요한 것

  1. HP Chromebook 11 G4 SD Card Reader Replacement, Keyboard: 1 단계, 이미지 1개 중 1개
    • Position the closed Chromebook with the rubber pads are facing up.

  2. HP Chromebook 11 G4 SD Card Reader Replacement: 2 단계, 이미지 2개 중 1개 HP Chromebook 11 G4 SD Card Reader Replacement: 2 단계, 이미지 2개 중 2개
    • Slide the flat end of the spudger under the rubber pads at the upper right-hand and the upper left-hand corners.

    • Pry off the rubber pads to reveal a screw under each pad.

    • The rubber pads are attached with a strong adhesive. The force applied may damage the pads.

  3. HP Chromebook 11 G4 SD Card Reader Replacement: 3 단계, 이미지 2개 중 1개 HP Chromebook 11 G4 SD Card Reader Replacement: 3 단계, 이미지 2개 중 2개
    • Remove the eleven 6mm Phillips #1 screws.

  4. HP Chromebook 11 G4 SD Card Reader Replacement: 4 단계, 이미지 1개 중 1개
    • Flip over the Chromebook and open it.

  5. HP Chromebook 11 G4 SD Card Reader Replacement: 5 단계, 이미지 2개 중 1개 HP Chromebook 11 G4 SD Card Reader Replacement: 5 단계, 이미지 2개 중 2개
    • Insert the flat end of the spudger between the bottom body of the Chromebook and keyboard body.

    • Slide the spudger along the gap, applying downward pressure to separate the two components.

    • You should hear popping sounds as you slide the spudger along the edge.

    • If the spudger gets stuck while sliding, simply slide the spudger back for a bit, and continue sliding forward.

  6. HP Chromebook 11 G4 SD Card Reader Replacement: 6 단계, 이미지 1개 중 1개
    • Lift the bottom of the keyboard assembly to reveal the internal components of the device.

  7. HP Chromebook 11 G4 SD Card Reader Replacement: 7 단계, 이미지 3개 중 1개 HP Chromebook 11 G4 SD Card Reader Replacement: 7 단계, 이미지 3개 중 2개 HP Chromebook 11 G4 SD Card Reader Replacement: 7 단계, 이미지 3개 중 3개
    • Use the pointed end of the spudger to flip up the black tabs on the two ZIF connectors located on the motherboard.

    • Disconnect the ribbon cables from the motherboard by gently sliding them out of their sockets.

  8. HP Chromebook 11 G4 SD Card Reader Replacement: 8 단계, 이미지 1개 중 1개
    • Remove the keyboard assembly by lifting it off the laptop base.

  9. HP Chromebook 11 G4 SD Card Reader Replacement, SD Card Reader: 9 단계, 이미지 3개 중 1개 HP Chromebook 11 G4 SD Card Reader Replacement, SD Card Reader: 9 단계, 이미지 3개 중 2개 HP Chromebook 11 G4 SD Card Reader Replacement, SD Card Reader: 9 단계, 이미지 3개 중 3개
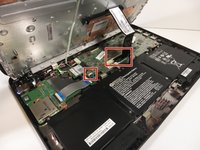
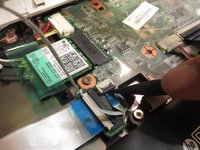
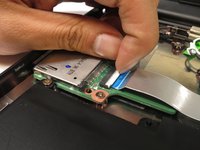
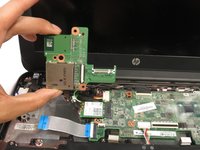
    • Flip up the flap on the ZIP connector with your finger.

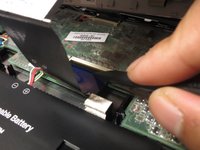
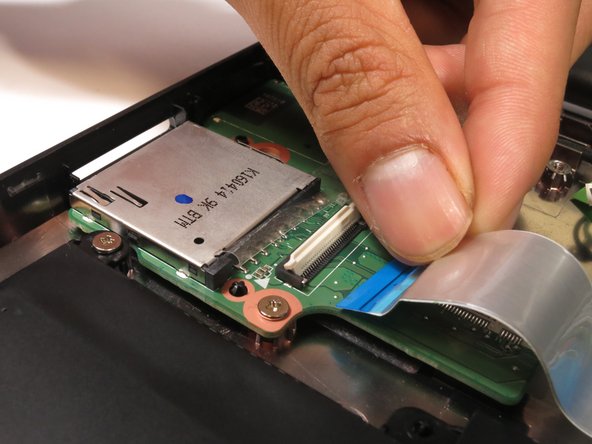
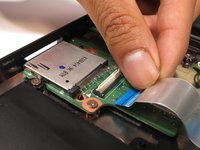
    • Gently pull out the ribbon cable.

  10. HP Chromebook 11 G4 SD Card Reader Replacement: 10 단계, 이미지 2개 중 1개 HP Chromebook 11 G4 SD Card Reader Replacement: 10 단계, 이미지 2개 중 2개
    • Remove the two 4 mm Phillips #1 screws.

  11. HP Chromebook 11 G4 SD Card Reader Replacement: 11 단계, 이미지 2개 중 1개 HP Chromebook 11 G4 SD Card Reader Replacement: 11 단계, 이미지 2개 중 2개
    • Lift the ribbon cable back and out of the way.

    • Pull out the SD card reader.

결론

To reassemble your device, follow these instructions in reverse order.

다른 2명이 해당 안내서를 완성하였습니다.

작성자

4다른 기여자 명과 함께

Jair Herrera

회원 가입일: 04/26/17

694 평판

안내서 4개를 작성함

0가이드 댓글

댓글 쓰기

조회 통계:

지난 24시간: 0

지난 7일: 2

지난 30일: 17

전체 시간: 1,358