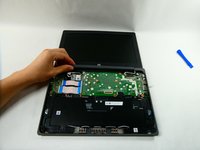
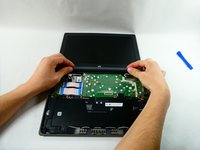
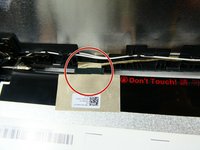
주요 콘텐츠로 건너뛰기

HP Chromebook 11 G8 EE Screen Replacement

필요한 것

  1. HP Chromebook 11 G8 EE Screen Replacement, Keyboard & Touchpad Assembly: 1 단계, 이미지 1/1
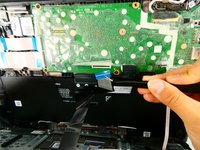
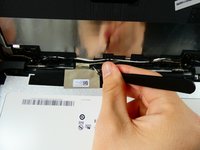
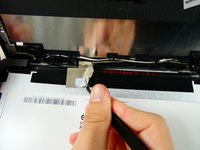
    • Use a Phillips #1 screwdriver to remove:

    • Four 7 mm screws.

    • Two 8 mm screws.

  2. HP Chromebook 11 G8 EE Screen Replacement: 2 단계, 이미지 1/2 HP Chromebook 11 G8 EE Screen Replacement: 2 단계, 이미지 2/2
    • Flip the device over and open the lid.

    • Use a plastic opening tool to pry the keyboard assembly away from the bottom case, prying around the perimeter until it fully separates.

    • Lift the keyboard assembly from the laptop towards you, away from the screen.

  3. HP Chromebook 11 G8 EE Screen Replacement: 3 단계, 이미지 1/3 HP Chromebook 11 G8 EE Screen Replacement: 3 단계, 이미지 2/3 HP Chromebook 11 G8 EE Screen Replacement: 3 단계, 이미지 3/3
    이 단계에 사용된 도구:
    Tweezers
    $4.99
    구매
    • Lift the keyboard ribbon lock bar and use tweezers to disconnect the keyboard ribbon from the motherboard.

    • Lift the lock bar and use tweezers to remove the touchpad ribbon.

    • Remove the keyboard.

  4. HP Chromebook 11 G8 EE Screen Replacement, Bezel: 4 단계, 이미지 1/2 HP Chromebook 11 G8 EE Screen Replacement, Bezel: 4 단계, 이미지 2/2
    • Using your hands, pry off the hinge cover by lifting it.

  5. HP Chromebook 11 G8 EE Screen Replacement: 5 단계, 이미지 1/3 HP Chromebook 11 G8 EE Screen Replacement: 5 단계, 이미지 2/3 HP Chromebook 11 G8 EE Screen Replacement: 5 단계, 이미지 3/3
    • Using the opening tool, pry the bezel away from the top case.

    • It requires a bit of force; you aren't going to break it!

  6. HP Chromebook 11 G8 EE Screen Replacement: 6 단계, 이미지 1/1
    • Pull the bezel toward you.

    • Peel it away from the screen gently.

  7. HP Chromebook 11 G8 EE Screen Replacement: 7 단계, 이미지 1/1
    • Completely remove the bezel.

  8. HP Chromebook 11 G8 EE Screen Replacement, Screen: 8 단계, 이미지 1/1
    • Remove the four 3.5 mm screws with a Phillips #1 screwdriver.

  9. HP Chromebook 11 G8 EE Screen Replacement: 9 단계, 이미지 1/1
    • Flip the screen toward you.

  10. HP Chromebook 11 G8 EE Screen Replacement: 10 단계, 이미지 1/3 HP Chromebook 11 G8 EE Screen Replacement: 10 단계, 이미지 2/3 HP Chromebook 11 G8 EE Screen Replacement: 10 단계, 이미지 3/3
    이 단계에 사용된 도구:
    Tweezers
    $4.99
    구매
    • Use tweezers to peel away the black tape holding the connector.

  11. HP Chromebook 11 G8 EE Screen Replacement: 11 단계, 이미지 1/3 HP Chromebook 11 G8 EE Screen Replacement: 11 단계, 이미지 2/3 HP Chromebook 11 G8 EE Screen Replacement: 11 단계, 이미지 3/3
    • Use the tweezers to pull away the tan tape.

    • You should see the colored wires of the connector.

  12. HP Chromebook 11 G8 EE Screen Replacement: 12 단계, 이미지 1/2 HP Chromebook 11 G8 EE Screen Replacement: 12 단계, 이미지 2/2
    • Using the tweezers, lift up the small red latch on the connector.

    • Pull off the connector.

  13. HP Chromebook 11 G8 EE Screen Replacement: 13 단계, 이미지 1/1
    • Remove the screen.

결론

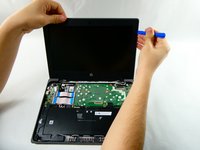
To reassemble your device, follow these instructions in reverse order.

Isabella Brown

회원 가입일: 10/25/22

312 평판

안내서 2개 작성하였습니다

UMass Dartmouth, Team 4-2, Sinclaire Fall 2022 UMass Dartmouth, Team 4-2, Sinclaire Fall 2022 회원

UMASSD-SINCLAIRE-F22S4G2

5 회원들

안내서 13개 작성하였습니다

댓글 0개

댓글 쓰기

조회 통계:

24 시간 전: 1

7일 전: 20

30일 전: 103

전체 시간: 746