주요 콘텐츠로 건너뛰기

HP Chromebook 11A G8 EE Screen Replacement

필요한 것

  1. HP Chromebook 11A G8 EE Screen Replacement, Keyboard Assembly: 1 단계, 이미지 2개 중 1개 HP Chromebook 11A G8 EE Screen Replacement, Keyboard Assembly: 1 단계, 이미지 2개 중 2개
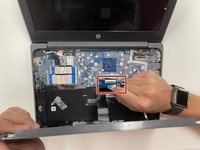
    • On the bottom of the laptop, remove four 7 mm screw using a Phillips #1 screwdriver.

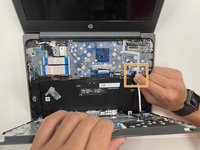
    • Using the Phillips #1 screwdriver, remove the two remaining 8 mm screws by the hinges.

  2. HP Chromebook 11A G8 EE Screen Replacement: 2 단계, 이미지 3개 중 1개 HP Chromebook 11A G8 EE Screen Replacement: 2 단계, 이미지 3개 중 2개 HP Chromebook 11A G8 EE Screen Replacement: 2 단계, 이미지 3개 중 3개
    • Flip the laptop over and open up the display.

    • Using the iFixit opening tool, carefully separate the palm rest from the bottom cover by working your way around the perimeter and prying it up.

    • You will hear an audible and tactile click or pop letting you know that you have unclipped a portion of the palm rest from the base enclosure.

    • Lift the palm rest of the laptops towards you, away from the screen.

  3. HP Chromebook 11A G8 EE Screen Replacement: 3 단계, 이미지 2개 중 1개 HP Chromebook 11A G8 EE Screen Replacement: 3 단계, 이미지 2개 중 2개
    • Carefully, lift the keyboard ribbon lock and disconnect the keyboard ribbon from the motherboard.

    • Disconnect the touchpad ribbon from the motherboard, and remove top cover.

    • Remove the keyboard.

  4. HP Chromebook 11A G8 EE Screen Replacement, Bezel: 4 단계, 이미지 1개 중 1개
    • Pry the hinge cap off with your hands by lifting it up.

  5. HP Chromebook 11A G8 EE Screen Replacement: 5 단계, 이미지 1개 중 1개
    • Use the iFixit opening tool to pry the bezel up.

  6. HP Chromebook 11A G8 EE Screen Replacement: 6 단계, 이미지 1개 중 1개
    • Once you have pried away the bezel, pull it up towards you.

    • Peel it off gently from the screen.

  7. HP Chromebook 11A G8 EE Screen Replacement: 7 단계, 이미지 1개 중 1개
    • You are finished once the bezel is off of the device.

  8. HP Chromebook 11A G8 EE Screen Replacement, Screen: 8 단계, 이미지 1개 중 1개
    • Remove the four 3.5 mm screws with the Phillips #0 screwdriver.

  9. HP Chromebook 11A G8 EE Screen Replacement: 9 단계, 이미지 1개 중 1개
    • Flip the screen towards you.

  10. HP Chromebook 11A G8 EE Screen Replacement: 10 단계, 이미지 1개 중 1개
    이 단계에 사용된 도구:
    Tweezers
    $4.99
    • Once the screen is flipped down, use the tweezers to peel away the black tape holding down the connector.

  11. HP Chromebook 11A G8 EE Screen Replacement: 11 단계, 이미지 1개 중 1개
    • Next, peel away the tan tape, using the tweezers, exposing the screen connector.

  12. HP Chromebook 11A G8 EE Screen Replacement: 12 단계, 이미지 1개 중 1개
    • Using the tweezers, remove the connector by the latch attached to it.

  13. HP Chromebook 11A G8 EE Screen Replacement: 13 단계, 이미지 1개 중 1개
    • Finally, pull away the screen, to remove it from the device.

결론

To reassemble your device, follow these instructions in reverse order.

다른 8명이 해당 안내서를 완성하였습니다.

작성자

4다른 기여자 명과 함께

Kim Travers

회원 가입일: 09/03/21

553 평판

안내서 2개를 작성함

1가이드 댓글

Does IFixit Sell this screen? I am unable to source parts and this screen for these educational units by HP. I wish iFixit would also list the parts that are needed for the repairs and not just the tools they sell.

Glenn Silva - 답글

댓글 쓰기

조회 통계:

지난 24시간: 2

지난 7일: 25

지난 30일: 82

전체 시간: 4,483