주요 콘텐츠로 건너뛰기

HP Chromebook 11A G8 EE Touchpad Replacement

필요한 것

  1. HP Chromebook 11A G8 EE Touchpad Replacement, Keyboard Assembly: 1 단계, 이미지 1/2 HP Chromebook 11A G8 EE Touchpad Replacement, Keyboard Assembly: 1 단계, 이미지 2/2
    • On the bottom of the laptop, remove four 7 mm screw using a Phillips #1 screwdriver.

    • Using the Phillips #1 screwdriver, remove the two remaining 8 mm screws by the hinges.

  2. HP Chromebook 11A G8 EE Touchpad Replacement: 2 단계, 이미지 1/3 HP Chromebook 11A G8 EE Touchpad Replacement: 2 단계, 이미지 2/3 HP Chromebook 11A G8 EE Touchpad Replacement: 2 단계, 이미지 3/3
    • Flip the laptop over and open up the display.

    • Using the iFixit opening tool, carefully separate the palm rest from the bottom cover by working your way around the perimeter and prying it up.

    • You will hear an audible and tactile click or pop letting you know that you have unclipped a portion of the palm rest from the base enclosure.

    • Lift the palm rest of the laptops towards you, away from the screen.

  3. HP Chromebook 11A G8 EE Touchpad Replacement: 3 단계, 이미지 1/2 HP Chromebook 11A G8 EE Touchpad Replacement: 3 단계, 이미지 2/2
    • Carefully, lift the keyboard ribbon lock and disconnect the keyboard ribbon from the motherboard.

    • Disconnect the touchpad ribbon from the motherboard, and remove top cover.

    • Remove the keyboard.

  4. HP Chromebook 11A G8 EE Touchpad Replacement, Touchpad: 4 단계, 이미지 1/2 HP Chromebook 11A G8 EE Touchpad Replacement, Touchpad: 4 단계, 이미지 2/2
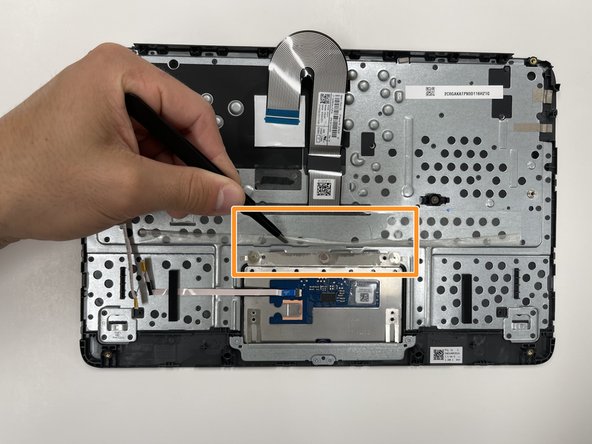
    • Using tweezers, carefully disconnect the touchpad board ribbon cable from the touchpad board.

    • Using tweezers, carefully peel back the clear sheet that covers the the touchpad board screws.

  5. HP Chromebook 11A G8 EE Touchpad Replacement: 5 단계, 이미지 1/2 HP Chromebook 11A G8 EE Touchpad Replacement: 5 단계, 이미지 2/2
    • Use the Phillips #0 screwdriver and remove the top three 1.6 mm screws from the touchpad.

    • Remove the four bottom 2 mm screws using the same Phillips #0 screwdriver.

  6. HP Chromebook 11A G8 EE Touchpad Replacement: 6 단계, 이미지 1/1
    • Lift the touchpad brackets off of the alignment pins on the top cover and remove.

  7. HP Chromebook 11A G8 EE Touchpad Replacement: 7 단계, 이미지 1/1
    • Using tweezers, carefully lift the touchpad board off of the board to remove.

결론

To reassemble your device, follow these instructions in reverse order.

다른 2명이 해당 안내서를 완성하였습니다.

Ella Portwood

회원 가입일: 09/03/21

684 평판

안내서 4개 작성하였습니다

University of Alabama, Team 2-1, Bedsole Fall 2021 University of Alabama, Team 2-1, Bedsole Fall 2021 회원

UA-BEDSOLE-F21S2G1

4 회원들

안내서 7개 작성하였습니다

댓글 0개

댓글 쓰기

조회 통계:

24 시간 전: 0

7일 전: 5

30일 전: 16

전체 시간: 407