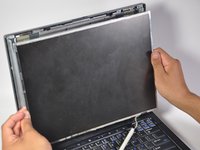
주요 콘텐츠로 건너뛰기

HP Compaq NC6120 Monitor Replacement

필요한 것

  1. HP Compaq NC6120 Monitor Replacement, Monitor: 1 단계, 이미지 1/2 HP Compaq NC6120 Monitor Replacement, Monitor: 1 단계, 이미지 2/2
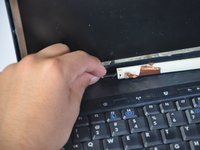
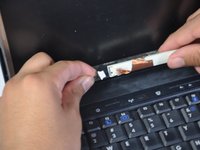
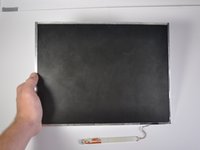
    • Locate and remove four black 5.1mm Phillips #1 screws from the left and right sides of the monitor.

  2. HP Compaq NC6120 Monitor Replacement: 2 단계, 이미지 1/3 HP Compaq NC6120 Monitor Replacement: 2 단계, 이미지 2/3 HP Compaq NC6120 Monitor Replacement: 2 단계, 이미지 3/3
    • Using a small spudger, remove the four black plastic covers from above the monitor, revealing screws underneath.

  3. HP Compaq NC6120 Monitor Replacement: 3 단계, 이미지 1/1
    • Remove the four screws that were just uncovered. They are 6.2mm 3.0 flathead screws.

  4. HP Compaq NC6120 Monitor Replacement: 4 단계, 이미지 1/1
    • Pry off the plastic case surrounding the monitor.

    • A spudger may be needed to pry off the case.

  5. HP Compaq NC6120 Monitor Replacement: 5 단계, 이미지 1/3 HP Compaq NC6120 Monitor Replacement: 5 단계, 이미지 2/3 HP Compaq NC6120 Monitor Replacement: 5 단계, 이미지 3/3
    • Remove the black and silver cable, located directly below the monitor.

    • Proceed to pull monitor approximately 10cm away from the back of the laptop case.

  6. HP Compaq NC6120 Monitor Replacement: 6 단계, 이미지 1/2 HP Compaq NC6120 Monitor Replacement: 6 단계, 이미지 2/2
    • Remove the grey cable (with yellow tip) connecting the monitor to the back plastic casing and the monitor will be free from the rest of the laptop.

결론

To reassemble your device, follow these instructions in reverse order.

다른 한 분이 해당 안내서를 완성하였습니다.

Mateo Cuellar

회원 가입일: 04/08/15

601 평판

안내서 4개 작성하였습니다

Cal Poly, Team 17-4, Forte Spring 2015 Cal Poly, Team 17-4, Forte Spring 2015 회원

CPSU-FORTE-S15S17G4

3 회원들

안내서 6개 작성하였습니다

댓글 0개

댓글 쓰기

조회 통계:

24 시간 전: 0

7일 전: 0

30일 전: 5

전체 시간: 1,404