주요 콘텐츠로 건너뛰기

HP Elite X2 1013 G3 Battery Replacement

필요한 것

  1. HP Elite X2 1013 G3 Battery Replacement, Screen: 1 단계, 이미지 1/1
    • Flip the device over so the base is facing the ceiling.

    • Lift up the tablet stand.

    • Remove the four 2 mm screws from the tablet using a T5 Torx screwdriver.

  2. HP Elite X2 1013 G3 Battery Replacement: 2 단계, 이미지 1/2 HP Elite X2 1013 G3 Battery Replacement: 2 단계, 이미지 2/2
    • Flip the tablet over with the screen facing upwards.

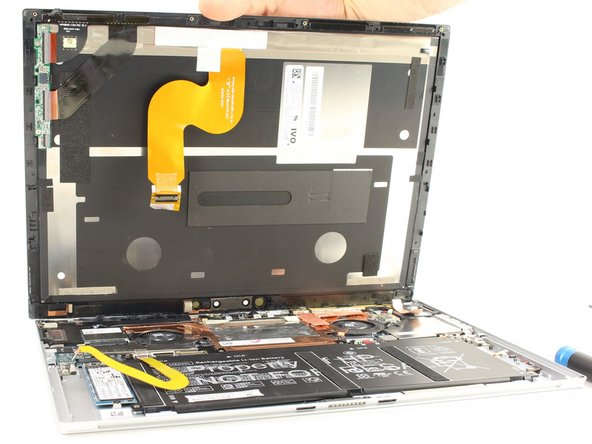
    • Place the suction handle in the center of the screen and slowly lift off the screen until it is at a 30 degree angle, starting by gently prying up the bottom.

    • Do not pull the screen beyond a 30 degree angle. Additional internal components must be disconnected first.

  3. HP Elite X2 1013 G3 Battery Replacement: 3 단계, 이미지 1/2 HP Elite X2 1013 G3 Battery Replacement: 3 단계, 이미지 2/2
    • With the screen lifted at a 30 degree angle, gently disconnect the yellow ribbon cable at the end connected to the screen.

    • Gently disconnect the orange ribbon cable at the end connected to the bottom plate.

  4. HP Elite X2 1013 G3 Battery Replacement: 4 단계, 이미지 1/2 HP Elite X2 1013 G3 Battery Replacement: 4 단계, 이미지 2/2
    • Remove the screen from the tablet.

  5. HP Elite X2 1013 G3 Battery Replacement, Battery: 5 단계, 이미지 1/1
    • Use the Phillips #00 screwdriver to remove the six 2 mm screws.

    • Gently disconnect the two connectors.

  6. HP Elite X2 1013 G3 Battery Replacement: 6 단계, 이미지 1/1
    • Lift the battery out of the housing.

결론

To reassemble your device, follow these instructions in reverse order.

다른 한 분이 해당 안내서를 완성하였습니다.

Asmita Sharma

회원 가입일: 04/18/19

186 평판

안내서 1개 작성함

Cal Poly, Team S9-G12, Maness Spring 2019 Cal Poly, Team S9-G12, Maness Spring 2019 회원

CPSU-MANESS-S19S9G12

4 회원들

안내서 5개 작성하였습니다

댓글 0개

댓글 쓰기

조회 통계:

24 시간 전: 0

7일 전: 6

30일 전: 51

전체 시간: 2,418