주요 콘텐츠로 건너뛰기

HP EliteBook 820 G3 Hard Drive Replacement

필요한 것

  1. HP EliteBook 820 G3 Hard Drive Replacement, Back Cover: 1 단계, 이미지 2개 중 1개 HP EliteBook 820 G3 Hard Drive Replacement, Back Cover: 1 단계, 이미지 2개 중 2개
    • Remove the eleven 3 mm screws with a Phillips #00 screwdriver.

    • Keep track of where the screw covers were attached to as there are four different sizes.

  2. HP EliteBook 820 G3 Hard Drive Replacement: 2 단계, 이미지 2개 중 1개 HP EliteBook 820 G3 Hard Drive Replacement: 2 단계, 이미지 2개 중 2개
    • Remove the SD card blank and the single 3 mm screw beneath it using a Phillips #00 screwdriver.

    • Lift off the back cover with your hands.

  3. HP EliteBook 820 G3 Hard Drive Replacement, Hard Drive: 3 단계, 이미지 2개 중 1개 HP EliteBook 820 G3 Hard Drive Replacement, Hard Drive: 3 단계, 이미지 2개 중 2개
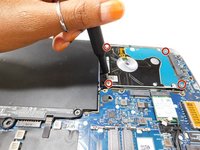
    • Remove the four 3 mm screws from the hard drive using a Phillips #00 screwdriver.

  4. HP EliteBook 820 G3 Hard Drive Replacement: 4 단계, 이미지 2개 중 1개 HP EliteBook 820 G3 Hard Drive Replacement: 4 단계, 이미지 2개 중 2개
    • Slide the hard drive away from the system board connector to disconnect the hard drive from the system board.

    • Place it in a static dissipative bag.

결론

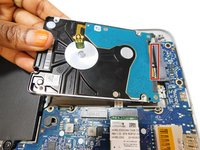
To reassemble your device, follow these instructions in reverse order.

다른 한 분이 해당 안내서를 완성하였습니다.

작성자

3다른 기여자 명과 함께

Sarah Bisimwa

회원 가입일: 08/25/22

343 평판

안내서 2개를 작성함

Gateway, Team 1-1, Class Fall 2022 Gateway, Team 1-1, Class Fall 2022 회원

GCC-CLASS-F22S1G1

4 회원들

안내서 8개를 작성함

0가이드 댓글

댓글 쓰기

조회 통계:

지난 24시간: 1

지난 7일: 7

지난 30일: 40

전체 시간: 2,135