소개
Warning: There may be multiple iterations of this laptop, and each uses a different battery model. Before you purchase a replacement battery, open the back cover up to visually confirm which battery replacement you should purchase.
The battery within a laptop is the most important component to having a functioning laptop. If you are experiencing a poor battery lifetime in your HP Elitebook 840 G5, then please follow the step-by-step replacement guide for the battery below. As this replacement requires the backing to be completely removed, use caution during the replacement as the electrical components inside of your laptop will be exposed. Also ensure to carefully remove any connecting wires by the heads-not the wires themselves. This will prevent any wires from breaking during the replacement.
필요한 것
-
-
Use a Phillips #1 screwdriver to undo the five screws. The top three screws are 10 mm and the two side screws are 7 mm.
-
Unscrew the bottom three screws using the same screwdriver.
-
-
-
Turn computer so that the hinged side is facing up.
-
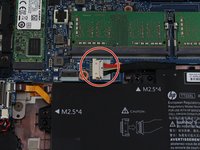
Use the plastic opening tool to pry open the back plate.
-
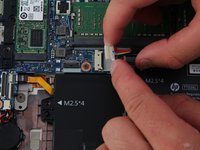
Drag the plastic opening tool along the edge from left to right and use a second opening tool to pry open the top right corner.
-
Repeat the 3rd step for the other side.
-
Repeat on Left and Right sides of the system. There are two points in the middle (on the left and right sides of the center screw) that will release with slight lifting pressure.
-
-
-
-
Remove the 4mm screws that are fastened on the battery with your T9 Torx screwdriver.
-


To reassemble your device, follow these instructions in reverse order.
To reassemble your device, follow these instructions in reverse order.
다른 28명이 해당 안내서를 완성하였습니다.
팀

Cal Poly, Team S25-G13, Maness Spring 2018 Cal Poly, Team S25-G13, Maness Spring 2018 회원
CPSU-MANESS-S18S25G13
4 회원들
안내서 18개를 작성함
댓글 7개
Unfortunately, the TR9 Torx Security Screwdriver did not work on my Elitebook 840 G5. It is unclear if this is due to the battery model. Mine is a SS03XL battery.
Same problem, i ordered battery based on this, but this model have SS03XL battery un TT03XL battery is for Hp EliteBook 850 G5 G6, ZBook 15U G5 G6 Series
Replaced the battery with the correct SS03XL battery sold from here and have had zero luck in getting it to charge. Updated bios, firmware, everything under the sun, drained the system of residual power. Disconnected CMOS battery because I'm reaching for anything at this point. Bios diag options doesn't even list battery diag as an option. Battery is not detected. I'm at a loss, help pls.