주요 콘텐츠로 건너뛰기

HP EliteBook x360 830 G6 Cooling System Replacement

필요한 것

  1. HP EliteBook x360 830 G6 Cooling System Replacement, Unfasten the back cover: 1 단계, 이미지 1/1
    • For your safety, discharge the battery below 25% and power down your device before disassembly.

    • Use a Torx T5 screwdriver to loosen the five captive screws holding the back cover.

  2. HP EliteBook x360 830 G6 Cooling System Replacement, Release the clips: 2 단계, 이미지 1/2 HP EliteBook x360 830 G6 Cooling System Replacement, Release the clips: 2 단계, 이미지 2/2
    • Insert an opening pick between a corner of the back corner and the chassis, near a hinge.

    • Pry upward to release the retaining clips.

    • These clips will make an audible click when they release.

    • Repeat this process for the opposite corner.

  3. HP EliteBook x360 830 G6 Cooling System Replacement, Release the remaining clips: 3 단계, 이미지 1/2 HP EliteBook x360 830 G6 Cooling System Replacement, Release the remaining clips: 3 단계, 이미지 2/2
    • Insert your opening pick between the back cover and chassis, along the edge of the cover between the hinges.

    • Pry up to release the additional retaining clips.

  4. HP EliteBook x360 830 G6 Cooling System Replacement, Remove the back cover: 4 단계, 이미지 1/3 HP EliteBook x360 830 G6 Cooling System Replacement, Remove the back cover: 4 단계, 이미지 2/3 HP EliteBook x360 830 G6 Cooling System Replacement, Remove the back cover: 4 단계, 이미지 3/3
    • Grab the cover by the corners next to the hinges.

    • Swing the cover open and away from you.

    • If the back cover feels stuck to the chassis, use an opening pick to release remaining clips around the perimeter of the back cover.

    • Lift and remove the back cover from the laptop body.

  5. HP EliteBook x360 830 G6 Cooling System Replacement, Disconnect the battery: 5 단계, 이미지 1/3 HP EliteBook x360 830 G6 Cooling System Replacement, Disconnect the battery: 5 단계, 이미지 2/3 HP EliteBook x360 830 G6 Cooling System Replacement, Disconnect the battery: 5 단계, 이미지 3/3
    • Use the point of a spudger to push the sides of the battery connector out of its socket.

    • Push on alternate sides to "walk" the connector out.

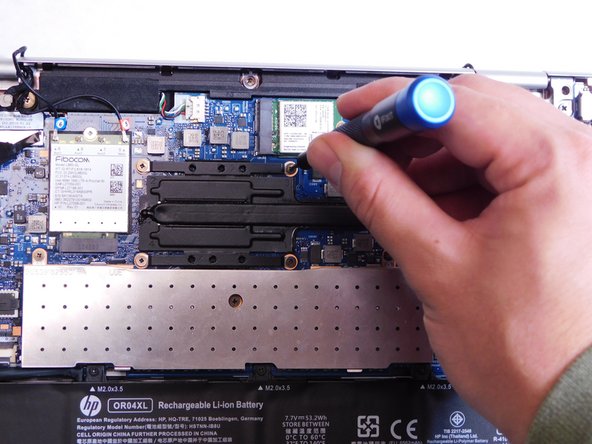
  6. HP EliteBook x360 830 G6 Cooling System Replacement, Cooling System: 6 단계, 이미지 1/3 HP EliteBook x360 830 G6 Cooling System Replacement, Cooling System: 6 단계, 이미지 2/3 HP EliteBook x360 830 G6 Cooling System Replacement, Cooling System: 6 단계, 이미지 3/3
    • Using the Phillips #0 screwdriver, remove the seven 3 mm screws from the cooling system.

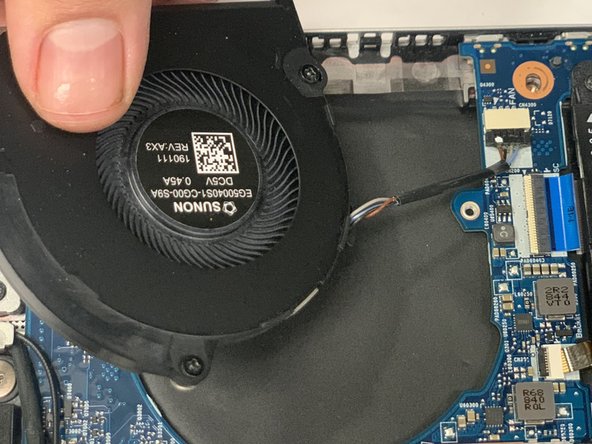
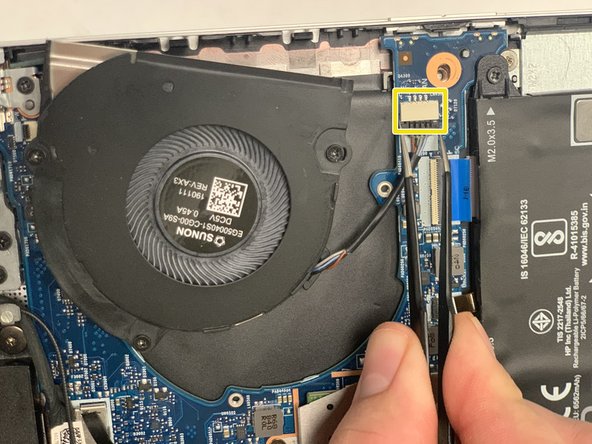
  7. HP EliteBook x360 830 G6 Cooling System Replacement: 7 단계, 이미지 1/3 HP EliteBook x360 830 G6 Cooling System Replacement: 7 단계, 이미지 2/3 HP EliteBook x360 830 G6 Cooling System Replacement: 7 단계, 이미지 3/3
    이 단계에 사용된 도구:
    Tweezers
    $4.99
    구매
    • Remove the three 3mm captive screws from the fan using the Philips 0 screwdriver.

    • Using needle nose tweezers, gently grab the base of the connection and pull to disconnect.

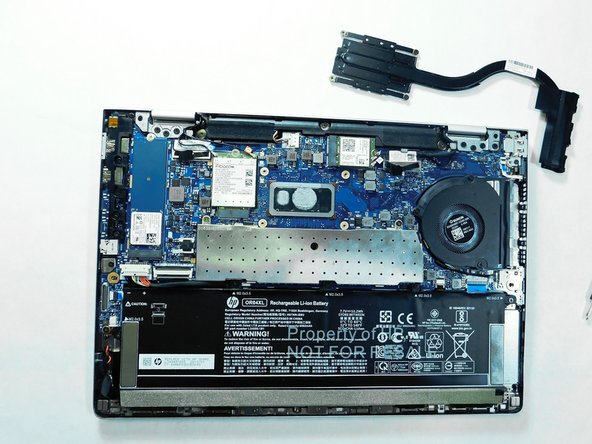
  8. HP EliteBook x360 830 G6 Cooling System Replacement: 8 단계, 이미지 1/1
    • Separate the fan and cooling system from the motherboard.

결론

To reassemble your device, follow these instructions in reverse order.

Take your e-waste to an R2 or e-Stewards certified recycler.

Repair didn’t go as planned? Try some basic troubleshooting, or ask our HP EliteBook community for help.

Bukari

회원 가입일: 09/01/21

97 평판

안내서 1개 작성함

Gateway, Team 1-2, Saknee Fall 2021 Gateway, Team 1-2, Saknee Fall 2021 회원

GCC-SAKNEE-F21S1G2

4 회원들

안내서 6개 작성하였습니다

댓글 0개

댓글 쓰기

조회 통계:

24 시간 전: 3

7일 전: 6

30일 전: 31

전체 시간: 528