주요 콘텐츠로 건너뛰기

HP Elitebook 840 G1 Motherboard Replacement

필요한 것

  1. HP Elitebook 840 G1 Motherboard Replacement, Battery: 1 단계, 이미지 1/1
    • Working on your device while it is turned on may result in electric shock. Make sure to shut down and unplug your device before you begin.

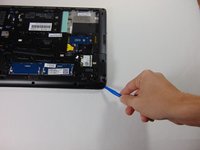
    • Slide the latch, to the right, away from the lock symbol.

    • Slide the cover away from the latch to remove it.

  2. HP Elitebook 840 G1 Motherboard Replacement: 2 단계, 이미지 1/1
    • Once the cover is removed you will be able to see the battery and the two latches that hold it in place.

    • The two latches should be pulled back, one of which is spring loaded and must be held in place in order to remove the battery.

  3. HP Elitebook 840 G1 Motherboard Replacement: 3 단계, 이미지 1/1
    • Battery should easily be lifted up and out.

  4. HP Elitebook 840 G1 Motherboard Replacement, RAM: 4 단계, 이미지 1/1
    이 단계에 사용된 도구:
    Anti-Static Wrist Strap
    $7.95
    구매
    • Identify the RAM and the pull tabs that will be used in the next step.

    • Always use an anti-static wrist strap when working on a computer.

  5. HP Elitebook 840 G1 Motherboard Replacement: 5 단계, 이미지 1/1
    • Pull back the two tabs on either side of the RAM this will allow the RAM to be removed.

    • When handling a memory module, use care to prevent touching the memory chips on the board. Touching the memory chips could damage or destroy the memory.

  6. HP Elitebook 840 G1 Motherboard Replacement: 6 단계, 이미지 1/1
    • Pull the RAM stick gently out and up once the tabs have been pulled to the side.

  7. HP Elitebook 840 G1 Motherboard Replacement, Hard Drive: 7 단계, 이미지 1/2 HP Elitebook 840 G1 Motherboard Replacement, Hard Drive: 7 단계, 이미지 2/2
    • Loosen the four Phillips screws securing the hard drive.

    • These screws will stay captive to the plastic hard drive bracket.

  8. HP Elitebook 840 G1 Motherboard Replacement: 8 단계, 이미지 1/1
    • Grab the pull tab on the hard drives plastic casing and pull it out and to the side.

    • Make sure all screws have been properly loosened and are no longer connected at the bottom before doing this step.

    • Remove the 2.5" hard drive from the plastic bracket.

  9. HP Elitebook 840 G1 Motherboard Replacement, Heatsink and Fan: 9 단계, 이미지 1/1
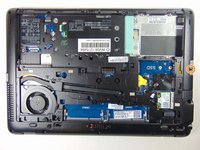
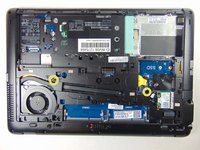
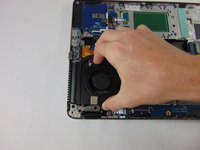
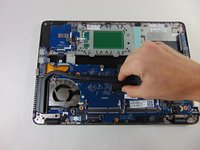
    • In order to take out the fan and heatsink the plastic cover must first be taken off.

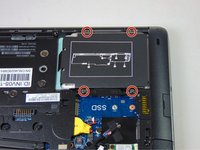
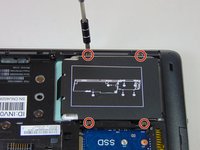
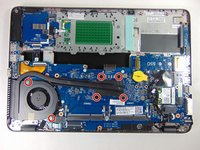
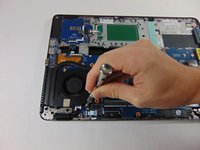
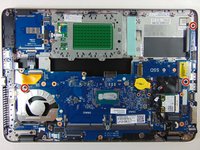
    • Remove the eight 2 mm Phillips #1 screws.

  10. HP Elitebook 840 G1 Motherboard Replacement: 10 단계, 이미지 1/1
    • Remove SD card by sliding it out.

  11. HP Elitebook 840 G1 Motherboard Replacement: 11 단계, 이미지 1/3 HP Elitebook 840 G1 Motherboard Replacement: 11 단계, 이미지 2/3 HP Elitebook 840 G1 Motherboard Replacement: 11 단계, 이미지 3/3
    • Remove the thirteen 6 mm Torx T8 screws.

    • Some screws have plastic covers over them that need to be pried out before the screws can be removed.

    • Remove the five Torx M2.5x5 screws.

    • Remove the single 7 mm Phillips #1 screw.

    • Loosen the two Phillips #1 screws. These screws will remain captive to the device.

  12. HP Elitebook 840 G1 Motherboard Replacement: 12 단계, 이미지 1/2 HP Elitebook 840 G1 Motherboard Replacement: 12 단계, 이미지 2/2
    • Using the plastic opening tools, remove the plastic cover by beginning at one of the corners and prying it up.

  13. HP Elitebook 840 G1 Motherboard Replacement: 13 단계, 이미지 1/2 HP Elitebook 840 G1 Motherboard Replacement: 13 단계, 이미지 2/2
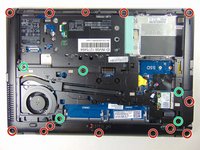
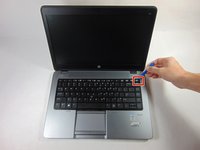
    • Use the plastic opening tools to remove the keyboard, starting at one of the top corners. You need to lift the top side and then takeing it out moving the keyboard towards the screen.

    • Once the keyboard is removed, detach the ribbons connecting the keyboard to the laptop by prying the small tab and sliding the ribbon out.

  14. HP Elitebook 840 G1 Motherboard Replacement: 14 단계, 이미지 1/2 HP Elitebook 840 G1 Motherboard Replacement: 14 단계, 이미지 2/2
    • Loosen the six Phillips #1 screws. These will remain captive to the heatsink.

  15. HP Elitebook 840 G1 Motherboard Replacement: 15 단계, 이미지 1/1
    • Use the plastic opening tools to remove the tape covering the wires connected from the fan to the motherboard.

    • Disconnect the fan by sliding the wire out.

  16. HP Elitebook 840 G1 Motherboard Replacement: 16 단계, 이미지 1/2 HP Elitebook 840 G1 Motherboard Replacement: 16 단계, 이미지 2/2
    • Remove the fan by lifting it up and sliding it out.

    • Remove the heat sink by lifting it up and sliding it out.

  17. HP Elitebook 840 G1 Motherboard Replacement, Motherboard: 17 단계, 이미지 1/1
    • Disconnect the two antenna cables.

    • They are labeled as 1 and 2 and should go back to the same place when put back.

  18. HP Elitebook 840 G1 Motherboard Replacement: 18 단계, 이미지 1/1
    • Remove the single 3 mm Phillips #1 screw securing the wireless card.

  19. HP Elitebook 840 G1 Motherboard Replacement: 19 단계, 이미지 1/2 HP Elitebook 840 G1 Motherboard Replacement: 19 단계, 이미지 2/2
    • Remove the three 4 mm Phillips #1 screws.

    • Remove the single 2 mm Phillips #1 screw.

  20. HP Elitebook 840 G1 Motherboard Replacement: 20 단계, 이미지 1/1
    • Remove both ribbons marked.

    • Before removing the ribbon pry the small black tabs that seat them.

  21. HP Elitebook 840 G1 Motherboard Replacement: 21 단계, 이미지 1/1
    • Pry the grey plastic tab from the orange tab to free it.

    • Repeat for the clear plastic tab.

  22. HP Elitebook 840 G1 Motherboard Replacement: 22 단계, 이미지 1/1
    • Disconnect the cables by taking off the tape and getting them out from under the plastic.

  23. HP Elitebook 840 G1 Motherboard Replacement: 23 단계, 이미지 1/1
    • Remove ribbon cable connected to the motherboard.

    • Before removing ribbon pry the small white tab that seats the ribbon.

  24. HP Elitebook 840 G1 Motherboard Replacement: 24 단계, 이미지 1/1
    • Disconnect plastic port.

  25. HP Elitebook 840 G1 Motherboard Replacement: 25 단계, 이미지 1/1
    • Remove black tape near the edge of the motherboard.

  26. HP Elitebook 840 G1 Motherboard Replacement: 26 단계, 이미지 1/1
    • The motherboard can now be lifted up easily, if any snagging occurs make sure everything was disconnected properly before continuing.

    • When reassembly ensure nothing is stuck under the motherboard.

결론

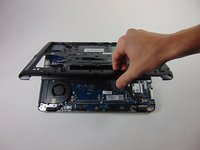
To reassemble your device, follow these instructions in reverse order.

다른 16명이 해당 안내서를 완성하였습니다.

Ashley Williams

회원 가입일: 08/27/15

2,398 평판

안내서 5개 작성하였습니다

USF Tampa, Team 5-3, Blackwell Fall 2015 USF Tampa, Team 5-3, Blackwell Fall 2015 회원

USFT-BLACKWELL-F15S5G3

4 회원들

안내서 19개 작성하였습니다

댓글 7개

thanks a lot for this good article ... could you please advice where to buy the replacement motherboard online ?

many thanks again

Siyamand Rashid - 답글

Alibaba or AliExpress is cheaper than eBay or Amazon but if in USA then buy from

Baba Callum -

Does someone know if we can replace a 745 g2 motherboard by another model like a 820 g2 or something like this ? Tks.

Rusterholtz - 답글

745 G2 can only be replaced with 840 G2.

While 725 G2 can only be replaced by 820 G2

Baba Callum -

How can i find this mother card

Heritier Habumugisha - 답글

댓글 쓰기

조회 통계:

24 시간 전: 2

7일 전: 9

30일 전: 56

전체 시간: 18,140