주요 콘텐츠로 건너뛰기

HP Elitebook 8460p Speaker Assembly Replacement

필요한 것

  1. HP Elitebook 8460p Speaker Assembly Replacement, Battery: 1 단계, 이미지 1/1
    • On the back of the computer, slide the left switch towards the outside of the laptop until you hear a click.

    what if it does not work,what does that mean?

    julia melrose - 답글

  2. HP Elitebook 8460p Speaker Assembly Replacement: 2 단계, 이미지 1/1
    • Slide the battery away from the switches until it can be lifted away from the laptop.

    • Lift the battery away from the laptop.

  3. HP Elitebook 8460p Speaker Assembly Replacement, Back Panel: 3 단계, 이미지 1/1
    • On the back of the laptop, slide the right switch toward the outside of the laptop until you hear a click.

  4. HP Elitebook 8460p Speaker Assembly Replacement: 4 단계, 이미지 1/1
    • Slide the back shell of the laptop away from the switches until it can be lifted up.

    • Lift the shell straight up.

  5. HP Elitebook 8460p Speaker Assembly Replacement, CPU Cooling Fan: 5 단계, 이미지 1/2 HP Elitebook 8460p Speaker Assembly Replacement, CPU Cooling Fan: 5 단계, 이미지 2/2
    • Attach an ESD strap to your wrist and to a ground.

    • Using a Phillips #0 bit, unscrew the two screws on opposite corners of the fan.

  6. HP Elitebook 8460p Speaker Assembly Replacement: 6 단계, 이미지 1/2 HP Elitebook 8460p Speaker Assembly Replacement: 6 단계, 이미지 2/2
    • Pull the fan straight up and to the side slightly.

  7. HP Elitebook 8460p Speaker Assembly Replacement: 7 단계, 이미지 1/2 HP Elitebook 8460p Speaker Assembly Replacement: 7 단계, 이미지 2/2
    • Disconnect the small electrical connector. Pry the edge up with your finger nails or using a small plastic pry tool.

  8. HP Elitebook 8460p Speaker Assembly Replacement: 8 단계, 이미지 1/1
    • Using a Phillips #0 bit, unscrew the six screws on the heat sink.

  9. HP Elitebook 8460p Speaker Assembly Replacement: 9 단계, 이미지 1/2 HP Elitebook 8460p Speaker Assembly Replacement: 9 단계, 이미지 2/2
    • Pry the inside edge up, pulling the entire assembly to the inside of the laptop, exposing the processor and graphics processor

    • Clean and replace the thermal paste on the processor if you have any thermal paste.

  10. HP Elitebook 8460p Speaker Assembly Replacement: 10 단계, 이미지 1/1
    • Blow compressed air through the vent from the outside and through the heat sink.

  11. HP Elitebook 8460p Speaker Assembly Replacement, Optical Drive: 11 단계, 이미지 1/3 HP Elitebook 8460p Speaker Assembly Replacement, Optical Drive: 11 단계, 이미지 2/3 HP Elitebook 8460p Speaker Assembly Replacement, Optical Drive: 11 단계, 이미지 3/3
    • Using a Phillips #0 bit, unscrew the one Phillips head screw.

    • Using a T2 Torx screwdriver, remove the two 8.0mm Torx screws.

  12. HP Elitebook 8460p Speaker Assembly Replacement: 12 단계, 이미지 1/2 HP Elitebook 8460p Speaker Assembly Replacement: 12 단계, 이미지 2/2
    • With your fingernail, pry the edge of the optical drive away from the chassis of the laptop and pull it straight out.

  13. HP Elitebook 8460p Speaker Assembly Replacement: 13 단계, 이미지 1/3 HP Elitebook 8460p Speaker Assembly Replacement: 13 단계, 이미지 2/3 HP Elitebook 8460p Speaker Assembly Replacement: 13 단계, 이미지 3/3
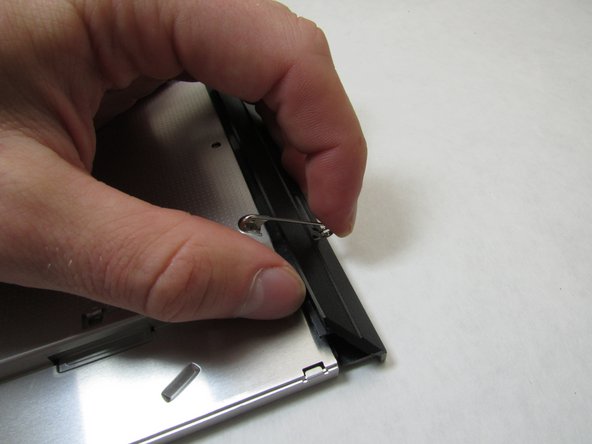
    • Skip this step if you are removing the optical drive to fix or replace a different component in the laptop.

    • Using a small paper clip, push the paper clip straight in to open the optical drive.

  14. HP Elitebook 8460p Speaker Assembly Replacement: 14 단계, 이미지 1/3 HP Elitebook 8460p Speaker Assembly Replacement: 14 단계, 이미지 2/3 HP Elitebook 8460p Speaker Assembly Replacement: 14 단계, 이미지 3/3
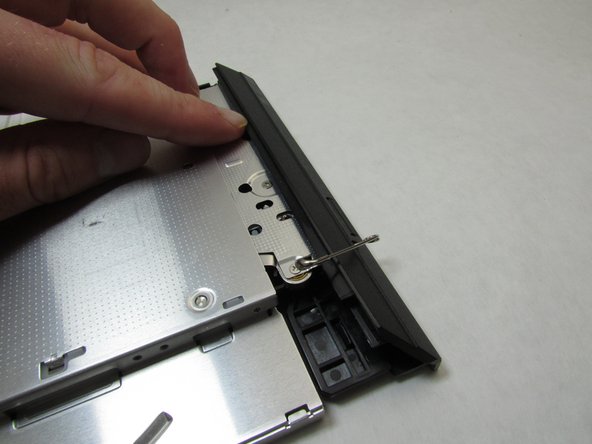
    • Skip this step if you are removing the optical drive to fix or replace a different component in the laptop.

    • Using a small point, pop the tab out.

    • Rotate the plastic cover clockwise to release the tab on the left hand side of the optical drive.

  15. HP Elitebook 8460p Speaker Assembly Replacement, Hard Drive: 15 단계, 이미지 1/2 HP Elitebook 8460p Speaker Assembly Replacement, Hard Drive: 15 단계, 이미지 2/2
    • Attach an ESD strap to your wrist and to a ground.

    • Pull the tab with the small engraved arrow up and towards the inside of the laptop.

  16. HP Elitebook 8460p Speaker Assembly Replacement: 16 단계, 이미지 1/2 HP Elitebook 8460p Speaker Assembly Replacement: 16 단계, 이미지 2/2
    • Using a Phillips #0 bit, unscrew the three screws that hold the hard drive assembly in place.

  17. HP Elitebook 8460p Speaker Assembly Replacement: 17 단계, 이미지 1/2 HP Elitebook 8460p Speaker Assembly Replacement: 17 단계, 이미지 2/2
    • Remove the silver metal cover by pulling straight up on the black tab.

  18. HP Elitebook 8460p Speaker Assembly Replacement: 18 단계, 이미지 1/1
    • Disconnect the hard drive by pulling the drive straight out to the left.

    • If replacing the hard drive, seat the new hard drive firmly in the connector.

  19. HP Elitebook 8460p Speaker Assembly Replacement, Speaker Assembly: 19 단계, 이미지 1/2 HP Elitebook 8460p Speaker Assembly Replacement, Speaker Assembly: 19 단계, 이미지 2/2
    • Using a Phillips #0 screwdriver, remove the two 3.0mm screws holding the speaker assembly in place.

  20. HP Elitebook 8460p Speaker Assembly Replacement: 20 단계, 이미지 1/1
    • Grasping one corner with two fingers, lift the speaker assembly up and out of the laptop.

  21. HP Elitebook 8460p Speaker Assembly Replacement: 21 단계, 이미지 1/3 HP Elitebook 8460p Speaker Assembly Replacement: 21 단계, 이미지 2/3 HP Elitebook 8460p Speaker Assembly Replacement: 21 단계, 이미지 3/3
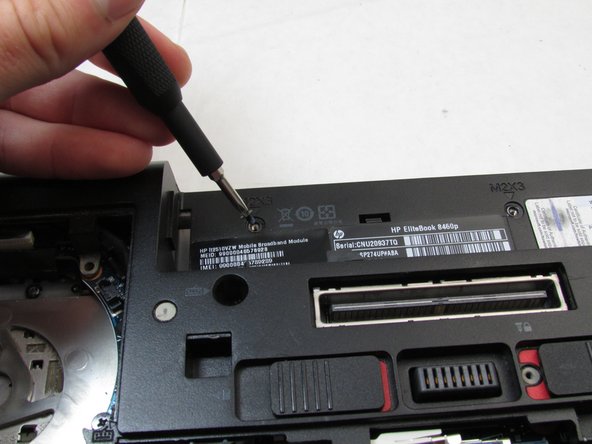
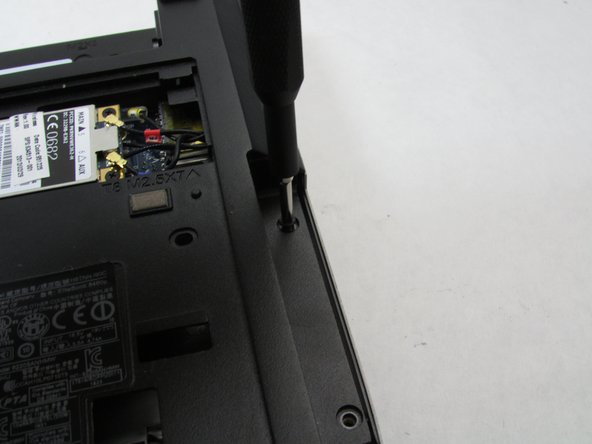
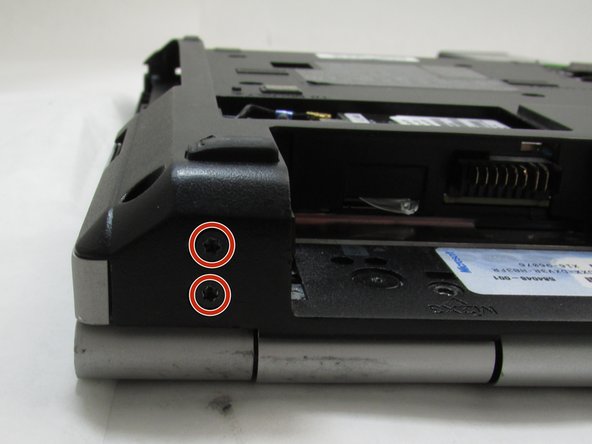
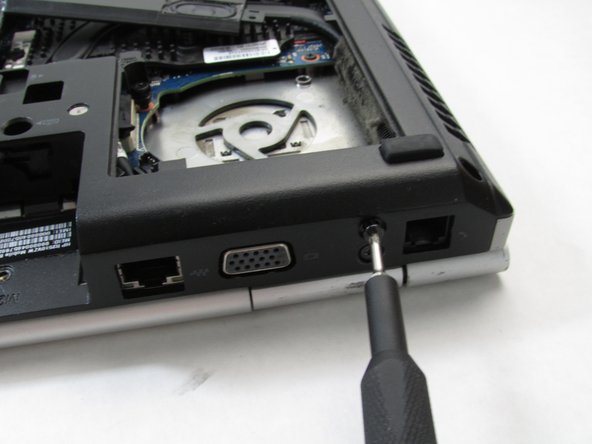
    • Using a T2 Torx screwdriver, remove the six 8.0mm Torx screws.

    • Four of the Torx screws are located on the four corners of the laptop and the other two are next to the hard drive assembly.

  22. HP Elitebook 8460p Speaker Assembly Replacement: 22 단계, 이미지 1/2 HP Elitebook 8460p Speaker Assembly Replacement: 22 단계, 이미지 2/2
    • Using a Phillips #0 screwdriver, unscrew the Phillips screw next to the fan assembly.

  23. HP Elitebook 8460p Speaker Assembly Replacement: 23 단계, 이미지 1/3 HP Elitebook 8460p Speaker Assembly Replacement: 23 단계, 이미지 2/3 HP Elitebook 8460p Speaker Assembly Replacement: 23 단계, 이미지 3/3
    • Using a Philips #0 screwdriver, unscrew the two Phillips screws next to the battery.

  24. HP Elitebook 8460p Speaker Assembly Replacement: 24 단계, 이미지 1/2 HP Elitebook 8460p Speaker Assembly Replacement: 24 단계, 이미지 2/2
    • Using a Phillips #0 screwdriver, remove the three 2.0mm Phillips screws underneath the battery.

  25. HP Elitebook 8460p Speaker Assembly Replacement: 25 단계, 이미지 1/2 HP Elitebook 8460p Speaker Assembly Replacement: 25 단계, 이미지 2/2
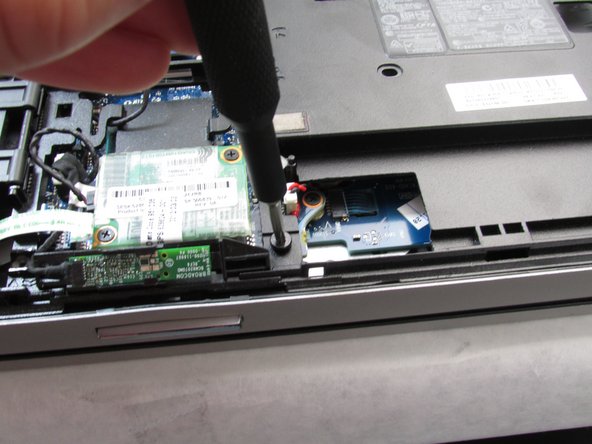
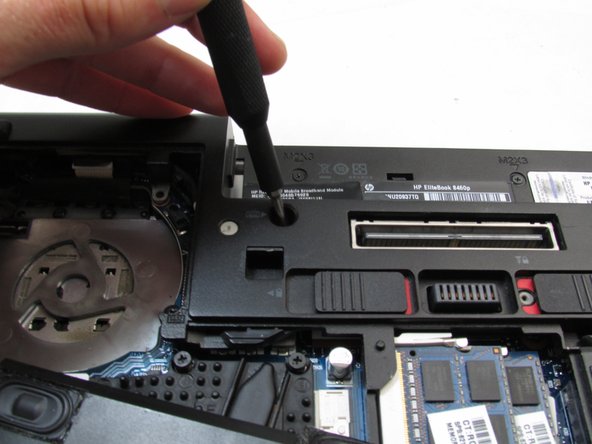
    • Using a Phillips #0 screwdriver, remove the two 3.0mm Phillips screws to the right of the optical drive slot

  26. HP Elitebook 8460p Speaker Assembly Replacement: 26 단계, 이미지 1/2 HP Elitebook 8460p Speaker Assembly Replacement: 26 단계, 이미지 2/2
    • Using a Phillips #0 screwdriver, remove the two 2.0mm Phillips screws underneath the hard drive assembly.

  27. HP Elitebook 8460p Speaker Assembly Replacement: 27 단계, 이미지 1/3 HP Elitebook 8460p Speaker Assembly Replacement: 27 단계, 이미지 2/3 HP Elitebook 8460p Speaker Assembly Replacement: 27 단계, 이미지 3/3
    • Using a T2 Torx screwdriver, remove the four 8.0mm Torx screws on the back side of the laptop.

  28. HP Elitebook 8460p Speaker Assembly Replacement: 28 단계, 이미지 1/3 HP Elitebook 8460p Speaker Assembly Replacement: 28 단계, 이미지 2/3 HP Elitebook 8460p Speaker Assembly Replacement: 28 단계, 이미지 3/3
    • Using a spudger, work your way around the edge of the laptop popping the plastic chassis up.

  29. HP Elitebook 8460p Speaker Assembly Replacement: 29 단계, 이미지 1/2 HP Elitebook 8460p Speaker Assembly Replacement: 29 단계, 이미지 2/2
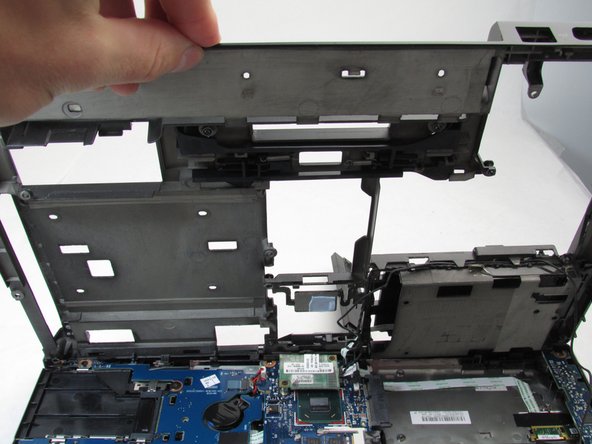
    • Lift the chassis up and detach the small connector between the hard drive and heat sink.

  30. HP Elitebook 8460p Speaker Assembly Replacement: 30 단계, 이미지 1/3 HP Elitebook 8460p Speaker Assembly Replacement: 30 단계, 이미지 2/3 HP Elitebook 8460p Speaker Assembly Replacement: 30 단계, 이미지 3/3
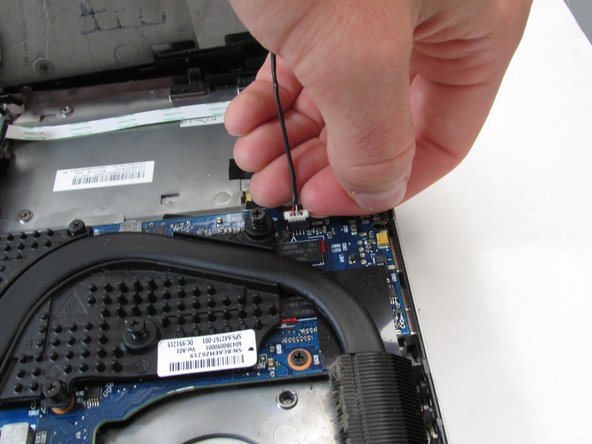
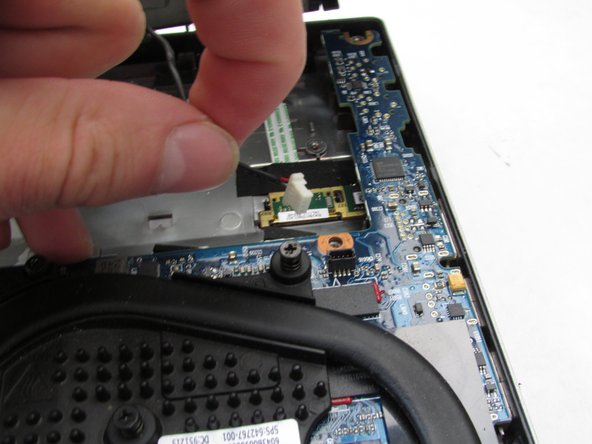
    • Disconnect the speaker connector from the motherboard.

    • Remove the old speaker assembly and connect the wire for the new speaker assembly in the same location.

결론

To reassemble your device, follow these instructions in reverse order.

다른 6명이 해당 안내서를 완성하였습니다.

Garrett Anderson

회원 가입일: 09/16/19

2,184 평판

안내서 10개 작성하였습니다

댓글 2개

Thanks for the tutorial. I skipped step 11 - 29 and just cut the wire of the old speakers on both ends. Put in the new speaker and hid the wire under the lid of the hard drive. Looking back.. I could have done this straight away after step 5. Removing the fan and heat sinc isn't necessary if onne's going to cut the wire. Nevertheless, taking out the fan was good to remove all the dust in front of the outlet.

Thanks again!

JJJJJJJJJJJ - 답글

Thanks for your idea..I have searching easy way for it 🙏

Muditha Mahanama -

댓글 쓰기

조회 통계:

24 시간 전: 3

7일 전: 28

30일 전: 110

전체 시간: 4,771