주요 콘텐츠로 건너뛰기

HP Envy 17-3070NR Fan Assembly Replacement

필요한 것

  1. HP Envy 17-3070NR Fan Assembly Replacement, Back Cover: 1 단계, 이미지 1/2 HP Envy 17-3070NR Fan Assembly Replacement, Back Cover: 1 단계, 이미지 2/2
    • Before you begin taking apart the computer, make sure that it is completely powered off.

    • Slide the release latch away from the nearest edge.

    • Slide the back cover off of the computer.

  2. HP Envy 17-3070NR Fan Assembly Replacement: 2 단계, 이미지 1/3 HP Envy 17-3070NR Fan Assembly Replacement: 2 단계, 이미지 2/3 HP Envy 17-3070NR Fan Assembly Replacement: 2 단계, 이미지 3/3
    • Remove the six 3.7mm Phillips screws.

    • Slide the back cover until it clicks, then lift it straight off.

  3. HP Envy 17-3070NR Fan Assembly Replacement, Hard Drive: 3 단계, 이미지 1/3 HP Envy 17-3070NR Fan Assembly Replacement, Hard Drive: 3 단계, 이미지 2/3 HP Envy 17-3070NR Fan Assembly Replacement, Hard Drive: 3 단계, 이미지 3/3
    • Remove the four 3.7mm Phillips screws that hold the hard drive onto the computer.

    • Remove the hard drive by lifting it out of its cavity.

    • Unplug the hard drive cable that connects it to the main assembly.

  4. HP Envy 17-3070NR Fan Assembly Replacement, Subwoofer: 4 단계, 이미지 1/3 HP Envy 17-3070NR Fan Assembly Replacement, Subwoofer: 4 단계, 이미지 2/3 HP Envy 17-3070NR Fan Assembly Replacement, Subwoofer: 4 단계, 이미지 3/3
    • Unscrew the three 6.5mm Phillips shoulder screws that connect the subwoofer to the computer.

    • Disconnect the red and black subwoofer cable from the system board by pulling it upwards.

    • Remove the subwoofer by pulling straight up from the main assembly.

  5. HP Envy 17-3070NR Fan Assembly Replacement, Battery: 5 단계, 이미지 1/2 HP Envy 17-3070NR Fan Assembly Replacement, Battery: 5 단계, 이미지 2/2
    • Disconnect the multi-colored battery cable from the main assembly by gently pulling upward on it.

  6. HP Envy 17-3070NR Fan Assembly Replacement: 6 단계, 이미지 1/3 HP Envy 17-3070NR Fan Assembly Replacement: 6 단계, 이미지 2/3 HP Envy 17-3070NR Fan Assembly Replacement: 6 단계, 이미지 3/3
    • Remove the two 3.8 mm Torx screws using M8 Torx screwdriver.

    • Remove the battery by pulling it straight out away from the computer.

    • It is much easier to use the battery cable to carefully lift the battery off than to try to pry it off with tools.

  7. HP Envy 17-3070NR Fan Assembly Replacement, Optical Drive: 7 단계, 이미지 1/3 HP Envy 17-3070NR Fan Assembly Replacement, Optical Drive: 7 단계, 이미지 2/3 HP Envy 17-3070NR Fan Assembly Replacement, Optical Drive: 7 단계, 이미지 3/3
    • Remove the four 3.7mm Phillips screws that secure the optical drive to the computer.

    • Slowly lift the optical drive away from the computer ensuring that you don't put stress on the connecting cable.

    • Do not fully lift off the optical drive as there is still a cable that connects it to the motherboard.

    • Remove Sub Speaker assembly first in order to remove Optical drive. Carefully disconnect speaker connector.

  8. HP Envy 17-3070NR Fan Assembly Replacement: 9 단계, 이미지 1/3 HP Envy 17-3070NR Fan Assembly Replacement: 9 단계, 이미지 2/3 HP Envy 17-3070NR Fan Assembly Replacement: 9 단계, 이미지 3/3
    • Carefully disconnect the connecting cable by lifting the white clamp with a Flathead screwdriver and pulling on the blue tab away from connector.

  9. HP Envy 17-3070NR Fan Assembly Replacement, Top Cover: 10 단계, 이미지 1/3 HP Envy 17-3070NR Fan Assembly Replacement, Top Cover: 10 단계, 이미지 2/3 HP Envy 17-3070NR Fan Assembly Replacement, Top Cover: 10 단계, 이미지 3/3
    • Remove the first connector by lifting the white clamp with a Flathead screwdriver and pulling the connector to your right.

  10. HP Envy 17-3070NR Fan Assembly Replacement: 11 단계, 이미지 1/3 HP Envy 17-3070NR Fan Assembly Replacement: 11 단계, 이미지 2/3 HP Envy 17-3070NR Fan Assembly Replacement: 11 단계, 이미지 3/3
    • Remove the second connector by gently pulling upward.

  11. HP Envy 17-3070NR Fan Assembly Replacement: 12 단계, 이미지 1/1
    • Remove the seventeen 6.6mm Phillips screws.

    • Remove the three 3.6 mm Phillips screws.

    • Remove the eleven 3.2mm Phillips screws

    • Three of the 3.2mm Phillips screws are located underneath the black hard drive flap.

    • Make sure that you keep the screws organized so that you keep track of all of the different sizes and locations.

  12. HP Envy 17-3070NR Fan Assembly Replacement: 13 단계, 이미지 1/3 HP Envy 17-3070NR Fan Assembly Replacement: 13 단계, 이미지 2/3 HP Envy 17-3070NR Fan Assembly Replacement: 13 단계, 이미지 3/3
    • Flip the laptop over.

    • Use a Plastic Opening tool to carefully pry all around the top cover up off of the remaining assembly.

    • Starting location for prying does not matter as long as you pry all around the frame before lifting it off.

    • Do not fully lift the top cover because there are cables that will need to be disconnected before removal.

  13. HP Envy 17-3070NR Fan Assembly Replacement: 14 단계, 이미지 1/2 HP Envy 17-3070NR Fan Assembly Replacement: 14 단계, 이미지 2/2
    • Gently pull the white connector shown in the picture towards you to disconnect it from the system board.

  14. HP Envy 17-3070NR Fan Assembly Replacement: 15 단계, 이미지 1/1
    • Gently pull the black connector towards you to disconnect the top cover from the main assembly.

    • Once both connectors are disconnected, lift the top cover off of the main assembly.

  15. HP Envy 17-3070NR Fan Assembly Replacement, Disassembling HP Envy 17-3070NR Motherboard Assembly: 16 단계, 이미지 1/1
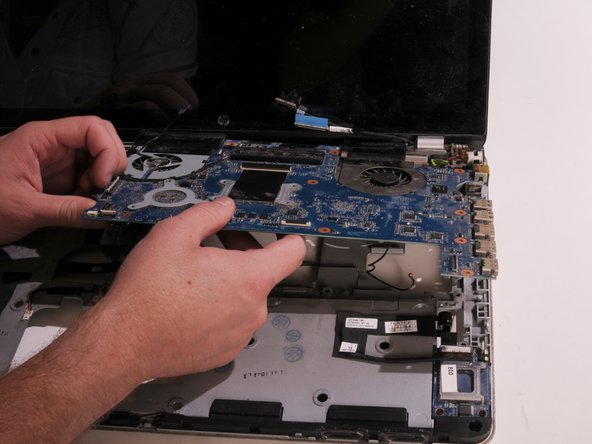
    • Remove the two 4.5mm Phillips screws from the system board

  16. HP Envy 17-3070NR Fan Assembly Replacement: 17 단계, 이미지 1/3 HP Envy 17-3070NR Fan Assembly Replacement: 17 단계, 이미지 2/3 HP Envy 17-3070NR Fan Assembly Replacement: 17 단계, 이미지 3/3
    • Disconnect three cables by lifting a white clamp with a Flathead screwdriver and pulling on the blue tab.

  17. HP Envy 17-3070NR Fan Assembly Replacement: 18 단계, 이미지 1/3 HP Envy 17-3070NR Fan Assembly Replacement: 18 단계, 이미지 2/3 HP Envy 17-3070NR Fan Assembly Replacement: 18 단계, 이미지 3/3
    • Disconnect three cables by pulling upward on black or blue tabs connected to them.

  18. HP Envy 17-3070NR Fan Assembly Replacement: 19 단계, 이미지 1/3 HP Envy 17-3070NR Fan Assembly Replacement: 19 단계, 이미지 2/3 HP Envy 17-3070NR Fan Assembly Replacement: 19 단계, 이미지 3/3
    • Disconnect cable by using a Flathead screwdriver to gently pry it off the black connector towards you.

  19. HP Envy 17-3070NR Fan Assembly Replacement: 20 단계, 이미지 1/3 HP Envy 17-3070NR Fan Assembly Replacement: 20 단계, 이미지 2/3 HP Envy 17-3070NR Fan Assembly Replacement: 20 단계, 이미지 3/3
    • Lift up the power connector from the clip.

  20. HP Envy 17-3070NR Fan Assembly Replacement: 21 단계, 이미지 1/3 HP Envy 17-3070NR Fan Assembly Replacement: 21 단계, 이미지 2/3 HP Envy 17-3070NR Fan Assembly Replacement: 21 단계, 이미지 3/3
    • Carefully lift up motherboard from the main assembly.

  21. HP Envy 17-3070NR Fan Assembly Replacement, Fan Assembly: 22 단계, 이미지 1/3 HP Envy 17-3070NR Fan Assembly Replacement, Fan Assembly: 22 단계, 이미지 2/3 HP Envy 17-3070NR Fan Assembly Replacement, Fan Assembly: 22 단계, 이미지 3/3
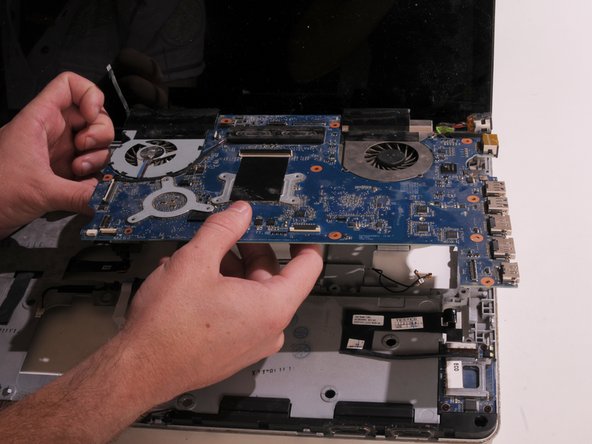
    • Flip the system board over.

    • Unplug the first fan assembly cable by carefully pulling it upwards.

  22. HP Envy 17-3070NR Fan Assembly Replacement: 23 단계, 이미지 1/3 HP Envy 17-3070NR Fan Assembly Replacement: 23 단계, 이미지 2/3 HP Envy 17-3070NR Fan Assembly Replacement: 23 단계, 이미지 3/3
    • Unplug the second fan assembly cable by carefully pulling it upwards.

  23. HP Envy 17-3070NR Fan Assembly Replacement: 24 단계, 이미지 1/3 HP Envy 17-3070NR Fan Assembly Replacement: 24 단계, 이미지 2/3 HP Envy 17-3070NR Fan Assembly Replacement: 24 단계, 이미지 3/3
    • Remove the three 4.5mm Phillips screws on the fan assembly.

    • Loosen the seven captive Phillips screws in the ascending numerical order (1-7). Numbers are printed next to each screw on the housing.

    • Screws will not fully come off the assembly. You need to only loosen them.

    • Remove the fan assembly from the system board by lifting it straight up.

    • For reassembly, you will need to clean the old thermal paste off of areas highlighted in yellow as well as matching parts on the fan assembly. Following that, you would need to reapply thermal paste before putting back the fan assembly. Small amount of the size of the rice grain should be enough for each plate.

결론

To reassemble your device, follow these instructions in reverse order.

다른 4명이 해당 안내서를 완성하였습니다.

Jasper Lewin

회원 가입일: 04/21/15

750 평판

안내서 6개 작성하였습니다

Cal Poly, Team 14-8, Amido Spring 2015 Cal Poly, Team 14-8, Amido Spring 2015 회원

CPSU-AMIDO-S15S14G8

4 회원들

안내서 12개 작성하였습니다

댓글 한 개

Amazingly detailed guide! EVERYTHING needed to do this very tricky disassembly correctly!

Terry Roberts - 답글

댓글 쓰기

조회 통계:

24 시간 전: 1

7일 전: 1

30일 전: 4

전체 시간: 3,677