주요 콘텐츠로 건너뛰기

HP Envy 17-3070NR Optical Drive Replacement

필요한 것

  1. HP Envy 17-3070NR Optical Drive Replacement, Back Cover: 1 단계, 이미지 1/2 HP Envy 17-3070NR Optical Drive Replacement, Back Cover: 1 단계, 이미지 2/2
    • Before you begin taking apart the computer, make sure that it is completely powered off.

    • Slide the release latch away from the nearest edge.

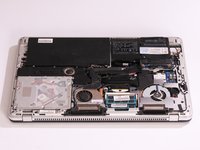
    • Slide the back cover off of the computer.

  2. HP Envy 17-3070NR Optical Drive Replacement: 2 단계, 이미지 1/3 HP Envy 17-3070NR Optical Drive Replacement: 2 단계, 이미지 2/3 HP Envy 17-3070NR Optical Drive Replacement: 2 단계, 이미지 3/3
    • Remove the six 3.7mm Phillips screws.

    • Slide the back cover until it clicks, then lift it straight off.

  3. HP Envy 17-3070NR Optical Drive Replacement, Optical Drive: 3 단계, 이미지 1/3 HP Envy 17-3070NR Optical Drive Replacement, Optical Drive: 3 단계, 이미지 2/3 HP Envy 17-3070NR Optical Drive Replacement, Optical Drive: 3 단계, 이미지 3/3
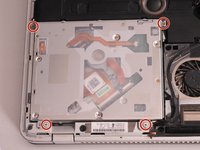
    • Remove the four 3.7mm Phillips screws that secure the optical drive to the computer.

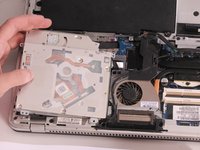
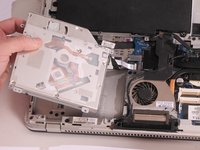
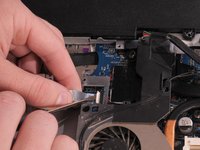
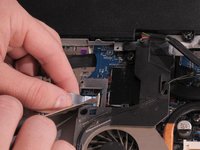
    • Slowly lift the optical drive away from the computer ensuring that you don't put stress on the connecting cable.

    • Do not fully lift off the optical drive as there is still a cable that connects it to the motherboard.

    • Remove Sub Speaker assembly first in order to remove Optical drive. Carefully disconnect speaker connector.

  4. HP Envy 17-3070NR Optical Drive Replacement: 5 단계, 이미지 1/3 HP Envy 17-3070NR Optical Drive Replacement: 5 단계, 이미지 2/3 HP Envy 17-3070NR Optical Drive Replacement: 5 단계, 이미지 3/3
    • Carefully disconnect the connecting cable by lifting the white clamp with a Flathead screwdriver and pulling on the blue tab away from connector.

결론

To reassemble your device, follow these instructions in reverse order.

Jon Fuson

회원 가입일: 04/21/15

140 평판

안내서 1개 작성함

Cal Poly, Team 14-8, Amido Spring 2015 Cal Poly, Team 14-8, Amido Spring 2015 회원

CPSU-AMIDO-S15S14G8

4 회원들

안내서 12개 작성하였습니다

댓글 0개

댓글 쓰기

조회 통계:

24 시간 전: 0

7일 전: 0

30일 전: 2

전체 시간: 1,201