주요 콘텐츠로 건너뛰기

HP Envy Ultrabook 4-1015dx Keyboard Replacement

필요한 것

  1. HP Envy Ultrabook 4-1015dx Keyboard Replacement, Battery: 1 단계, 이미지 1/1
    • Make sure that the device is turned off and that all external devices are removed.

  2. HP Envy Ultrabook 4-1015dx Keyboard Replacement: 2 단계, 이미지 1/1
    • Flip the device over so that the back plate is facing upwards.

  3. HP Envy Ultrabook 4-1015dx Keyboard Replacement: 3 단계, 이미지 1/2 HP Envy Ultrabook 4-1015dx Keyboard Replacement: 3 단계, 이미지 2/2
    • Using a small (size 0) Phillips head screwdriver, remove the twelve 5.5 mm external Phillips head screws that connect the back plate to the device.

    • Make sure to set the screws aside in a safe place so that you do not lose them, as they will be needed to reattach the backplate later.

  4. HP Envy Ultrabook 4-1015dx Keyboard Replacement: 4 단계, 이미지 1/2 HP Envy Ultrabook 4-1015dx Keyboard Replacement: 4 단계, 이미지 2/2
    • Using the plastic opening tool, gently pry off the back plate from the device.

  5. HP Envy Ultrabook 4-1015dx Keyboard Replacement: 5 단계, 이미지 1/2 HP Envy Ultrabook 4-1015dx Keyboard Replacement: 5 단계, 이미지 2/2
    • The large black box with the white warning images is the battery.

    • Move the ribbon cable so that it is no longer on top of the battery.

  6. HP Envy Ultrabook 4-1015dx Keyboard Replacement: 6 단계, 이미지 1/2 HP Envy Ultrabook 4-1015dx Keyboard Replacement: 6 단계, 이미지 2/2
    • Using a small (size 0) Phillips head screwdriver, remove the three 3.5 mm Phillips head internal screws that hold the battery in place.

    • Make sure not to lose these internal screws; they will later be used to reattach the battery.

  7. HP Envy Ultrabook 4-1015dx Keyboard Replacement: 7 단계, 이미지 1/2 HP Envy Ultrabook 4-1015dx Keyboard Replacement: 7 단계, 이미지 2/2
    • Lift up the battery and remove it from the slot as shown.

  8. HP Envy Ultrabook 4-1015dx Keyboard Replacement: 8 단계, 이미지 1/3 HP Envy Ultrabook 4-1015dx Keyboard Replacement: 8 단계, 이미지 2/3 HP Envy Ultrabook 4-1015dx Keyboard Replacement: 8 단계, 이미지 3/3
    • Use the plastic opening tool to disconnect the battery cable.

  9. HP Envy Ultrabook 4-1015dx Keyboard Replacement: 9 단계, 이미지 1/1
    • Lift up the battery and remove it from the device.

  10. HP Envy Ultrabook 4-1015dx Keyboard Replacement, Hard Disk Drive: 10 단계, 이미지 1/3 HP Envy Ultrabook 4-1015dx Keyboard Replacement, Hard Disk Drive: 10 단계, 이미지 2/3 HP Envy Ultrabook 4-1015dx Keyboard Replacement, Hard Disk Drive: 10 단계, 이미지 3/3
    • The hard disk drive is under a metallic looking case in the bottom-right corner of the device.

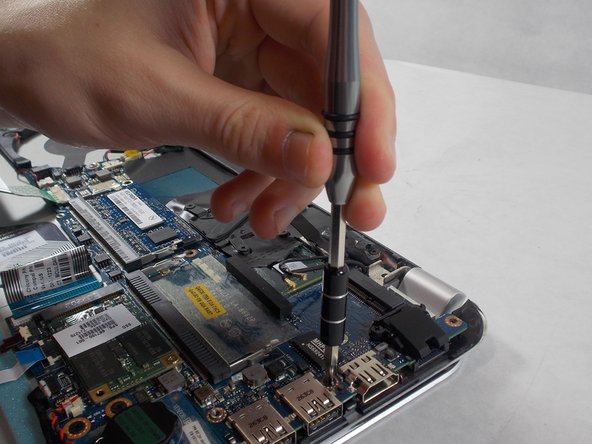
    • Using a size 0 Phillips head screwdriver, remove the four 3 mm size 0 screws attaching the hard drive casing to the device.

  11. HP Envy Ultrabook 4-1015dx Keyboard Replacement: 11 단계, 이미지 1/1
    • Remove the hard drive case.

  12. HP Envy Ultrabook 4-1015dx Keyboard Replacement: 12 단계, 이미지 1/1
    • Unplug the hard drive from the hard drive plug.

  13. HP Envy Ultrabook 4-1015dx Keyboard Replacement, Keyboard: 13 단계, 이미지 1/2 HP Envy Ultrabook 4-1015dx Keyboard Replacement, Keyboard: 13 단계, 이미지 2/2
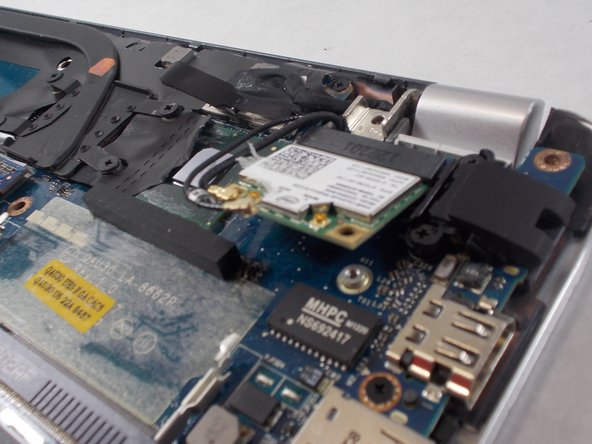
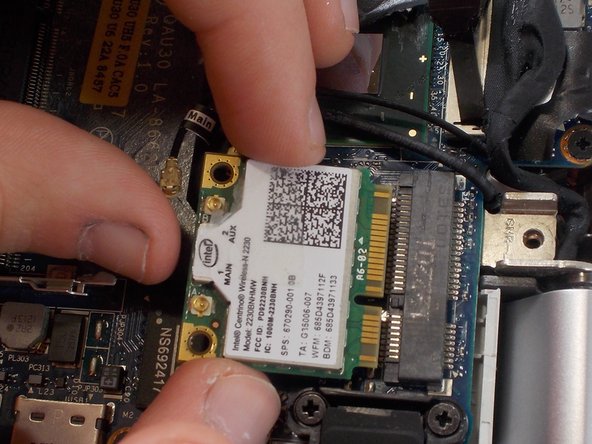
    • After removing the hard drive, you now must remove the motherboard. Start by pulling out the ribbon cable that attaches the touch pad to the motherboard.

  14. HP Envy Ultrabook 4-1015dx Keyboard Replacement: 14 단계, 이미지 1/2 HP Envy Ultrabook 4-1015dx Keyboard Replacement: 14 단계, 이미지 2/2
    • Using the plastic opening tool, pry out the small chip next to the touch pad that is attached via ribbon cable to the motherboard. Make sure to pry from the side that only has one small black bump, rather than the side that has two.

    • The chip should be located underneath the ribbon cables, which is reflected in the first image.

  15. HP Envy Ultrabook 4-1015dx Keyboard Replacement: 15 단계, 이미지 1/2 HP Envy Ultrabook 4-1015dx Keyboard Replacement: 15 단계, 이미지 2/2
    • Using the plastic opening tool, flip up the clasp for the ribbon cable connecting the keyboard to the motherboard and then unplug the ribbon cable.

  16. HP Envy Ultrabook 4-1015dx Keyboard Replacement: 16 단계, 이미지 1/2 HP Envy Ultrabook 4-1015dx Keyboard Replacement: 16 단계, 이미지 2/2
    • Using the plastic spudger, disconnect the hard drive plug from the motherboard.

  17. HP Envy Ultrabook 4-1015dx Keyboard Replacement: 17 단계, 이미지 1/1
    • Now, remove the LAN adapter. Peel back the black plastic cover so that the LAN adapter is visible.

  18. HP Envy Ultrabook 4-1015dx Keyboard Replacement: 18 단계, 이미지 1/2 HP Envy Ultrabook 4-1015dx Keyboard Replacement: 18 단계, 이미지 2/2
    • Pull off the two cables from the LAN adapter.

  19. HP Envy Ultrabook 4-1015dx Keyboard Replacement: 19 단계, 이미지 1/3 HP Envy Ultrabook 4-1015dx Keyboard Replacement: 19 단계, 이미지 2/3 HP Envy Ultrabook 4-1015dx Keyboard Replacement: 19 단계, 이미지 3/3
    • Using a size 0 Phillips head screwdriver, remove the two metallic 3 mm Phillips head screws.

    • Once the screws are removed, the LAN adapter should pop up. Pull out the LAN adapter from its socket.

  20. HP Envy Ultrabook 4-1015dx Keyboard Replacement: 20 단계, 이미지 1/2 HP Envy Ultrabook 4-1015dx Keyboard Replacement: 20 단계, 이미지 2/2
    • Use plastic spudger to remove black and red wire from the socket.

  21. HP Envy Ultrabook 4-1015dx Keyboard Replacement: 21 단계, 이미지 1/2 HP Envy Ultrabook 4-1015dx Keyboard Replacement: 21 단계, 이미지 2/2
    • Using plastic spudger, disconnect power connector.

  22. HP Envy Ultrabook 4-1015dx Keyboard Replacement: 22 단계, 이미지 1/1
    • Disconnect display panel cable by pulling on black tab to unplug the cable from the socket

  23. HP Envy Ultrabook 4-1015dx Keyboard Replacement: 23 단계, 이미지 1/1
    • Using the plastic opening tool, flip up the clasp on the power button cable and unplug the power button cable from the socket.

  24. HP Envy Ultrabook 4-1015dx Keyboard Replacement: 24 단계, 이미지 1/3 HP Envy Ultrabook 4-1015dx Keyboard Replacement: 24 단계, 이미지 2/3 HP Envy Ultrabook 4-1015dx Keyboard Replacement: 24 단계, 이미지 3/3
    • Remove clasp beneath the headphone port.

    • Using a size 0 Phillips head screwdriver, remove the 3 mm size 0 Phillips head screw that attaches the clasp to the device.

    • Then, take off the clasp.

  25. HP Envy Ultrabook 4-1015dx Keyboard Replacement: 25 단계, 이미지 1/2 HP Envy Ultrabook 4-1015dx Keyboard Replacement: 25 단계, 이미지 2/2
    • Using a size 0 Phillips head screwdriver, remove the two 3 mm size 0 screws attaching the motherboard to the device.

  26. HP Envy Ultrabook 4-1015dx Keyboard Replacement: 26 단계, 이미지 1/2 HP Envy Ultrabook 4-1015dx Keyboard Replacement: 26 단계, 이미지 2/2
    • Remove the fan.

    • Use a size 0 Phillips head screwdriver to remove the 3 mm size 0 screw attaching the fan to the device.

    • Pull the fan out of the slot and, using the plastic opening tool, unplug the connector cable from the socket.

  27. HP Envy Ultrabook 4-1015dx Keyboard Replacement: 27 단계, 이미지 1/1
    • Unplug the cable attaching the keyboard to the motherboard.

  28. HP Envy Ultrabook 4-1015dx Keyboard Replacement: 28 단계, 이미지 1/2 HP Envy Ultrabook 4-1015dx Keyboard Replacement: 28 단계, 이미지 2/2
    • Remove the subwoofer.

    • Using plastic opening tool, remove the red and black subwoofer cable.

    • Use a size 0 Phillips head screwdriver to remove the two 3 mm size 0 screws attaching the subwoofer to the device.

  29. HP Envy Ultrabook 4-1015dx Keyboard Replacement: 29 단계, 이미지 1/2 HP Envy Ultrabook 4-1015dx Keyboard Replacement: 29 단계, 이미지 2/2
    • Use a size 0 Phillips head screwdriver to remove the 3 mm size 0 screw attaching the charging port clasp to the device.

    • Remove the charging port clasp.

  30. HP Envy Ultrabook 4-1015dx Keyboard Replacement: 30 단계, 이미지 1/2 HP Envy Ultrabook 4-1015dx Keyboard Replacement: 30 단계, 이미지 2/2
    • Use a size 0 Phillips head screwdriver to remove the 3 mm size 0 screw attaching the black claspto the device.

    • Remove the black clasp.

  31. HP Envy Ultrabook 4-1015dx Keyboard Replacement: 31 단계, 이미지 1/1
    • Lift up the motherboard and the power cable off of the device and place them to the side.

  32. HP Envy Ultrabook 4-1015dx Keyboard Replacement: 32 단계, 이미지 1/3 HP Envy Ultrabook 4-1015dx Keyboard Replacement: 32 단계, 이미지 2/3 HP Envy Ultrabook 4-1015dx Keyboard Replacement: 32 단계, 이미지 3/3
    • Use a size 0 Phillips head screwdriver to remove the four 3 mm size 0 screws securing the hinges to the device.

    • Lift up the hinges off of the keyboard.

  33. HP Envy Ultrabook 4-1015dx Keyboard Replacement: 33 단계, 이미지 1/2 HP Envy Ultrabook 4-1015dx Keyboard Replacement: 33 단계, 이미지 2/2
    • Using a size 0 Phillips head screwdriver, remove all of the 3 mm size 0 screws attaching the keyboard to the device.

  34. HP Envy Ultrabook 4-1015dx Keyboard Replacement: 34 단계, 이미지 1/1
    • Lift up and remove the keyboard from the device.

결론

To reassemble your device, follow these instructions in reverse order.

Salvador Balkus

회원 가입일: 10/15/18

596 평판

안내서 2개 작성하였습니다

UMass Dartmouth, Team S1-G3, Valliere Fall 2018 UMass Dartmouth, Team S1-G3, Valliere Fall 2018 회원

UMASSD-VALLIERE-F18S1G3

5 회원들

안내서 6개 작성하였습니다

댓글 0개

댓글 쓰기

조회 통계:

24 시간 전: 0

7일 전: 0

30일 전: 0

전체 시간: 367