주요 콘텐츠로 건너뛰기

HP Envy x360 m6-aq103dx Headphone Jack Replacement

필요한 것

  1. HP Envy x360 m6-aq103dx Headphone Jack Replacement, Bottom Cover: 1 단계, 이미지 1/3 HP Envy x360 m6-aq103dx Headphone Jack Replacement, Bottom Cover: 1 단계, 이미지 2/3 HP Envy x360 m6-aq103dx Headphone Jack Replacement, Bottom Cover: 1 단계, 이미지 3/3
    • Flip the laptop over to expose the underside.

    • Remove the two grip pads with blue plastic opening tool by inserting the tool between the laptop and the pads and slowly lifting up.

    • The grip pads are tacky, remove slowly to avoid separating the adhesive.

  2. HP Envy x360 m6-aq103dx Headphone Jack Replacement: 2 단계, 이미지 1/1
    • Remove the two 8 mm Phillips Head screws that were under the grip pads using a Phillip's Head 1 Screwdriver.

  3. HP Envy x360 m6-aq103dx Headphone Jack Replacement: 3 단계, 이미지 1/1
    • Remove the six 5 mm Torx screws using a T5 Torx Screwdriver.

  4. HP Envy x360 m6-aq103dx Headphone Jack Replacement: 4 단계, 이미지 1/3 HP Envy x360 m6-aq103dx Headphone Jack Replacement: 4 단계, 이미지 2/3 HP Envy x360 m6-aq103dx Headphone Jack Replacement: 4 단계, 이미지 3/3
    • Use the nylon spudger to pop off the bottom cover by inserting it into the heat vent and twisting to the left or right.

    • You may hear a slight clicking or popping, but that is normal.

  5. HP Envy x360 m6-aq103dx Headphone Jack Replacement, Battery: 5 단계, 이미지 1/2 HP Envy x360 m6-aq103dx Headphone Jack Replacement, Battery: 5 단계, 이미지 2/2
    • Use the Phillips Head 1 Screwdriver to remove the six 4 mm screws.

  6. HP Envy x360 m6-aq103dx Headphone Jack Replacement: 6 단계, 이미지 1/3 HP Envy x360 m6-aq103dx Headphone Jack Replacement: 6 단계, 이미지 2/3 HP Envy x360 m6-aq103dx Headphone Jack Replacement: 6 단계, 이미지 3/3
    • Disconnect the battery port from the motherboard by gently lifting it on both sides with the plastic opening tool.

    • Lift up the port with the tool.

  7. HP Envy x360 m6-aq103dx Headphone Jack Replacement: 7 단계, 이미지 1/3 HP Envy x360 m6-aq103dx Headphone Jack Replacement: 7 단계, 이미지 2/3 HP Envy x360 m6-aq103dx Headphone Jack Replacement: 7 단계, 이미지 3/3
    • Lift the battery out of the laptop with your hands.

  8. HP Envy x360 m6-aq103dx Headphone Jack Replacement, Headphone Jack: 8 단계, 이미지 1/2 HP Envy x360 m6-aq103dx Headphone Jack Replacement, Headphone Jack: 8 단계, 이미지 2/2
    이 단계에 사용된 도구:
    Anti-Static Wrist Strap
    $7.95
    구매
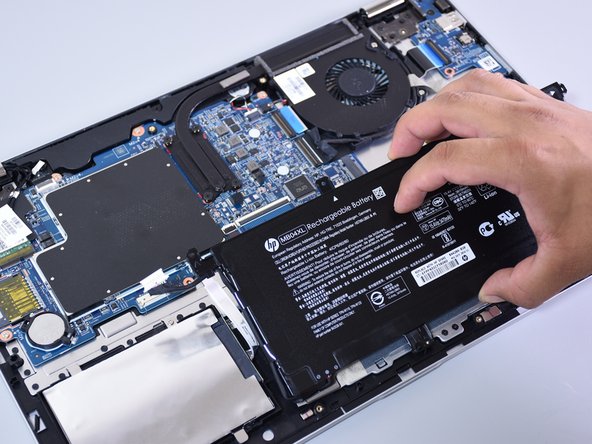
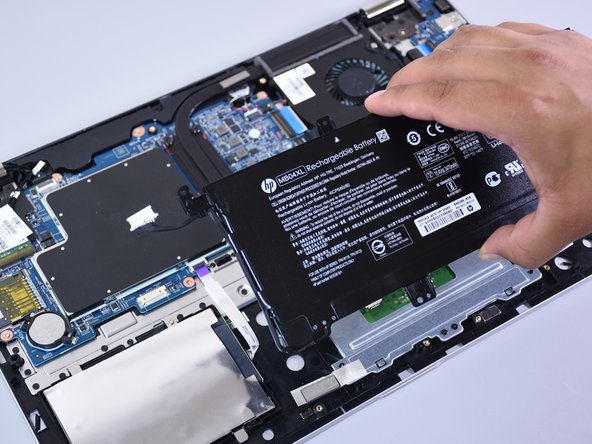
    • Make sure you are wearing an anti-static wrist strap.

    • Remove the four screws from the blue board that contains the headphone jack using the Phillips head 1 screwdriver (one 4 mm black screw, one 3 mm black screw, and two 4.5 mm silver screws).

  9. HP Envy x360 m6-aq103dx Headphone Jack Replacement: 9 단계, 이미지 1/3 HP Envy x360 m6-aq103dx Headphone Jack Replacement: 9 단계, 이미지 2/3 HP Envy x360 m6-aq103dx Headphone Jack Replacement: 9 단계, 이미지 3/3
    • Insert the plastic opening tool underneath the connector on the black flexible flat cable with the blue plastic stripe.

    • Lift the opening tool to open the connector.

    • Use your fingers to slide the ribbon cable out of the connector.

  10. HP Envy x360 m6-aq103dx Headphone Jack Replacement: 10 단계, 이미지 1/3 HP Envy x360 m6-aq103dx Headphone Jack Replacement: 10 단계, 이미지 2/3 HP Envy x360 m6-aq103dx Headphone Jack Replacement: 10 단계, 이미지 3/3
    • Hold the left side of the board between your fingers.

    • Lift the edge upwards enough to clear the other components in the way.

    • Be gentle when lifting to avoid breaking the board.

    • Slide and rotate to lift the board out of the designated slot for the board.

    • You may have to wiggle the board back and forth, and up and down, to remove the board.

결론

To reassemble your device, follow these instructions in reverse order.

다른 한 분이 해당 안내서를 완성하였습니다.

Jordan Eremeyeff

회원 가입일: 10/01/17

597 평판

안내서 3개 작성하였습니다

Cal Poly, Team S4-G3, Livingston Fall 2017 Cal Poly, Team S4-G3, Livingston Fall 2017 회원

CPSU-LIVINGSTON-F17S4G3

4 회원들

안내서 9개 작성하였습니다

댓글 0개

댓글 쓰기

조회 통계:

24 시간 전: 1

7일 전: 2

30일 전: 10

전체 시간: 1,518