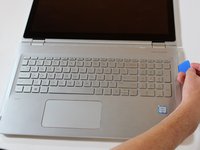
주요 콘텐츠로 건너뛰기

HP Envy x360 m6-w103dx Battery Replacement

필요한 것

  1. HP Envy x360 m6-w103dx Battery Replacement, Keyboard: 1 단계, 이미지 1/2 HP Envy x360 m6-w103dx Battery Replacement, Keyboard: 1 단계, 이미지 2/2
    • Before you begin, be sure to power off your laptop.

    • Using an opening pick, remove the 4 rubber feet and 4 screw covers.

  2. HP Envy x360 m6-w103dx Battery Replacement: 2 단계, 이미지 1/2 HP Envy x360 m6-w103dx Battery Replacement: 2 단계, 이미지 2/2
    • Unscrew the twelve 6 mm screws from the bottom of the laptop using a Phillips #0 screwdriver.

  3. HP Envy x360 m6-w103dx Battery Replacement: 3 단계, 이미지 1/3 HP Envy x360 m6-w103dx Battery Replacement: 3 단계, 이미지 2/3 HP Envy x360 m6-w103dx Battery Replacement: 3 단계, 이미지 3/3
    • Open the laptop carefully, with the keyboard face up.

    • Pry around the outside of the keyboard with the plastic opening tool until the keyboard can be lifted slightly.

    • When lifting the keyboard do not pull too hard. There are cables that must be disconnected before the keyboard can be removed.

  4. HP Envy x360 m6-w103dx Battery Replacement: 4 단계, 이미지 1/3 HP Envy x360 m6-w103dx Battery Replacement: 4 단계, 이미지 2/3 HP Envy x360 m6-w103dx Battery Replacement: 4 단계, 이미지 3/3
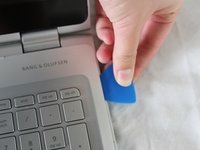
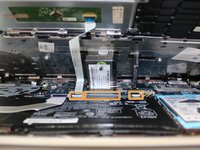
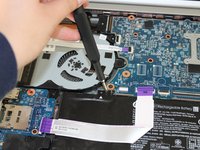
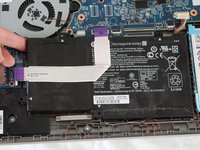
    • Lift the keyboard until you can see the cables connected to the motherboard.

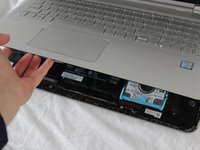
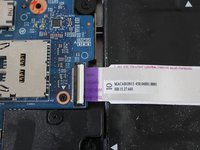
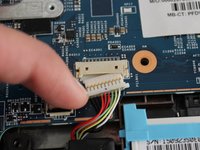
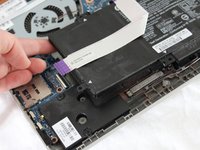
    • Gently lift the tab on each ZIF connector that connects each cable to the motherboard using a spudger. Once each tab is flipped up, the corresponding ribbon cable will come out easily.

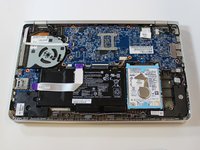
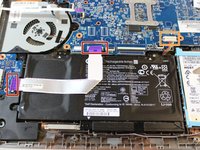
    • Detach the keyboard.

  5. HP Envy x360 m6-w103dx Battery Replacement, Battery: 5 단계, 이미지 1/3 HP Envy x360 m6-w103dx Battery Replacement, Battery: 5 단계, 이미지 2/3 HP Envy x360 m6-w103dx Battery Replacement, Battery: 5 단계, 이미지 3/3
    • Remove the four 6 mm Phillips #0 screws holding the battery in place.

    • The white arrows on the battery point to where each screw is.

  6. HP Envy x360 m6-w103dx Battery Replacement: 6 단계, 이미지 1/3 HP Envy x360 m6-w103dx Battery Replacement: 6 단계, 이미지 2/3 HP Envy x360 m6-w103dx Battery Replacement: 6 단계, 이미지 3/3
    • Unplug the ribbon cable by flipping up the white tabs on the ZIF connectors and gently sliding the ribbon cables out of their sockets.

    • Unplug the battery connector by grasping the small white tabs on either side of the connector and pulling down towards the battery.

  7. HP Envy x360 m6-w103dx Battery Replacement: 7 단계, 이미지 1/3 HP Envy x360 m6-w103dx Battery Replacement: 7 단계, 이미지 2/3 HP Envy x360 m6-w103dx Battery Replacement: 7 단계, 이미지 3/3
    • Lift out the battery.

    • You may need to peel off the ribbon cable and replace it after installing the new battery if your replacement part doesn't have one already adhered.

결론

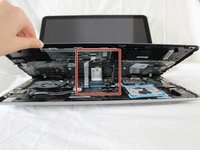
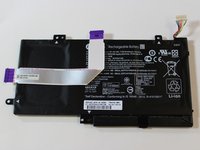
To reassemble your device, follow these instructions in reverse order.

다른 8명이 해당 안내서를 완성하였습니다.

Steven Ngo

회원 가입일: 10/10/19

927 평판

안내서 7개 작성하였습니다

Cal Poly, Team S12-G2, Regan Fall 2019 Cal Poly, Team S12-G2, Regan Fall 2019 회원

CPSU-REGAN-F19S12G2

4 회원들

안내서 23개 작성하였습니다

댓글 3개

Thank you Steven for the provided guide, it helped a lot! There are no guides available on the internet particular for the HP Envy x360 m6-w103dx Battery Replacement. And using the IFIXIT tool kit, it was much easier to replace the battery…love these tools. Awesome job!

Charlie - 답글

Thank you, I was able to change the battery successfully, not an easy task with this model of laptop. I would not have been able to do it without your instructions.

Nancy Gaj - 답글

댓글 쓰기

조회 통계:

24 시간 전: 6

7일 전: 49

30일 전: 214

전체 시간: 7,851