주요 콘텐츠로 건너뛰기

HP Flyer Red Hard Disc Drive Replacement

필요한 것

  1. HP Flyer Red Hard Disc Drive Replacement, Battery: 1 단계, 이미지 1/2 HP Flyer Red Hard Disc Drive Replacement, Battery: 1 단계, 이미지 2/2
    • Make sure your laptop is powered off.

    • With laptop closed flip to look at the underside of the laptop.

  2. HP Flyer Red Hard Disc Drive Replacement: 2 단계, 이미지 1/1
    • On the underside of the laptop towards the hinge for the screen there are two rectangular slide switches located inside of rectangular tracks.

  3. HP Flyer Red Hard Disc Drive Replacement: 3 단계, 이미지 1/2 HP Flyer Red Hard Disc Drive Replacement: 3 단계, 이미지 2/2
    • The left switch is the battery unlock switch.

    • Inside the rectangular track of this switch there is an image of a closed lock that should be visible. Push this switch to the other end of the track and an image of an open lock should be visible.

  4. HP Flyer Red Hard Disc Drive Replacement: 4 단계, 이미지 1/1
    • Then take and slide the other switch to the other end of its track which will pop out the battery.

    • Grab the battery and pull it out of the slot.

  5. HP Flyer Red Hard Disc Drive Replacement, Optical Disc Drive: 5 단계, 이미지 1/1
    • Remove the 4mm Phillips #1 screw located towards the middle of the laptop slightly towards the right with the picture of the CD next to it.

  6. HP Flyer Red Hard Disc Drive Replacement: 6 단계, 이미지 1/2 HP Flyer Red Hard Disc Drive Replacement: 6 단계, 이미지 2/2
    • Slide the disc tray out of the its slot.

  7. HP Flyer Red Hard Disc Drive Replacement, Keyboard: 7 단계, 이미지 1/2 HP Flyer Red Hard Disc Drive Replacement, Keyboard: 7 단계, 이미지 2/2
    • Next locate and unscrew the two 4mm Phllips #1 screws with the keyboard symbol located towards the middle and top of the bottom of the laptop.

  8. HP Flyer Red Hard Disc Drive Replacement: 8 단계, 이미지 1/3 HP Flyer Red Hard Disc Drive Replacement: 8 단계, 이미지 2/3 HP Flyer Red Hard Disc Drive Replacement: 8 단계, 이미지 3/3
    • Next turn the laptop over and flip open the screen.

    • Use the plastic opening tool to pry the keyboard upwards from the bottom right hand corner of the keyboard.

    • Use another plastic opening tool with the first plastic opening tool you placed to undo every plastic clasp surrounding the keyboard.

  9. HP Flyer Red Hard Disc Drive Replacement: 9 단계, 이미지 1/3 HP Flyer Red Hard Disc Drive Replacement: 9 단계, 이미지 2/3 HP Flyer Red Hard Disc Drive Replacement: 9 단계, 이미지 3/3
    • Next lift up the keyboard gently and use the plastic opening tool to undo the ribbon wire by unclasping the ZIF (zero insertion force) connector to the laptop.

    • Gently slide the ribbon wire out of its slot.

  10. HP Flyer Red Hard Disc Drive Replacement, Hard Disc Drive: 10 단계, 이미지 1/2 HP Flyer Red Hard Disc Drive Replacement, Hard Disc Drive: 10 단계, 이미지 2/2
    • After removing the keyboard close the laptop and flip it over.

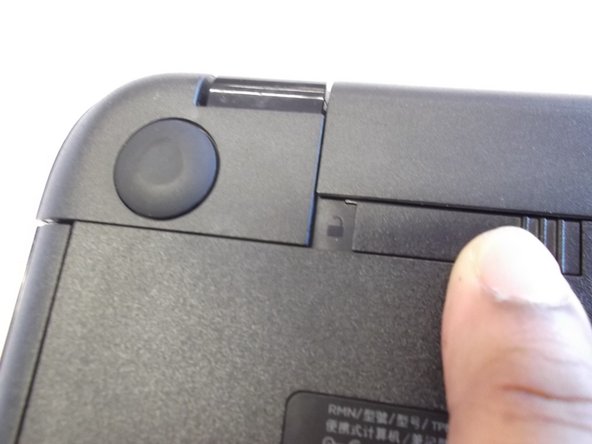
    • Using a spudger to remove the rubber bumpers located at the top left and top right of the laptop.

  11. HP Flyer Red Hard Disc Drive Replacement: 11 단계, 이미지 1/2 HP Flyer Red Hard Disc Drive Replacement: 11 단계, 이미지 2/2
    • Remove the two 4mm Phillips #1 screws located under the rubber bumpers.

  12. HP Flyer Red Hard Disc Drive Replacement: 12 단계, 이미지 1/1
    • Now remove both corner pieces by sliding them away from the laptop and pulling upwards.

  13. HP Flyer Red Hard Disc Drive Replacement: 13 단계, 이미지 1/1
    • Remove the two 4mm Phillips #1 screws located where you pulled the disk tray out of.

  14. HP Flyer Red Hard Disc Drive Replacement: 14 단계, 이미지 1/1
    • Now flip the laptop back over and open the screen. Remove the four 4mm Phllips #1 screws.

  15. HP Flyer Red Hard Disc Drive Replacement: 15 단계, 이미지 1/2 HP Flyer Red Hard Disc Drive Replacement: 15 단계, 이미지 2/2
    • Using the plastic opening tool you will need to remove two pieces of tape.

  16. HP Flyer Red Hard Disc Drive Replacement: 16 단계, 이미지 1/2 HP Flyer Red Hard Disc Drive Replacement: 16 단계, 이미지 2/2
    • Using the plastic opening tool detach both ribbon cables by disconnecting both ZIF (zero insertion force) connectors on the ends.

  17. HP Flyer Red Hard Disc Drive Replacement: 17 단계, 이미지 1/2 HP Flyer Red Hard Disc Drive Replacement: 17 단계, 이미지 2/2
    • Now peel back the glued longer ribbon cable gently.

    • Ribbon wire is very fragile be sure not to rip it.

  18. HP Flyer Red Hard Disc Drive Replacement: 18 단계, 이미지 1/2 HP Flyer Red Hard Disc Drive Replacement: 18 단계, 이미지 2/2
    • Now you can see the hard drive.

    • Remove the two 4 mm Phllips #1 screws.

  19. HP Flyer Red Hard Disc Drive Replacement: 19 단계, 이미지 1/2 HP Flyer Red Hard Disc Drive Replacement: 19 단계, 이미지 2/2
    • Now pull the bracket where the screws where to right as you lift up the hard drive.

    • It will disconnect from the motherboard as shown.

결론

To reassemble your device, follow these instructions in reverse order.

다른 9명이 해당 안내서를 완성하였습니다.

Anthony Ciotti

회원 가입일: 04/07/16

747 평판

안내서 5개 작성하였습니다

UMass Dartmouth, Team 4-5, Catania Spring 2016 UMass Dartmouth, Team 4-5, Catania Spring 2016 회원

UMASSD-CATANIA-S16S4G5

4 회원들

안내서 5개 작성하였습니다

댓글 0개

댓글 쓰기

조회 통계:

24 시간 전: 0

7일 전: 1

30일 전: 16

전체 시간: 6,421