이 버전에는 잘못된 편집 사항이 있을 수 있습니다. 최신 확인된 스냅샷으로 전환하십시오.
필요한 것
-
이 단계는 번역되지 않았습니다. 번역을 도와주십시오
-
Power-off the netbook fully before attempting to remove the battery.
-
Flip your netbook upside down, and locate the sliding tabs near the battery.
-
Slide both tabs inward so that the battery visibly moves away from the case of the computer.
-
Release the tabs and pull the battery out.
-
-
이 단계는 번역되지 않았습니다. 번역을 도와주십시오
-
With the screen closed, turn your netbook around so that the battery slot is facing you.
-
Remove the three 2.9mm screws in the battery slot.
-
This step can be made easier by using a magnetic screwdriver.
-
-
이 단계는 번역되지 않았습니다. 번역을 도와주십시오
-
Flip the netbook upright, and open the screen as far as it will go.
-
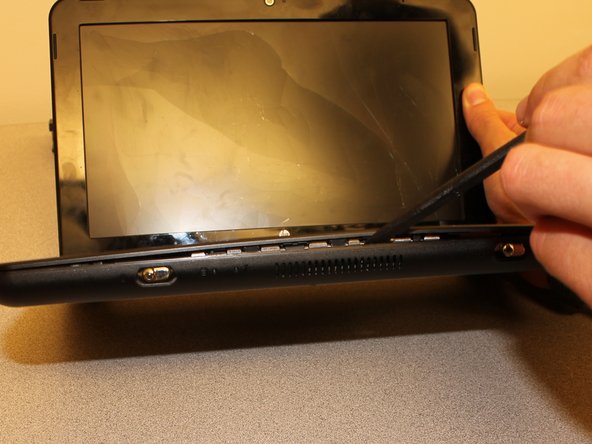
Pry up the keyboard from the middle of the top edge.
-
Insert the flat end of the spudger between middle of the the top edge of the keyboard and the plastic frame behind it.
-
Pry the keyboard up until it pops out or until you can grab it with your fingers, and then pull gently until it pops out on both sides.
-
-
이 단계는 번역되지 않았습니다. 번역을 도와주십시오
-
Flip the keyboard over (toward you) by pivoting it about the lower edge, and lay it upside down on top of the touchpad area to reveal the ribbon cable.
-
Lightly pull up on the black tab on top of the keyboard ribbon cable until it hinges toward you and releases the ribbon cable end.
-
Pull the ribbon cable backward and out of the receptacle. This should not require any effort.
-
-
-
이 단계는 번역되지 않았습니다. 번역을 도와주십시오
-
Remove the three screws holding down the hard drive. Use a Phillips PH0 screwdriver for the two silver, 3.4mm screws on the right, and use a PH1 for the black, 10.3mm screw on the left.
-
It is not necessary to fully remove the 10.3mm screw, but if you do, be careful to not lose the spring.
-
-
이 단계는 번역되지 않았습니다. 번역을 도와주십시오
-
As shown on the top face of the hard drive itself, pull hard drive left using the black tab until the hard drive is unplugged and entirely released from its receptacle.
-
Lift the hard drive out of the laptop.
-
Place the hard drive in an anti-static bag to reduce the likelihood of damaging it with static electricity.
-
-
이 단계는 번역되지 않았습니다. 번역을 도와주십시오
-
Flip the netbook over so you are looking at the bottom, and locate the two screws that hold the memory card cover.
-
Next, take a Phillips PH1 screwdriver and unscrew the two screws.
-
If necessary, use the flat end of the spudger to assist in prying the cover away from the computer.
-
-
이 단계는 번역되지 않았습니다. 번역을 도와주십시오
-
Remove the 4.9mm screw located to the right of the of the memory card using a PH1 screwdriver.
-
-
이 단계는 번역되지 않았습니다. 번역을 도와주십시오
-
Pry the four feet with the pick-end of the spudger. These are glued down, so this may require some force.
-
Remove the 6mm PH1 screws located under each foot.
-
-
이 단계는 번역되지 않았습니다. 번역을 도와주십시오
-
Flip the netbook over and remove with a PH1 screwdriver the eight 5.9mm screws that secure the keyboard bezel in place.
-
Using the flat end of the spudger or pry stick, pry the keyboard bezel away from the base by wedging the tool between the base and keyboard bezel and run the tool along the side until the cover is fully released.
-
Carefully flip the keyboard bezel over (toward you) to reveal the touchpad ribbon cable.
-
-
이 단계는 번역되지 않았습니다. 번역을 도와주십시오
-
Locate the black and white tab that connects the touchpad ribbon cable to the motherboard.
-
Using your fingernail or a pry stick, flip the white tab up to release the ribbon cable end.
-
Remove the touchpad ribbon cable from the receptacle on the system board by gently pulling the ribbon away from the clamp.
-


팀

Clemson, Team 14-1, Benson Fall 2013 Clemson, Team 14-1, Benson Fall 2013 회원
CLEM-BENSON-F13S14G1
3 회원들
안내서 12개 작성하였습니다