주요 콘텐츠로 건너뛰기

HP Mini 110-3131dx Wireless Card Replacement

필요한 것

    • Power off the laptop before trying to remove the battery.

    • Turn the laptop upside down, and locate the sliding tabs on the battery.

    • Slide both tabs in an inward direction, then slide the battery away from the laptop.

  1. HP Mini 110-3131dx Wireless Card Replacement, Keyboard: 2 단계, 이미지 1/1
    • Remove the three black screws marked by the keyboard symbol using a Phillips #1 screwdriver.

  2. HP Mini 110-3131dx Wireless Card Replacement: 3 단계, 이미지 1/3 HP Mini 110-3131dx Wireless Card Replacement: 3 단계, 이미지 2/3 HP Mini 110-3131dx Wireless Card Replacement: 3 단계, 이미지 3/3
    • Turn the laptop upright and open it.

    • Disconnect the clips located around the perimeter of the keyboard.

    • Slide the iFixit opening tool between the top edge of the keyboard and the plastic bezel.

    • Start either above the esc key or the delete key.

    • Pull the keyboard with your fingers until it comes out on both sides.

    • Be careful not to pull the keyboard out too fast. There is a fragile ribbon cable that attaches to the motherboard behind the keyboard.

  3. HP Mini 110-3131dx Wireless Card Replacement: 4 단계, 이미지 1/1
    • Tilt the keyboard toward you to reveal the ribbon cable.

    • Lift up the black tab on top of the keyboard ribbon cable to release the ribbon cable.

    • Pull the ribbon cable out of its container.

  4. HP Mini 110-3131dx Wireless Card Replacement, Hard Drive: 5 단계, 이미지 1/1
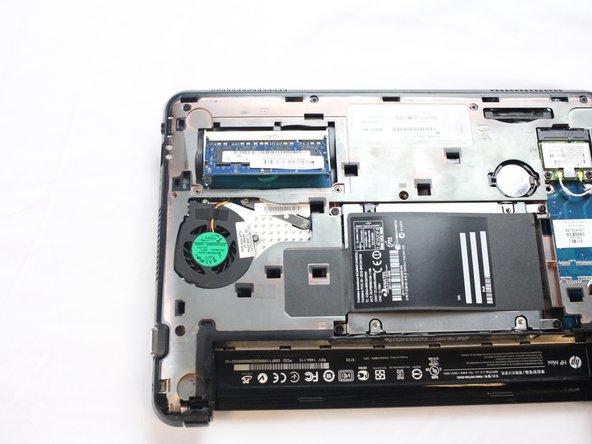
    • Remove the four screws holding down the hard drive using a Phillips #1 screwdriver.

  5. HP Mini 110-3131dx Wireless Card Replacement: 6 단계, 이미지 1/2 HP Mini 110-3131dx Wireless Card Replacement: 6 단계, 이미지 2/2
    • Lift the black flap covering the hard drive then slide it towards the left using the orange tab until it's released from its receptacle.

    • Pull the hard drive out of the laptop.

    • Put the hard drive in an anti-static bag to decrease the likelihood of harming it with static electricity.

  6. HP Mini 110-3131dx Wireless Card Replacement, Memory Card: 7 단계, 이미지 1/3 HP Mini 110-3131dx Wireless Card Replacement, Memory Card: 7 단계, 이미지 2/3 HP Mini 110-3131dx Wireless Card Replacement, Memory Card: 7 단계, 이미지 3/3
    • Find the two silver screws that hold the memory card cover.

    • Take a PH1 screwdriver and unscrew the two screws.

    • Remove the metal cover

  7. HP Mini 110-3131dx Wireless Card Replacement: 8 단계, 이미지 1/2 HP Mini 110-3131dx Wireless Card Replacement: 8 단계, 이미지 2/2
    • Pull the two white tabs located on either side of the memory card away from each other until the card pops up

    • Remove the card

  8. HP Mini 110-3131dx Wireless Card Replacement, Keyboard Bezel: 9 단계, 이미지 1/2 HP Mini 110-3131dx Wireless Card Replacement, Keyboard Bezel: 9 단계, 이미지 2/2
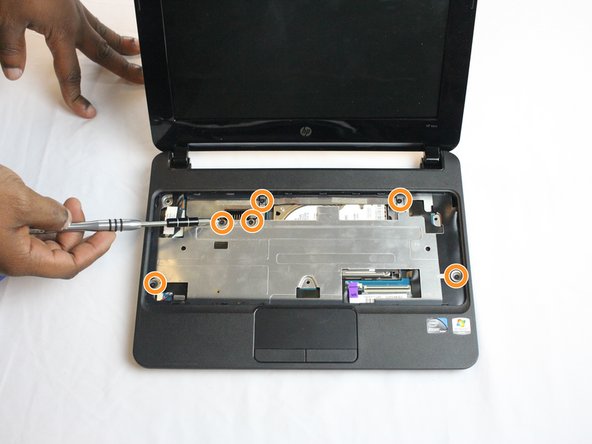
    • Remove the six black screws around the perimeter of the laptop using a Phillips #1 screwdriver.

    • Be sure to keep track of which screws go where as they are not all the same size.

    • Flip the laptop over and remove the six black screws.

  9. HP Mini 110-3131dx Wireless Card Replacement: 10 단계, 이미지 1/2 HP Mini 110-3131dx Wireless Card Replacement: 10 단계, 이미지 2/2
    • Using your fingernail or the iFixit opening tool, flip the black tab up to release the ribbon cable that connects the touchpad and motherboard.

    • Disconnect the red and black wires from the motherboard on the left-hand side of the bezel using your fingernail or iFixit opening tool.

  10. HP Mini 110-3131dx Wireless Card Replacement: 11 단계, 이미지 1/1
    • Lift the keyboard bezel from the back end and slide the iFixit opening tool around the perimeter of the bezel until it is fully released.

  11. HP Mini 110-3131dx Wireless Card Replacement, Wireless Card: 12 단계, 이미지 1/1
    • Using a pry stick, removing the two cables from the back of the card.

    • Be sure to remember which cable attaches to which connector on the card. The cable with the white band should be attached to the connector labelled "J2."

  12. HP Mini 110-3131dx Wireless Card Replacement: 13 단계, 이미지 1/1
    • Detach the two 3.4mm screws that is holding down the back of the card with a Phillips PH0 screwdriver.

    • The card is spring loaded at the receptacle. If you are holding it down, the card will jump up once both screws are dissemble.

    • Allow the card to raise up, and then slightly push it out of the black receptacle.

    • As you are putting the card back in, make sure it is fully placed in the receptacle before pushing it back down to place in the screws.

결론

To reassemble your device, follow these instructions in reverse order.

aarondcollege

회원 가입일: 10/06/16

1,297 평판

안내서 10개 작성하였습니다

USF Tampa, Team 2-4, Cagle Fall 2016 USF Tampa, Team 2-4, Cagle Fall 2016 회원

USFT-CAGLE-F16S2G4

5 회원들

안내서 10개 작성하였습니다

댓글 0개

댓글 쓰기

조회 통계:

24 시간 전: 0

7일 전: 0

30일 전: 2

전체 시간: 354