주요 콘텐츠로 건너뛰기
HP Mini 210 Hard Drive Replacement

HP Mini 210 Hard Drive Replacement

Heather Freed

Heather Freed10 다른 기여자

최종 수정일 May 7, 2024

10 - 20 분
쉬움
누락된 단계

If the hard drive makes scratching or whining noises, or if the operating system does not boot due to a disk read error, you may need to replace it.

The hard drive contains operating system files and your personal files. If you intend to replace the hard drive, save any personal files you need later onto an alternative media source before completing these steps. You will need to install an operating system on the new hard drive once the new hard drive is installed on the netbook.

필요한 것

도구

더보기...

  1. HP Mini 210 Hard Drive Replacement, Battery: 1 단계, 이미지 2개 중 1개 HP Mini 210 Hard Drive Replacement, Battery: 1 단계, 이미지 2개 중 2개
    • Turn off and unplug the netbook before replacing the battery.

    • Hold the netbook top-side down with the lid closed.

    • Slide the plastic battery release latches towards the lock symbols.

    • The left tab unlocks completely, but you will need to hold the right tab towards the lock symbol as you remove the battery.

  2. HP Mini 210 Hard Drive Replacement: 2 단계, 이미지 1개 중 1개
    • Slide the battery out from the netbook.

  3. HP Mini 210 Hard Drive Replacement, Disassembling HP Mini 210 Back Case: 3 단계, 이미지 1개 중 1개
    • Turn the netbook to view its edge.

    • Press both orange eject buttons simultaneously, and use a spudger to pry off the back case.

  4. HP Mini 210 Hard Drive Replacement: 4 단계, 이미지 1개 중 1개
    • If the back case does not separate from the netbook easily, use the spudger to pry off the back case by the edge near the battery compartment, and work your way to the sides. The case will then pivot along the front edge.

  5. HP Mini 210 Hard Drive Replacement: 5 단계, 이미지 1개 중 1개
    • Pull the back case off from the front edge.

  6. HP Mini 210 Hard Drive Replacement, Hard Drive: 6 단계, 이미지 1개 중 1개
    이 단계에 사용된 도구:
    Tweezers
    $4.99
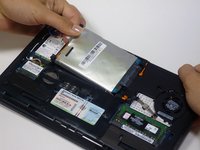
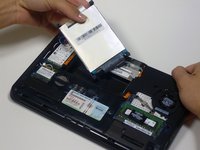
    • Peel back the black sticker covering the hard drive with tweezers or your fingers.

  7. HP Mini 210 Hard Drive Replacement: 7 단계, 이미지 1개 중 1개
    • Use a plastic opening tool to carefully disconnect the hard drive connector found above the RAM slot.

  8. HP Mini 210 Hard Drive Replacement: 8 단계, 이미지 2개 중 1개 HP Mini 210 Hard Drive Replacement: 8 단계, 이미지 2개 중 2개
    • Pull the silver plastic tab up and remove the hard drive. The tab may also be black.

    • Be aware of the 4 foam cushions on each corner of the hard drive as they may become loose during removal.

결론

To reassemble your device, follow these instructions in reverse order.

다른 14명이 해당 안내서를 완성하였습니다.

작성자

10다른 기여자 명과 함께

Heather Freed

회원 가입일: 10/06/12

723 평판

안내서 8개를 작성함

Cal Poly, Team 9-17, Amido Fall 2012 Cal Poly, Team 9-17, Amido Fall 2012 회원

CPSU-AMIDO-F12S9G17

3 회원들

안내서 8개를 작성함

댓글 한 개

Be aware that some models don't have buttons but a orange switch that need some pressure to release the cover

Alejandro - 답글

댓글 쓰기

조회 통계:

지난 24시간: 0

지난 7일: 4

지난 30일: 21

전체 시간: 18,438