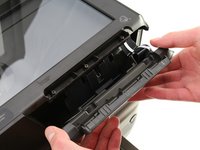
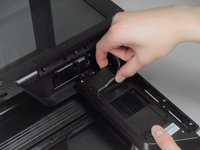
주요 콘텐츠로 건너뛰기

HP Officejet Pro 8600 Plus Control Panel Replacement

필요한 것

  1. HP Officejet Pro 8600 Plus Control Panel Replacement, Control Panel: 1 단계, 이미지 1/1
    • Lift the scanner lid to a resting position.

  2. HP Officejet Pro 8600 Plus Control Panel Replacement: 2 단계, 이미지 1/1
    • Wedge the plastic opening tool into each of the three plugs to pry them from the control panel hinge located above the control panel screen.

  3. HP Officejet Pro 8600 Plus Control Panel Replacement: 3 단계, 이미지 1/1
    • Remove the three 10mm-T10 Torx screws.

  4. HP Officejet Pro 8600 Plus Control Panel Replacement: 4 단계, 이미지 1/1
    • Disconnect the control panel from the hinge by gently lifting upward, then outward towards you.

  5. HP Officejet Pro 8600 Plus Control Panel Replacement: 5 단계, 이미지 1/3 HP Officejet Pro 8600 Plus Control Panel Replacement: 5 단계, 이미지 2/3 HP Officejet Pro 8600 Plus Control Panel Replacement: 5 단계, 이미지 3/3
    • Detach the control panel from the black plastic latch by gently lifting upward, then outward towards you.

    • Pull up on the left side when sliding up so the panel does not get stuck at the end of the track.

  6. HP Officejet Pro 8600 Plus Control Panel Replacement: 6 단계, 이미지 1/3 HP Officejet Pro 8600 Plus Control Panel Replacement: 6 단계, 이미지 2/3 HP Officejet Pro 8600 Plus Control Panel Replacement: 6 단계, 이미지 3/3
    • Turn over the control panel, making the screen face downwards.

    • Place two fingers on the rectangular, plastic wire cover and squeeze inward. Slide the cover downward, away from the cables, until the cover is fully removed.

  7. HP Officejet Pro 8600 Plus Control Panel Replacement: 7 단계, 이미지 1/2 HP Officejet Pro 8600 Plus Control Panel Replacement: 7 단계, 이미지 2/2
    • Disconnect the two ribbon cables from the panel by pulling them upward out of their ports.

    • This does not break the cables. They can easily be reconnected by plugging them into their ports again.

결론

To reassemble your device, follow these instructions in reverse order.

다른 9명이 해당 안내서를 완성하였습니다.

Mackinnon Buck

회원 가입일: 04/18/18

1,182 평판

안내서 3개 작성하였습니다

Cal Poly, Team S16-G4, Livingston Spring 2018 Cal Poly, Team S16-G4, Livingston Spring 2018 회원

CPSU-LIVINGSTON-S18S16G4

4 회원들

안내서 10개 작성하였습니다

댓글 4개

This worked pretty much exactly as described; was a fairly straightforward procedure. Just have to be super-careful with those ribbon cables - they’re pretty delicate!

Angus McAllister - 답글

This is the easy one. Please do one for the HP Officejet Pro 8610. How the !&&* do you remove the led panel. It’s maddening!

Greg Freeman - 답글

Now if only I could find a replacement panel that I can trust! Any suggestions on where to buy the part?

L R Shukla - 답글

I’ve two of these printers and the screen is shot on both of them. Very frustrating that replacement screens aren’t available. Almost looks like a planned failure????

Jon Pagh - 답글

댓글 쓰기

조회 통계:

24 시간 전: 2

7일 전: 20

30일 전: 89

전체 시간: 9,150