주요 콘텐츠로 건너뛰기

HP Pavilion 14-b120dx CPU Cooling Fan Replacement

필요한 것

  1. HP Pavilion 14-b120dx CPU Cooling Fan Replacement, Battery: 1 단계, 이미지 1개 중 1개
    • Power down the laptop and detach the charging cord (failure to do so can result in electrical shock).

  2. HP Pavilion 14-b120dx CPU Cooling Fan Replacement: 2 단계, 이미지 3개 중 1개 HP Pavilion 14-b120dx CPU Cooling Fan Replacement: 2 단계, 이미지 3개 중 2개 HP Pavilion 14-b120dx CPU Cooling Fan Replacement: 2 단계, 이미지 3개 중 3개
    • Flip the laptop upside down so that the bottom is facing you.

    • Push the slide on the right toward the center of the laptop, releasing the battery latch.

    • Lift the battery up and away from the laptop.

  3. HP Pavilion 14-b120dx CPU Cooling Fan Replacement, Keyboard: 3 단계, 이미지 3개 중 1개 HP Pavilion 14-b120dx CPU Cooling Fan Replacement, Keyboard: 3 단계, 이미지 3개 중 2개 HP Pavilion 14-b120dx CPU Cooling Fan Replacement, Keyboard: 3 단계, 이미지 3개 중 3개
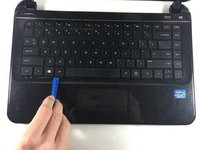
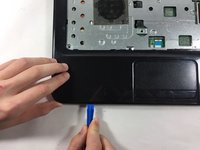
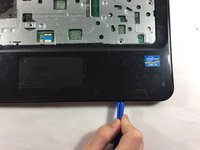
    • Insert the plastic opening tool between the keyboard and the palm rest.

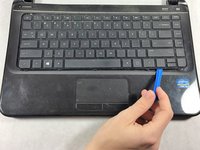
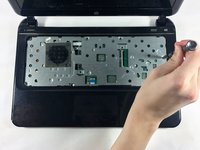
    • Pry upwards until the keyboard section detaches from the laptop.

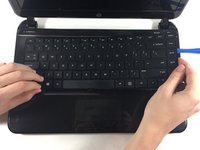
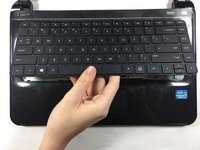
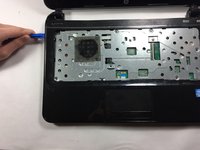
    • Repeat this around the edge of the entire keyboard.

    • Sections will make loud snapping noises as they detach from the palm rest - this is normal.

  4. HP Pavilion 14-b120dx CPU Cooling Fan Replacement: 4 단계, 이미지 2개 중 1개 HP Pavilion 14-b120dx CPU Cooling Fan Replacement: 4 단계, 이미지 2개 중 2개
    • Lift the keyboard slowly up until the connecting cable is exposed.

    • Carefully lift the flap on the ZIF connector using a fingernail or plastic opening tool. This will release the cable.

    • Detach the cable.

  5. HP Pavilion 14-b120dx CPU Cooling Fan Replacement, Palm Rest: 5 단계, 이미지 2개 중 1개 HP Pavilion 14-b120dx CPU Cooling Fan Replacement, Palm Rest: 5 단계, 이미지 2개 중 2개
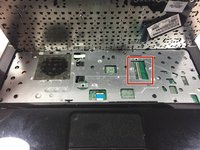
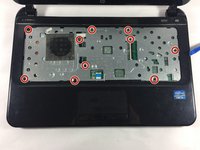
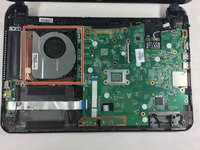
    • Unscrew the 10 6.0 mm screws under the keyboard housing with a Philips #0 head screwdriver.

  6. HP Pavilion 14-b120dx CPU Cooling Fan Replacement: 6 단계, 이미지 3개 중 1개 HP Pavilion 14-b120dx CPU Cooling Fan Replacement: 6 단계, 이미지 3개 중 2개 HP Pavilion 14-b120dx CPU Cooling Fan Replacement: 6 단계, 이미지 3개 중 3개
    • Insert the plastic opening tool into the seam between the palm rest and the laptop.

    • Pry upwards until the palm rest separates from the laptop.

    • Repeat this process around the entire computer.

    • These steps will be similar to the ones you took to remove the keyboard. Again, you will hear snapping noises.

  7. HP Pavilion 14-b120dx CPU Cooling Fan Replacement: 7 단계, 이미지 1개 중 1개
    • Lift upwards to remove the palm rest.

  8. HP Pavilion 14-b120dx CPU Cooling Fan Replacement, CPU Cooling Fan: 8 단계, 이미지 2개 중 1개 HP Pavilion 14-b120dx CPU Cooling Fan Replacement, CPU Cooling Fan: 8 단계, 이미지 2개 중 2개
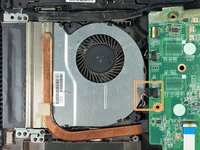
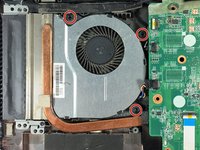
    • Locate the fan in the upper left hand corner of the laptop.

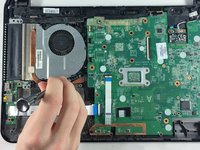
    • Remove the cable connecting the fan to the motherboard.

    • Be sure not to damage the motherboard or the connecting cable. Carefully apply force to remove the cable.

  9. HP Pavilion 14-b120dx CPU Cooling Fan Replacement: 9 단계, 이미지 2개 중 1개 HP Pavilion 14-b120dx CPU Cooling Fan Replacement: 9 단계, 이미지 2개 중 2개
    • Unscrew the 3 6.0 mm screws holding the fan with a Phillips #0 head screwdriver.

  10. HP Pavilion 14-b120dx CPU Cooling Fan Replacement: 10 단계, 이미지 1개 중 1개
    • Remove the fan by pulling upward and to the right.

결론

To reassemble your device, follow these instructions in reverse order.

다른 한 분이 해당 안내서를 완성하였습니다.

작성자

5다른 기여자 명과 함께

Erin Lavalla

회원 가입일: 10/18/16

458 평판

안내서 4개를 작성함

UMass Dartmouth, Team 4-4, Catania Fall 2016 UMass Dartmouth, Team 4-4, Catania Fall 2016 회원

UMASSD-CATANIA-F16S4G4

3 회원들

안내서 6개를 작성함

0가이드 댓글

댓글 쓰기

조회 통계:

지난 24시간: 0

지난 7일: 2

지난 30일: 25

전체 시간: 1,586