주요 콘텐츠로 건너뛰기

HP Pavilion 14-q020nr Keyboard & Touchpad Dissassembly

필요한 것

  1. HP Pavilion 14-q020nr  Keyboard & Touchpad Dissassembly, Keyboard & Touchpad Panel: 1 단계, 이미지 1/2 HP Pavilion 14-q020nr  Keyboard & Touchpad Dissassembly, Keyboard & Touchpad Panel: 1 단계, 이미지 2/2
    • Turn the laptop over.

    • Remove all nine 3mm screws on back panel with a Phillips Head 1 driver.

  2. HP Pavilion 14-q020nr  Keyboard & Touchpad Dissassembly: 2 단계, 이미지 1/3 HP Pavilion 14-q020nr  Keyboard & Touchpad Dissassembly: 2 단계, 이미지 2/3 HP Pavilion 14-q020nr  Keyboard & Touchpad Dissassembly: 2 단계, 이미지 3/3
    • Pry off the four rubber bumpers, located at the top corners and center of the back panel, off with a pair of tweezers.

    • Bumpers are delicate and can be easily ripped.

    • Unscrew the four 3mm screws under the bumpers using a Phillips Head 1 screwdriver.

  3. HP Pavilion 14-q020nr  Keyboard & Touchpad Dissassembly: 3 단계, 이미지 1/2 HP Pavilion 14-q020nr  Keyboard & Touchpad Dissassembly: 3 단계, 이미지 2/2
    • Flip the laptop right side up and open the clamshell.

    • Starting at the bottom right corner, slide the opening tool into the crevice between the blue and silver panels.

    • Carefully pry the top casing up around the edges, moving counterclockwise.

    • Keep the tool steady throughout, as prying in a rough manner can break the casing.

    • You will hear audible clicking sounds as the clips connecting the two halves disconnect from each other.

  4. HP Pavilion 14-q020nr  Keyboard & Touchpad Dissassembly: 4 단계, 이미지 1/1
    • Close the laptop and orient it on its side (clamshell hinge up), carefully holding it steady to ensure its safety.

    • Insert the opening tool inside of the hinge and pry with an even amount of force to disconnect the keyboard panel from the fan grate.

  5. HP Pavilion 14-q020nr  Keyboard & Touchpad Dissassembly: 5 단계, 이미지 1/3 HP Pavilion 14-q020nr  Keyboard & Touchpad Dissassembly: 5 단계, 이미지 2/3 HP Pavilion 14-q020nr  Keyboard & Touchpad Dissassembly: 5 단계, 이미지 3/3
    • Reorient the laptop in an upright fashion and open the clamshell.

    • If needed, continue to pry the silver keyboard panel from the rest of the hardware with minimal force.

    • Slowly slide the silver keyboard panel towards you while lifting gently to separate the halves.

    • The panel is still connected by a series of delicate connectors glued to the mainframe, so do not pull the panel right off.

  6. HP Pavilion 14-q020nr  Keyboard & Touchpad Dissassembly: 6 단계, 이미지 1/3 HP Pavilion 14-q020nr  Keyboard & Touchpad Dissassembly: 6 단계, 이미지 2/3 HP Pavilion 14-q020nr  Keyboard & Touchpad Dissassembly: 6 단계, 이미지 3/3
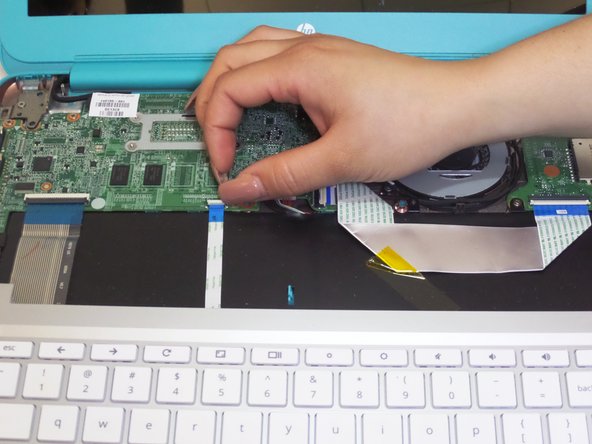
    • While keeping silver keyboard panel hovering above the laptop, locate the touchpad connector ribbon attached to both the silver panel and motherboard.

    • With your finger, flip up the white clasp that holds the connector, releasing the connector ribbon.

    • Unpeel the connector ribbon from its position on the motherboard.

  7. HP Pavilion 14-q020nr  Keyboard & Touchpad Dissassembly: 7 단계, 이미지 1/3 HP Pavilion 14-q020nr  Keyboard & Touchpad Dissassembly: 7 단계, 이미지 2/3 HP Pavilion 14-q020nr  Keyboard & Touchpad Dissassembly: 7 단계, 이미지 3/3
    • With your finger, flip up the white clasp that connects the larger keyboard connector to the motherboard, releasing the connector ribbon.

    • Gently pull the connector ribbon from the clasp.

  8. HP Pavilion 14-q020nr  Keyboard & Touchpad Dissassembly: 8 단계, 이미지 1/1
    • Lift the keyboard panel up and away from the CPU, completely revealing the mainframe.

결론

To reassemble your device, follow these instructions in reverse order. Remember to carefully handle and replace the blue and silver connectors.

다른 2명이 해당 안내서를 완성하였습니다.

Samantha Esqueda

회원 가입일: 09/11/17

155 평판

안내서 1개 작성함

CSU Fullerton, Team S2-G2, Bruce Fall 2017 CSU Fullerton, Team S2-G2, Bruce Fall 2017 회원

CSUF-BRUCE-F17S2G2

3 회원들

안내서 6개 작성하였습니다

댓글 0개

댓글 쓰기

조회 통계:

24 시간 전: 0

7일 전: 0

30일 전: 0

전체 시간: 319