주요 콘텐츠로 건너뛰기

HP Pavilion 14-v062us Screen Replacement

필요한 것

  1. HP Pavilion 14-v062us Screen Replacement, Battery: 1 단계, 이미지 1/2 HP Pavilion 14-v062us Screen Replacement, Battery: 1 단계, 이미지 2/2
    • Power laptop off and make sure it is not plugged into charger

    • Push inward towards the center of laptop (it may take a lot of pressure). Battery should release once buttons are completely pushed in

  2. HP Pavilion 14-v062us Screen Replacement: 2 단계, 이미지 1/2 HP Pavilion 14-v062us Screen Replacement: 2 단계, 이미지 2/2
    • Lift the battery upwards and out from the laptop

  3. HP Pavilion 14-v062us Screen Replacement, Keyboard: 3 단계, 이미지 1/3 HP Pavilion 14-v062us Screen Replacement, Keyboard: 3 단계, 이미지 2/3 HP Pavilion 14-v062us Screen Replacement, Keyboard: 3 단계, 이미지 3/3
    • Remove rectangular rubber tops with a spudger

    • Remove the two 4.60 mm PH#1 screws located under rectangular rubber tops.

    • Remove plastic edge covering with the blue plastic opening tool.

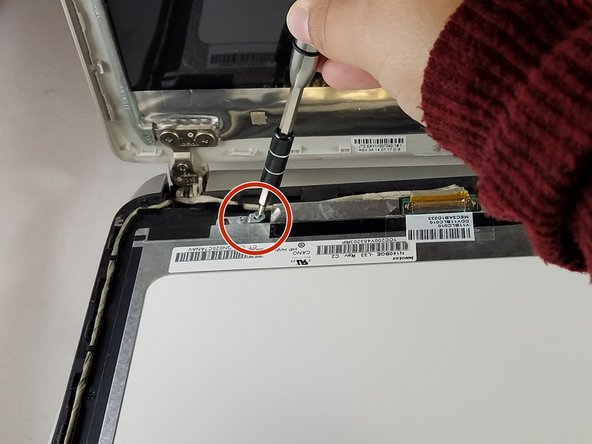
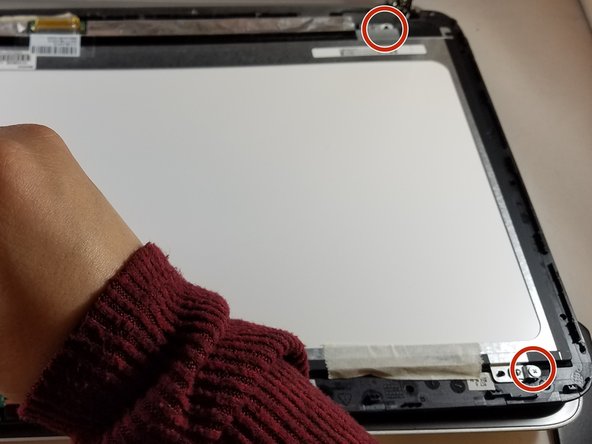
    • Remove two 4.63 mm PH#1 screws located under plastic edge covering.

  4. HP Pavilion 14-v062us Screen Replacement: 4 단계, 이미지 1/2 HP Pavilion 14-v062us Screen Replacement: 4 단계, 이미지 2/2
    • Use Phillips screwdriver #1

    • Remove all nine 7.09 mm PH#1 screw black screws including small rectangular cover.

    • Remove the three 7.14 mm PH#1 screws.

    • Remove the one 7.09 mm PH#1 screw that will be underneath the small rectangular cover

  5. HP Pavilion 14-v062us Screen Replacement: 5 단계, 이미지 1/2 HP Pavilion 14-v062us Screen Replacement: 5 단계, 이미지 2/2
    • Remove disc tray

    • Locate screw within computer that is inside of where the disc tray was

    • Using a Phillips #1 screwdriver, unscrew the screw

    • Set laptop down and open laptop so the keyboard is facing you

  6. HP Pavilion 14-v062us Screen Replacement: 6 단계, 이미지 1/3 HP Pavilion 14-v062us Screen Replacement: 6 단계, 이미지 2/3 HP Pavilion 14-v062us Screen Replacement: 6 단계, 이미지 3/3
    • Using a spudger or plastic opening tool, pry along siding of keyboard, where it connects to the rest of the laptop

    • Pry until you are able to lift entire face and keyboard

    • Only cables should be connecting it underneath

  7. HP Pavilion 14-v062us Screen Replacement: 7 단계, 이미지 1/3 HP Pavilion 14-v062us Screen Replacement: 7 단계, 이미지 2/3 HP Pavilion 14-v062us Screen Replacement: 7 단계, 이미지 3/3
    • Disconnect/ unplug cables using plastic opening tool.

    • Separate the keyboard panel from the laptop with your hands.

    • Turn around the laptop and lay it flat.

  8. HP Pavilion 14-v062us Screen Replacement: 8 단계, 이미지 1/2 HP Pavilion 14-v062us Screen Replacement: 8 단계, 이미지 2/2
    • Use a spudger to pry around the first layer of the silver panel until you are able to remove it

    • Only use a metal spudger as a last resort

  9. HP Pavilion 14-v062us Screen Replacement: 9 단계, 이미지 1/3 HP Pavilion 14-v062us Screen Replacement: 9 단계, 이미지 2/3 HP Pavilion 14-v062us Screen Replacement: 9 단계, 이미지 3/3
    • Using a spudger tool, start prying around the second layer of the silver panel until you are able to remove it

    • Only use a metal spudger as a last resort

  10. HP Pavilion 14-v062us Screen Replacement, Screen: 10 단계, 이미지 1/3 HP Pavilion 14-v062us Screen Replacement, Screen: 10 단계, 이미지 2/3 HP Pavilion 14-v062us Screen Replacement, Screen: 10 단계, 이미지 3/3
    • Using the spudger, wedge tool in between screen and laptop

    • Only use a metal spudger as a last resort. A regular black nylon spudger or a plastic opening tool should be used whenever possible

    • Pry open screen with spudger and your hands

  11. HP Pavilion 14-v062us Screen Replacement: 11 단계, 이미지 1/3 HP Pavilion 14-v062us Screen Replacement: 11 단계, 이미지 2/3 HP Pavilion 14-v062us Screen Replacement: 11 단계, 이미지 3/3
    • Remove the four 2.86 mm JIS#0 screws from each corner of the silver frame that is holding the digitizer.

  12. HP Pavilion 14-v062us Screen Replacement: 12 단계, 이미지 1/2 HP Pavilion 14-v062us Screen Replacement: 12 단계, 이미지 2/2
    • Locate the white and brown wiring that connects to the digitizer and the screen.

    • Cut through the clear part of tape attached to the brown latch and white wiring.

    • Disconnect the wiring, by lifting the brown latch with the blue plastic opening tool and pulling the white wire at the same time.

    • Lift off the digitizer. If you need to replace the digitizer stop here and replace this part.

    • If you need to replace the screen, then continue

  13. HP Pavilion 14-v062us Screen Replacement: 13 단계, 이미지 1/1
    • Remove the four 5.66 mm PH#0 from under the keyboard near the hinges.

  14. HP Pavilion 14-v062us Screen Replacement: 14 단계, 이미지 1/3 HP Pavilion 14-v062us Screen Replacement: 14 단계, 이미지 2/3 HP Pavilion 14-v062us Screen Replacement: 14 단계, 이미지 3/3
    • Wedge spudger in between screen and back of computer

    • Only use a metal spudger as a last resort. A regular black nylon spudger or a plastic opening tool should be used whenever possible

    • Detach screen

결론

To reassemble your device, follow these instructions in reverse order.

다른 한 분이 해당 안내서를 완성하였습니다.

Lorena Esquivel

회원 가입일: 09/27/17

247 평판

안내서 2개 작성하였습니다

댓글 0개

댓글 쓰기

조회 통계:

24 시간 전: 5

7일 전: 7

30일 전: 13

전체 시간: 1,330