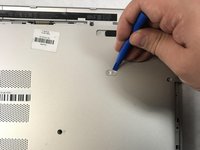
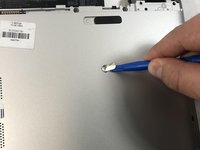
주요 콘텐츠로 건너뛰기

HP Pavilion 15-AB153NR Bottom Case Cover Replacement

필요한 것

  1. HP Pavilion 15-AB153NR Bottom Case Cover  Replacement, Battery: 1 단계, 이미지 1/1
    • Ensure computer is turned off and unplugged.

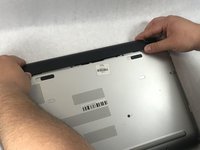
    • Slide the battery lock latch on the left to unlock. Slide from left to right to unlock.

  2. HP Pavilion 15-AB153NR Bottom Case Cover  Replacement: 2 단계, 이미지 1/2 HP Pavilion 15-AB153NR Bottom Case Cover  Replacement: 2 단계, 이미지 2/2
    • Slide the battery release latch on the right with continuous force from right to left.

    • Once battery pops, you may release latch.

  3. HP Pavilion 15-AB153NR Bottom Case Cover  Replacement: 3 단계, 이미지 1/2 HP Pavilion 15-AB153NR Bottom Case Cover  Replacement: 3 단계, 이미지 2/2
    • Grab the battery, rotating upwards and away from you. This will remove the battery.

  4. HP Pavilion 15-AB153NR Bottom Case Cover  Replacement, CD/DVD Drive: 4 단계, 이미지 1/1
    • Make sure computer is powered off and unplugged.

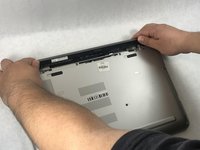
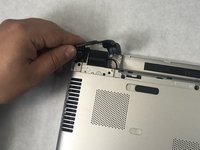
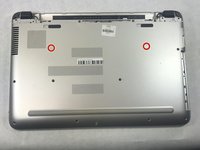
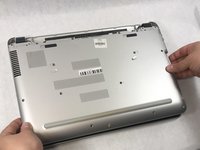
    • Flip computer over so that the bottom is facing the ceiling and the hinges are farthest from you.

  5. HP Pavilion 15-AB153NR Bottom Case Cover  Replacement: 5 단계, 이미지 1/1
    • Using the Phillips #000 screwdriver, remove the 7 mm screw on the middle right.

    • There is an icon that looks like a CD stamped into the back panel near this screw.

  6. HP Pavilion 15-AB153NR Bottom Case Cover  Replacement: 6 단계, 이미지 1/2 HP Pavilion 15-AB153NR Bottom Case Cover  Replacement: 6 단계, 이미지 2/2
    • Slide the drive out from the right side of the device.

  7. HP Pavilion 15-AB153NR Bottom Case Cover  Replacement, Bottom Case Cover: 7 단계, 이미지 1/1
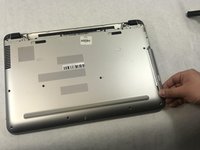
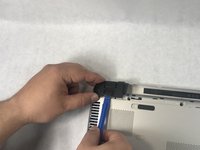
    • Using the Phillips #1 screwdriver, remove the two 12mm screws located on the hinge covers.

  8. HP Pavilion 15-AB153NR Bottom Case Cover  Replacement: 8 단계, 이미지 1/2 HP Pavilion 15-AB153NR Bottom Case Cover  Replacement: 8 단계, 이미지 2/2
    • Lift the corner covers off of the computer using a prying tool.

  9. HP Pavilion 15-AB153NR Bottom Case Cover  Replacement: 9 단계, 이미지 1/1
    • Remove the six 6.5mm screws using a Phillips #1 screwdriver that are located near the top of the laptop.

  10. HP Pavilion 15-AB153NR Bottom Case Cover  Replacement: 10 단계, 이미지 1/1
    • Remove the remaining seven 6.5mm screws using a Phillips #1 screwdriver that are securing the back cover.

  11. HP Pavilion 15-AB153NR Bottom Case Cover  Replacement: 11 단계, 이미지 1/1
    • Use the Phillips #0 screwdriver to remove the two 2mm screws.

  12. HP Pavilion 15-AB153NR Bottom Case Cover  Replacement: 12 단계, 이미지 1/3 HP Pavilion 15-AB153NR Bottom Case Cover  Replacement: 12 단계, 이미지 2/3 HP Pavilion 15-AB153NR Bottom Case Cover  Replacement: 12 단계, 이미지 3/3
    • Use prying tools to pry the covers off of the screwholes.

    • Using the Phillips #1 screwdriver, remove the two 6.5mm screws.

  13. HP Pavilion 15-AB153NR Bottom Case Cover  Replacement: 13 단계, 이미지 1/1
    • Be mindful of sharp edges on computer while using prying tools.

    • Flip computer over and open so that the screen is facing you.

    • Starting at the bottom right corner, insert the prying tool and lift upwards to loosen the back panel.

    • Continue down all sides and corners of the device.

  14. HP Pavilion 15-AB153NR Bottom Case Cover  Replacement: 14 단계, 이미지 1/2 HP Pavilion 15-AB153NR Bottom Case Cover  Replacement: 14 단계, 이미지 2/2
    • Flip laptop back over so that the bottom is facing up

    • After all sides are loosened, remove the back panel from the device.

결론

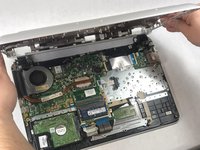
To reassemble your device, follow these instructions in reverse order.

다른 2명이 해당 안내서를 완성하였습니다.

Nicole Vachon

회원 가입일: 03/21/19

926 평판

안내서 7개 작성하였습니다

UMass Dartmouth, Team S1-G4, Simcock Spring 2019 UMass Dartmouth, Team S1-G4, Simcock Spring 2019 회원

UMASSD-SIMCOCK-S19S1G4

4 회원들

안내서 7개 작성하였습니다

댓글 0개

댓글 쓰기

조회 통계:

24 시간 전: 0

7일 전: 5

30일 전: 11

전체 시간: 1,119