주요 콘텐츠로 건너뛰기

HP Pavilion 15-d035dx Front Panel Replacement

필요한 것

  1. HP Pavilion 15-d035dx Front Panel Replacement, Battery: 1 단계, 이미지 1/3 HP Pavilion 15-d035dx Front Panel Replacement, Battery: 1 단계, 이미지 2/3 HP Pavilion 15-d035dx Front Panel Replacement, Battery: 1 단계, 이미지 3/3
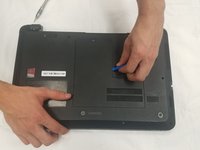
    • Switch the first lock, with the padlock icon, to the open position.

    • Then hold the second lock with the battery icon to the open position, while sliding out the battery pack.

  2. HP Pavilion 15-d035dx Front Panel Replacement, Front Panel: 2 단계, 이미지 1/1
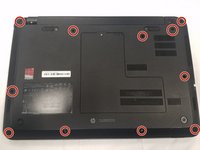
    • Begin by laying the laptop on its backside with the bottom of the laptop facing you.

  3. HP Pavilion 15-d035dx Front Panel Replacement: 3 단계, 이미지 1/2 HP Pavilion 15-d035dx Front Panel Replacement: 3 단계, 이미지 2/2
    • There will be 11, 2.5x3.0mm Philips head screws that you will need to locate.

    • Continue by unscrewing all of them using a 0 Phillips screwdriver.

  4. HP Pavilion 15-d035dx Front Panel Replacement: 4 단계, 이미지 1/3 HP Pavilion 15-d035dx Front Panel Replacement: 4 단계, 이미지 2/3 HP Pavilion 15-d035dx Front Panel Replacement: 4 단계, 이미지 3/3
    • Take off the back panel by removing the 4.0x4.7mm Philips head screw.

    • Then using the opening tool, work around the edges to pull off the back panel.

    • It will take some force to get the back panel off.

  5. HP Pavilion 15-d035dx Front Panel Replacement: 5 단계, 이미지 1/1
    • Now flip the computer right side up and open up the laptop.

    • You should be facing the screen and keyboard.

  6. HP Pavilion 15-d035dx Front Panel Replacement: 6 단계, 이미지 1/1
    • Now using the opening tool remove the front panel from the back panel.

    • It should start to pop off, you will have to do this step around the entire computer.

    • It will give some resistance so take your time to ensure that nothing breaks.

  7. HP Pavilion 15-d035dx Front Panel Replacement: 7 단계, 이미지 1/1
    • Once you have popped off the panel it should simply be able to lift off of the laptop.

    • Keep in mind that the keyboard is still connected to the motherboard. Simply lay the keyboard on top of the screen while you are completing future guides.

    • You can replace the front panel now.

결론

To reassemble your device, follow these instructions in reverse order.

다른 한 분이 해당 안내서를 완성하였습니다.

John Atkins

회원 가입일: 09/25/17

273 평판

안내서 2개 작성하였습니다

댓글 0개

댓글 쓰기

조회 통계:

24 시간 전: 0

7일 전: 1

30일 전: 3

전체 시간: 1,030