소개
The disk drive helps you listen to music, watch movies, or even write information to it to store for later use. This guide will help you replace it.
필요한 것
-
-
Press and hold the release switch, and then slide the battery out. Insert the new battery into the slot and you're done!
-
-
-
-
In the battery compartment, find the phillips screw that is holding the rear panel onto the computer. Unscrew it.
-
With the battery compartment closest to you, push the panel away from you. Once it slides back until it stops, gently lift it and put it to the side.
-
Please note that this particular screw does not completely come out, it stays with the rear panel and that is ok.
-
-
-
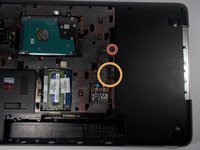
With the battery compartment closest to you, there will be a 9mm screw next in the center-right of the back plate, labeled with a keyboard symbol and a disk symbol. Remove this phillips screw.
-
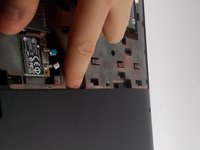
In the opening next to the screw, gently push out against the disk drive, and remove it from the disk drive compartment.
-


To reassemble your device, follow these instructions in reverse order.
To reassemble your device, follow these instructions in reverse order.
팀

UMass Dartmouth, Team 1-6, Miles Spring 2016 UMass Dartmouth, Team 1-6, Miles Spring 2016 회원
UMASSD-MILES-S16S1G6
3 회원들
안내서 9개를 작성함