주요 콘텐츠로 건너뛰기

HP Pavilion G6 Screen Replacement

필요한 것

  1. HP Pavilion G6  Screen Replacement, Remove the battery: 1 단계, 이미지 3개 중 1개 HP Pavilion G6  Screen Replacement, Remove the battery: 1 단계, 이미지 3개 중 2개 HP Pavilion G6  Screen Replacement, Remove the battery: 1 단계, 이미지 3개 중 3개
    • Close the laptop and flip it over.

    • Slide the release pin to pop the battery.

    • Remove the battery completely.

  2. HP Pavilion G6  Screen Replacement, Remove the screw covers: 2 단계, 이미지 3개 중 1개 HP Pavilion G6  Screen Replacement, Remove the screw covers: 2 단계, 이미지 3개 중 2개 HP Pavilion G6  Screen Replacement, Remove the screw covers: 2 단계, 이미지 3개 중 3개
    이 단계에 사용된 도구:
    Tweezers
    $4.99
    • Open the laptop and locate the screw covers.

    • Remove the screw covers at the bottom of the screen with tweezers.

    • Keep them somewhere safe as you will need to stick them back after the repair.

  3. HP Pavilion G6  Screen Replacement, Remove the plastic frame: 3 단계, 이미지 3개 중 1개 HP Pavilion G6  Screen Replacement, Remove the plastic frame: 3 단계, 이미지 3개 중 2개 HP Pavilion G6  Screen Replacement, Remove the plastic frame: 3 단계, 이미지 3개 중 3개
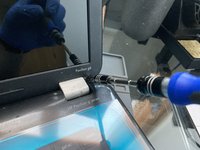
    • Unscrew the exposed 2 x Philips screws and set them aside.

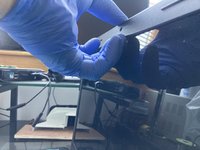
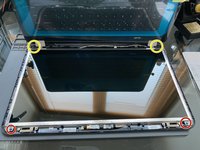
    • Starting from the top, pry up the plastic frame with your fingernails or a pry bar.

    • If you are using a pry bar, it can scratch the screen. Apply gentle pressure until the plastic frame pop out all around the frame. Don't force it!

    • Finally, remove the frame.

  4. HP Pavilion G6  Screen Replacement, Release the screen from the frame: 4 단계, 이미지 3개 중 1개 HP Pavilion G6  Screen Replacement, Release the screen from the frame: 4 단계, 이미지 3개 중 2개 HP Pavilion G6  Screen Replacement, Release the screen from the frame: 4 단계, 이미지 3개 중 3개
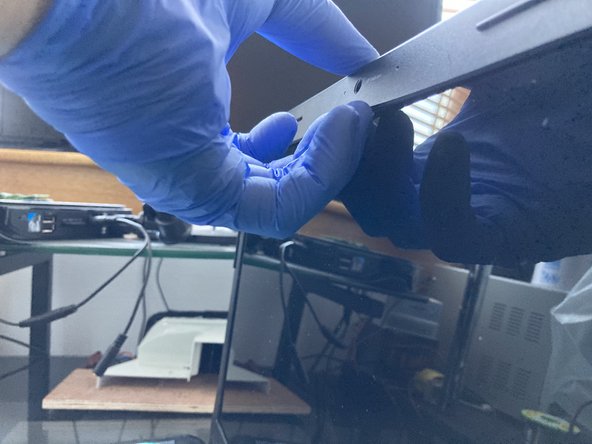
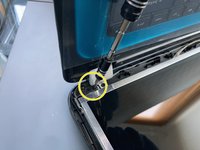
    • Remove the black Philips screw from the top on each side.

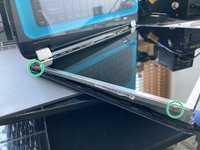
    • Remove the bottom screw from the hinge to make an easier access to the screws on the side of the screen.

    • Now that the frame is loose, you can remove the 4 x Philips screws holding the screen in the frame.

  5. HP Pavilion G6  Screen Replacement, Disconnect the screen connector: 5 단계, 이미지 3개 중 1개 HP Pavilion G6  Screen Replacement, Disconnect the screen connector: 5 단계, 이미지 3개 중 2개 HP Pavilion G6  Screen Replacement, Disconnect the screen connector: 5 단계, 이미지 3개 중 3개
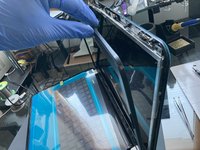
    • Turn the laptop back up and carefully tilt the screen out from the frame and rest it on the keyboard.

    • Don't try to fully remove it yet as it is still attached to the motherboard by the screen cable!

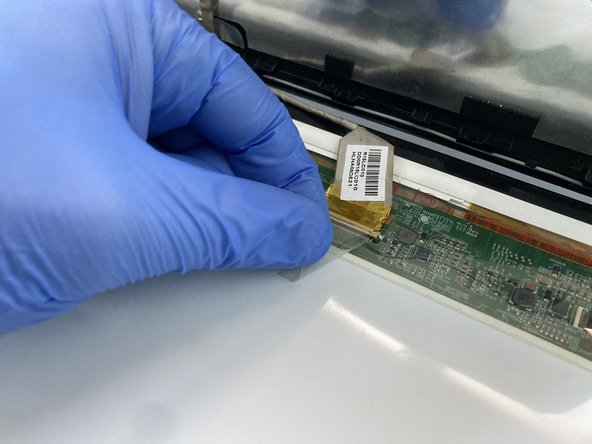
    • Gently lift up the adhesive and disconnect the screen connector. That is the screen released and ready for a change for a new one.

  6. HP Pavilion G6  Screen Replacement, Check the model number before ordering: 6 단계, 이미지 2개 중 1개 HP Pavilion G6  Screen Replacement, Check the model number before ordering: 6 단계, 이미지 2개 중 2개
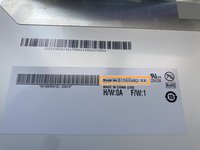
    • Before ordering a new screen make sure that you order the correct model number that is compatible with your old screen.

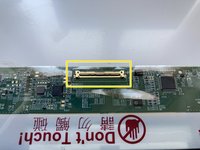
    • Check the cable connector to make sure you order the correct screen with the correct number of pins.

결론

To reassemble your device, follow these instructions in reverse order.

다른 2명이 해당 안내서를 완성하였습니다.

작성자

3다른 기여자 명과 함께

honakrisi

회원 가입일: 01/28/20

3,946 평판

안내서 8개를 작성함

0가이드 댓글

댓글 쓰기

조회 통계:

지난 24시간: 2

지난 7일: 7

지난 30일: 29

전체 시간: 1,793