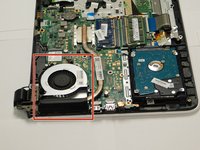
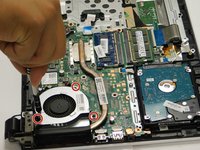
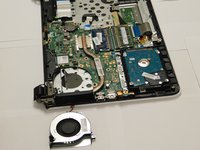
주요 콘텐츠로 건너뛰기

HP Pavilion Notebook 15-ab293cl CPU Fan Replacement

필요한 것

  1. HP Pavilion Notebook 15-ab293cl CPU Fan Replacement, CPU Fan: 1 단계, 이미지 1/2 HP Pavilion Notebook 15-ab293cl CPU Fan Replacement, CPU Fan: 1 단계, 이미지 2/2
    • Start by flipping the laptop, revealing its back.

  2. HP Pavilion Notebook 15-ab293cl CPU Fan Replacement: 2 단계, 이미지 1/3 HP Pavilion Notebook 15-ab293cl CPU Fan Replacement: 2 단계, 이미지 2/3 HP Pavilion Notebook 15-ab293cl CPU Fan Replacement: 2 단계, 이미지 3/3
    • Slide the tab marked with a lock/unlock symbol. The slide the other tab in order to release the battery.

  3. HP Pavilion Notebook 15-ab293cl CPU Fan Replacement: 3 단계, 이미지 1/2 HP Pavilion Notebook 15-ab293cl CPU Fan Replacement: 3 단계, 이미지 2/2
    • Once the battery is removed, unscrew and remove the both of the 7.5 mm screws off the black tabs using a PH1 screw driver. Then pry off the covers using the plastic opening tools.

  4. HP Pavilion Notebook 15-ab293cl CPU Fan Replacement: 4 단계, 이미지 1/3 HP Pavilion Notebook 15-ab293cl CPU Fan Replacement: 4 단계, 이미지 2/3 HP Pavilion Notebook 15-ab293cl CPU Fan Replacement: 4 단계, 이미지 3/3
    • Remove all 16 size 3.5 mm screws with a PH1 screwdriver and pry the CD drive in order reveal one last screw that must be removed.

  5. HP Pavilion Notebook 15-ab293cl CPU Fan Replacement: 5 단계, 이미지 1/1
    • Utilizing either a plastic or metal opening tool, begin prying the case from the laptop. Lastly, remove the remaining clips located on the back of the laptop.

  6. HP Pavilion Notebook 15-ab293cl CPU Fan Replacement: 6 단계, 이미지 1/2 HP Pavilion Notebook 15-ab293cl CPU Fan Replacement: 6 단계, 이미지 2/2
    • Once the laptop is fully open locate the cooling fan.

  7. HP Pavilion Notebook 15-ab293cl CPU Fan Replacement: 7 단계, 이미지 1/3 HP Pavilion Notebook 15-ab293cl CPU Fan Replacement: 7 단계, 이미지 2/3 HP Pavilion Notebook 15-ab293cl CPU Fan Replacement: 7 단계, 이미지 3/3
    • Utilizing a PH00 Screwdriver remove the two 3.5 mm screws detaining the cooling fan. Then use tweezers to remove the plug connecting the cooling fan to the mother board. Lastly remove the cooling fan.

결론

To reassemble your device, follow these instructions in reverse order.

다른 4명이 해당 안내서를 완성하였습니다.

John Carlo Barajas

회원 가입일: 09/10/18

208 평판

안내서 1개 작성함

Gateway, Team S1-G2, Luster Fall 2018 Gateway, Team S1-G2, Luster Fall 2018 회원

GCC-LUSTER-F18S1G2

4 회원들

안내서 4개 작성하였습니다

댓글 한 개

very detailed. Thanks!

mrobinson29 - 답글

댓글 쓰기

조회 통계:

24 시간 전: 1

7일 전: 2

30일 전: 6

전체 시간: 1,186