주요 콘텐츠로 건너뛰기

HP Pavilion dv5000 Screen Lock Mechanism Replacement

필요한 것

  1. HP Pavilion dv5000 Screen Lock Mechanism Replacement, Battery: 1 단계, 이미지 1/1
    • Turn off the computer, and unplug it from all external power sources.

    • Lay the computer face-down on a flat surface. Orient the computer to match the image.

    • Locate the battery release switch, as indicated in the image by the red rectangle. Slide the switch from right to left, and remove the battery.

  2. HP Pavilion dv5000 Screen Lock Mechanism Replacement, Screen Lock Mechanism: 2 단계, 이미지 1/1
    • Remove the two 11.0mm screws at the corners on either side of the battery compartment. (shown by the red circles)

    • Remove the three 6.0mm screws. (shown by the blue circles)

    • Remove the two silver 5.0mm screws. (shown by the yellow circles)

    • Remove the 6.0mm screw in the middle of the battery compartment. (shown by the teal circle)

  3. HP Pavilion dv5000 Screen Lock Mechanism Replacement: 3 단계, 이미지 1/3 HP Pavilion dv5000 Screen Lock Mechanism Replacement: 3 단계, 이미지 2/3 HP Pavilion dv5000 Screen Lock Mechanism Replacement: 3 단계, 이미지 3/3
    • Lift plastic covering strip gently at the corner to separate the plastic it from the keyboard area.

    • Slide a plastic separator tool along the strip and lift off to remove it.

  4. HP Pavilion dv5000 Screen Lock Mechanism Replacement: 4 단계, 이미지 1/3 HP Pavilion dv5000 Screen Lock Mechanism Replacement: 4 단계, 이미지 2/3 HP Pavilion dv5000 Screen Lock Mechanism Replacement: 4 단계, 이미지 3/3
    • Using tweezers, remove the (8) silicone covers over the screws of the screen's frame.

    • The image still shows the plastic strip that was removed in the last step

    • Remove the (8) now-exposed screws.

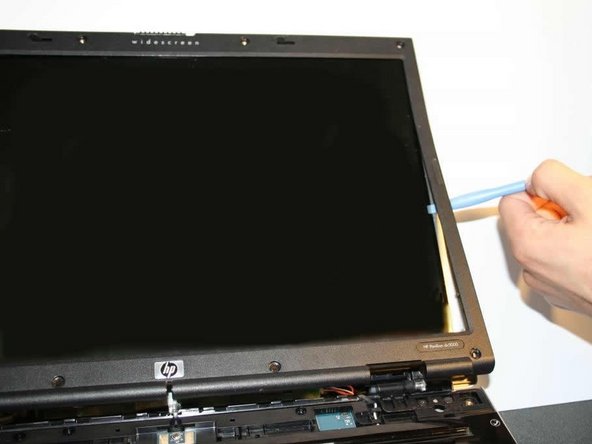
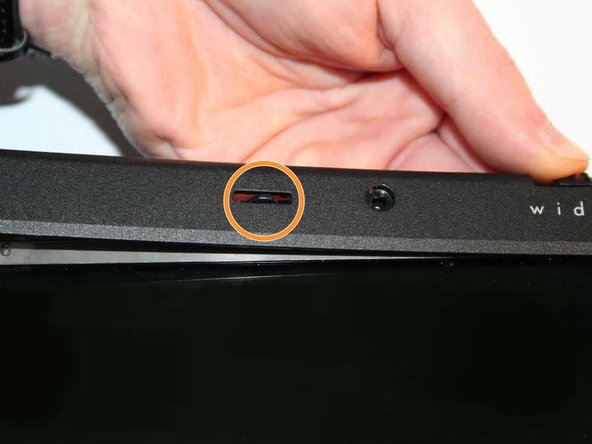
  5. HP Pavilion dv5000 Screen Lock Mechanism Replacement: 5 단계, 이미지 1/3 HP Pavilion dv5000 Screen Lock Mechanism Replacement: 5 단계, 이미지 2/3 HP Pavilion dv5000 Screen Lock Mechanism Replacement: 5 단계, 이미지 3/3
    • Using the plastic separator, make your way up from the bottom, separating the screen's frame off.

    • You may need to finagle the locking tab slightly in order to pull the frame away from it

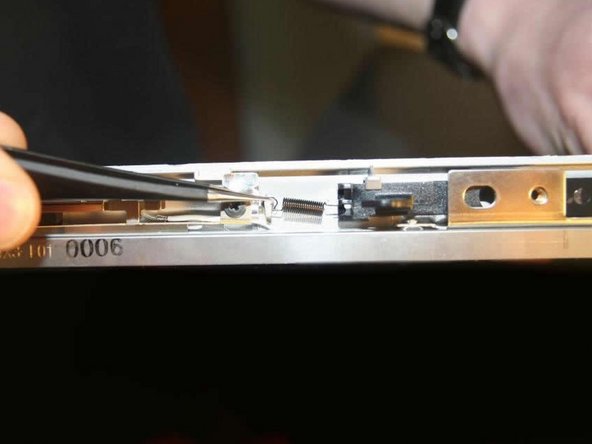
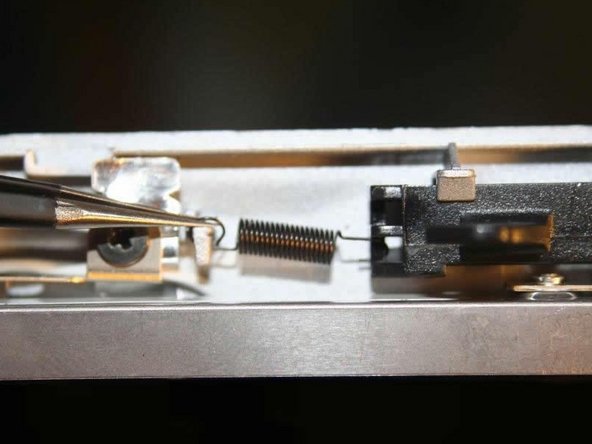
  6. HP Pavilion dv5000 Screen Lock Mechanism Replacement: 6 단계, 이미지 1/3 HP Pavilion dv5000 Screen Lock Mechanism Replacement: 6 단계, 이미지 2/3 HP Pavilion dv5000 Screen Lock Mechanism Replacement: 6 단계, 이미지 3/3
    • With frame removed, the locking assembly is visible

    • Using tweezers, pull the spring off the hook, and the locking assembly will pull down and off with little effort

    • Be sure not to drop the spring behind the screen while removing it!

  7. HP Pavilion dv5000 Screen Lock Mechanism Replacement: 7 단계, 이미지 1/1
    • Congratulations! You're ready to install the new assembly and reassemble your laptop!

결론

To reassemble your device, follow these instructions in reverse order.

다른 한 분이 해당 안내서를 완성하였습니다.

Thomas Leman

회원 가입일: 03/11/14

234 평판

안내서 2개 작성하였습니다

UMass Dartmouth, Team 4-5, Calaway Spring 2014 UMass Dartmouth, Team 4-5, Calaway Spring 2014 회원

UMASSD-CALAWAY-S14S4G5

4 회원들

안내서 3개 작성하였습니다

댓글 0개

댓글 쓰기

조회 통계:

24 시간 전: 0

7일 전: 0

30일 전: 3

전체 시간: 853