주요 콘텐츠로 건너뛰기

HP Pavilion dv7-1448dx Motherboard Replacement

필요한 것

  1. HP Pavilion dv7-1448dx Motherboard Replacement, Battery: 1 단계, 이미지 1/1
    • Make sure the computer is unplugged and turned off.

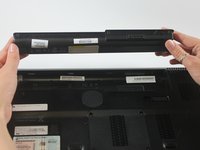
    • Place the computer front side down with the battery compartment farthest away.

  2. HP Pavilion dv7-1448dx Motherboard Replacement: 2 단계, 이미지 1/2 HP Pavilion dv7-1448dx Motherboard Replacement: 2 단계, 이미지 2/2
    • Slide the switch under the battery compartment to the left until the compartment opens. This may require some force.

  3. HP Pavilion dv7-1448dx Motherboard Replacement: 3 단계, 이미지 1/2 HP Pavilion dv7-1448dx Motherboard Replacement: 3 단계, 이미지 2/2
    • Lightly pry the battery upward to remove.

    • When reinserting the battery, match the latches along the backside of the battery with the corresponding slots in the computer in order to press it into place.

  4. HP Pavilion dv7-1448dx Motherboard Replacement, Motherboard: 4 단계, 이미지 1/3 HP Pavilion dv7-1448dx Motherboard Replacement, Motherboard: 4 단계, 이미지 2/3 HP Pavilion dv7-1448dx Motherboard Replacement, Motherboard: 4 단계, 이미지 3/3
    • Unscrew the six Phillips PM2.5×6.0 captive screws with a Phillips #00 screwdriver.

    • Pry the back casing up and away from the rest of the laptop with the plastic opening tool.

  5. HP Pavilion dv7-1448dx Motherboard Replacement: 5 단계, 이미지 1/2 HP Pavilion dv7-1448dx Motherboard Replacement: 5 단계, 이미지 2/2
    • Disconnect the WLAN antenna cables.

  6. HP Pavilion dv7-1448dx Motherboard Replacement: 6 단계, 이미지 1/1
    • Remove the five Phillips PM2.5×7.0 screws with a Phillips #00 screwdriver.

    • Remove the 17 Phillips PM2.5×3.0 screws with a Phillips #00 screwdriver.

    • A magnet may be useful to help take out the screws.

  7. HP Pavilion dv7-1448dx Motherboard Replacement: 7 단계, 이미지 1/3 HP Pavilion dv7-1448dx Motherboard Replacement: 7 단계, 이미지 2/3 HP Pavilion dv7-1448dx Motherboard Replacement: 7 단계, 이미지 3/3
    • Remove the grey mounting bracket by unscrewing the two Phillips PM2.5×3.0 screws with a Phillips #00 screwdriver.

    • Slide the bracket to the left to remove.

  8. HP Pavilion dv7-1448dx Motherboard Replacement: 8 단계, 이미지 1/1
    • Remove the two Phillips PM2.5×4.0 broadhead screws with a Phillips #00 screwdriver.

  9. HP Pavilion dv7-1448dx Motherboard Replacement: 9 단계, 이미지 1/3 HP Pavilion dv7-1448dx Motherboard Replacement: 9 단계, 이미지 2/3 HP Pavilion dv7-1448dx Motherboard Replacement: 9 단계, 이미지 3/3
    • Slide out and remove the black watch battery.

  10. HP Pavilion dv7-1448dx Motherboard Replacement: 10 단계, 이미지 1/2 HP Pavilion dv7-1448dx Motherboard Replacement: 10 단계, 이미지 2/2
    • Turn the laptop over and open it so that the keyboard is exposed.

    • Lift off the speaker cover.

  11. HP Pavilion dv7-1448dx Motherboard Replacement: 11 단계, 이미지 1/1
    • Remove the three Phillips PM2.5×3.0 screws, located on the speaker, with a Phillips #00 screwdriver.

  12. HP Pavilion dv7-1448dx Motherboard Replacement: 12 단계, 이미지 1/2 HP Pavilion dv7-1448dx Motherboard Replacement: 12 단계, 이미지 2/2
    • Unplug the white assembly cable.

  13. HP Pavilion dv7-1448dx Motherboard Replacement: 13 단계, 이미지 1/1
    • Lift off the speaker.

  14. HP Pavilion dv7-1448dx Motherboard Replacement: 14 단계, 이미지 1/2 HP Pavilion dv7-1448dx Motherboard Replacement: 14 단계, 이미지 2/2
    • Remove the four Phillips PM2.0×4.0 screws with a Phillips #00 screwdriver.

    • Partially lift the keyboard to access the ribbon cable underneath.

  15. HP Pavilion dv7-1448dx Motherboard Replacement: 15 단계, 이미지 1/1
    • Disconnect the black zero insertion force connector in order to completely remove the keyboard.

  16. HP Pavilion dv7-1448dx Motherboard Replacement: 16 단계, 이미지 1/3 HP Pavilion dv7-1448dx Motherboard Replacement: 16 단계, 이미지 2/3 HP Pavilion dv7-1448dx Motherboard Replacement: 16 단계, 이미지 3/3
    • Unhook the black WLAN antenna cables from the clasps holding it in place.

    • Pull up to fully disconnect the ends of the WLAN antenna cables.

  17. HP Pavilion dv7-1448dx Motherboard Replacement: 17 단계, 이미지 1/1
    • Disconnect the display panel cable.

  18. HP Pavilion dv7-1448dx Motherboard Replacement: 18 단계, 이미지 1/3 HP Pavilion dv7-1448dx Motherboard Replacement: 18 단계, 이미지 2/3 HP Pavilion dv7-1448dx Motherboard Replacement: 18 단계, 이미지 3/3
    • Remove the seven Phillips PM2.0×4.0 screws from the base of the screen with a Phillips #00 screwdriver.

    • Lift up the screen to remove it from the rest of the laptop.

  19. HP Pavilion dv7-1448dx Motherboard Replacement: 19 단계, 이미지 1/2 HP Pavilion dv7-1448dx Motherboard Replacement: 19 단계, 이미지 2/2
    • Press in on the silver cover in order to eject the dust cover.

    • Pull the plastic dust cover to completely remove it from the laptop.

  20. HP Pavilion dv7-1448dx Motherboard Replacement: 20 단계, 이미지 1/2 HP Pavilion dv7-1448dx Motherboard Replacement: 20 단계, 이미지 2/2
    • Disconnect the white ribbon cable.

  21. HP Pavilion dv7-1448dx Motherboard Replacement: 21 단계, 이미지 1/2 HP Pavilion dv7-1448dx Motherboard Replacement: 21 단계, 이미지 2/2
    • Remove the six PM2.5X5.0 screws with a Phillips #00 screwdriver.

    • Next, remove the six PM2.5X2.0 screws with a Phillips #00 screwdriver.

  22. HP Pavilion dv7-1448dx Motherboard Replacement: 22 단계, 이미지 1/3 HP Pavilion dv7-1448dx Motherboard Replacement: 22 단계, 이미지 2/3 HP Pavilion dv7-1448dx Motherboard Replacement: 22 단계, 이미지 3/3
    • Pry up on the metal casing to fully remove.

  23. HP Pavilion dv7-1448dx Motherboard Replacement: 23 단계, 이미지 1/3 HP Pavilion dv7-1448dx Motherboard Replacement: 23 단계, 이미지 2/3 HP Pavilion dv7-1448dx Motherboard Replacement: 23 단계, 이미지 3/3
    • Disconnect the white cable near the bottom of the laptop.

  24. HP Pavilion dv7-1448dx Motherboard Replacement: 24 단계, 이미지 1/3 HP Pavilion dv7-1448dx Motherboard Replacement: 24 단계, 이미지 2/3 HP Pavilion dv7-1448dx Motherboard Replacement: 24 단계, 이미지 3/3
    • Disconnect the white fan cable.

  25. HP Pavilion dv7-1448dx Motherboard Replacement: 25 단계, 이미지 1/1
    • Lift the motherboard up and away from the rest of the laptop.

    • The motherboard is still not fully removed.

  26. HP Pavilion dv7-1448dx Motherboard Replacement: 26 단계, 이미지 1/3 HP Pavilion dv7-1448dx Motherboard Replacement: 26 단계, 이미지 2/3 HP Pavilion dv7-1448dx Motherboard Replacement: 26 단계, 이미지 3/3
    • Rotate the motherboard so that the backside is now facing upward. It should still be connected by a single cable.

    • Unplug the white power connector cable. The motherboard is now fully removed.

결론

To reassemble your device, follow these instructions in reverse order.

다른 4명이 해당 안내서를 완성하였습니다.

Kirsten Gilliland

회원 가입일: 01/30/17

741 평판

안내서 4개 작성하였습니다

Baylor, Team 3-5, Whitney Spring 2017 Baylor, Team 3-5, Whitney Spring 2017 회원

BU-WHITNEY-S17S3G5

2 회원들

안내서 4개 작성하였습니다

댓글 한 개

This gets the east repairable laptop award.

trogfield - 답글

댓글 쓰기

조회 통계:

24 시간 전: 4

7일 전: 6

30일 전: 18

전체 시간: 1,851