주요 콘텐츠로 건너뛰기

HP Pavilion x360 15t-br000 Fan and Heatsink Assembly Replacement

필요한 것

  1. HP Pavilion x360 15t-br000 Fan and Heatsink Assembly Replacement, Keyboard Panel: 1 단계, 이미지 3개 중 1개 HP Pavilion x360 15t-br000 Fan and Heatsink Assembly Replacement, Keyboard Panel: 1 단계, 이미지 3개 중 2개 HP Pavilion x360 15t-br000 Fan and Heatsink Assembly Replacement, Keyboard Panel: 1 단계, 이미지 3개 중 3개
    • Remove the covers to access the screws attached to the back cover of the device.

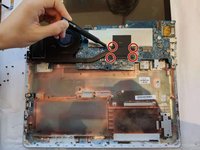
    • Remove six 3mm screws using the Phillips #0 screwdriver.

  2. HP Pavilion x360 15t-br000 Fan and Heatsink Assembly Replacement: 2 단계, 이미지 3개 중 1개 HP Pavilion x360 15t-br000 Fan and Heatsink Assembly Replacement: 2 단계, 이미지 3개 중 2개 HP Pavilion x360 15t-br000 Fan and Heatsink Assembly Replacement: 2 단계, 이미지 3개 중 3개
    • Use a metal spudger to loosen the four corners of the keyboard panel. The corner is circled red as shown in the first image.

    • Disconnect the keyboard panel cables under the upper case.

    • Remove the keyboard panel from the device.

  3. HP Pavilion x360 15t-br000 Fan and Heatsink Assembly Replacement, Fan and Heatsink Assembly: 3 단계, 이미지 3개 중 1개 HP Pavilion x360 15t-br000 Fan and Heatsink Assembly Replacement, Fan and Heatsink Assembly: 3 단계, 이미지 3개 중 2개 HP Pavilion x360 15t-br000 Fan and Heatsink Assembly Replacement, Fan and Heatsink Assembly: 3 단계, 이미지 3개 중 3개
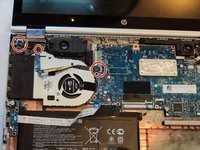
    • Remove all three 3.5 mm screws using the Phillips #0 screwdriver.

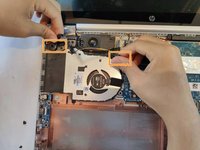
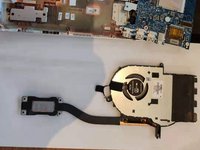
    • Disconnect the cables above the fan.

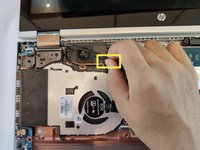
    • Disconnect the wire next to the fan.

  4. HP Pavilion x360 15t-br000 Fan and Heatsink Assembly Replacement: 4 단계, 이미지 1개 중 1개
    • Remove nine 4mm screws using the Phillips #0 screwdriver.

  5. HP Pavilion x360 15t-br000 Fan and Heatsink Assembly Replacement: 5 단계, 이미지 1개 중 1개
    • Flip over the motherboard.

  6. HP Pavilion x360 15t-br000 Fan and Heatsink Assembly Replacement: 6 단계, 이미지 2개 중 1개 HP Pavilion x360 15t-br000 Fan and Heatsink Assembly Replacement: 6 단계, 이미지 2개 중 2개
    • Remove four 3.5mm screws using the Phillips #0 screwdriver.

    • Remove the fan and heatsink assembly from the device.

결론

To reassemble your device, follow these instructions in reverse order.

다른 한 분이 해당 안내서를 완성하였습니다.

작성자

5다른 기여자 명과 함께

xi yang

회원 가입일: 10/01/19

409 평판

안내서 4개를 작성함

댓글 0개

댓글 쓰기

조회 통계:

지난 24시간: 2

지난 7일: 5

지난 30일: 18

전체 시간: 563